
In today’s Slanted Lens lesson we will take a look at depth of field as a creative tool while shooting some fashion shots on location at Vasquez Rocks, CA. We will use a simple 2 light set up to shoot beautiful Gabrielle Tuite and look at how different lens focal lengths give us different depth of field options. We will look at what lens choice will give us a shallow depth and what lens choice will give us a more scenic deep depth of field. Vasquez is the perfect place to look at depth of field. It’s one of the most photographed places in Southern California. It has a long history of film making. It has been in Star Track “Captain Kurk and the Lizard fight”, Austin Powers, Bonanza, John Carter, and many many more. It has a very strong rock point that is graphic and the reason I wanted to shoot here. We will use that as a graphic element in our shots. Let’s take a look at depth of field as a creative tool.
Keep those cameras rolling, and keep on click’n!

Video Transcript:
Today, The Slanted Lens will take a look at depth of field as a creative tool while we’re shooting some fashion shots on location at Vasquez Rocks. We’ll use a simple two-light setup to shoot beautiful Gabrielle Tuite, and look at how different focal lens or lenses give us depth of field control.
In this lesson, we’re going to cover several topics. We’re going to look at how to choose the clothing for a fashion shoot. We’re going to look at different lenses and how they affect the depth of field. We’re going to show you how to set up a lighting setup and then use the sun as a rim light and the strobe as our key light. And last of all, we’re going to look at depth of field as a creative tool.
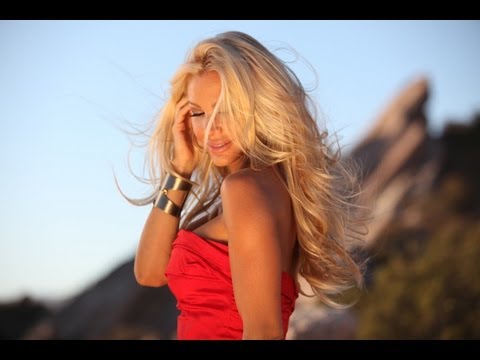
We’re shooting out on location at Vasquez Rocks. It’s about an hour drive from downtown Los Angeles. It’s one of the most photographed places in all of Southern California. It’s been in so many movies from Captain Kirk, who fights the lizard, to Austin Powers. It’s just a very interesting place to shoot. That will be the backdrop for our fashion shots today. The background of Vasquez Rocks is very brown and monochromatic. I wanted clothing that’ll work well with the brown of the rock and the blue sky that we get here in Los Angeles. Julia Perry, the stylist and I talked about colors that would stand out against that brown rock. We decided to go bold with red and strong colors. Clothes communicate, so it’s important to know what you want to say. We went with a strong juxtaposition; red dress and brown rocks. The dress is out of place here, it’s not camping clothing, so we’re not going after lifestyle. We’re really going for the dress as a statement not being in its natural environment. I always want several choices, at least two or three, so that we have options when we get on set. I have the stylists send me photographs of the clothes ahead of time so I get an idea that we’re on the same page, and then from that we’ll select two or three outfits that she’ll bring for the shoot. Always ask the talent to bring some clothes. Nine times out of ten, they’re going to bring something that they look great in and they want to wear, it works out excellent on set. While the tallent was in makeup, I looked at the place where we’re going to shoot at. There’s a great outcropping of rocks with a peak in the background, this will be a perfect place to shoot.
Let’s take a look at our lighting. The sun is going to act as a rim light. You can see that it’s rimming her body on the left side. I’ll be shooting at F11 and 1/125th of a second, 160 iso. Here’s our first shot. I’ll add a Dynalite travel head with a large photoflex softbox on her face. I don’t want the sun on her nose or her face, so I’m going to keep her turned away from the sun just a little bit. I like the soft light from the large soft box on her face and body. Here’s our final lighting. Yes, all of you naysayers out there, it’s actually two-light setup. I might surprise you the next time and do a one-light set-up. It’s not that I can’t, it’s just I like to look of multiple lights.
Let’s look at how depth of field and lens choice will affect this image. Depth of field is the distance between the closest and the furthest object in an image that appeared separately sharp. It can be affected by lens choice and subject distance from the camera. Let’s take a look at a 50 millimeter, 100 millimeter, and 200 millimeter lenses shooting the same image, and how the depth of field changes.
This is a 50 millimeter lens at F22. Pretty much everything is in focus.
This is a 50 millimeter lens at F8. The background starts to drift out of focus just a little bit.
This is now a 50 millimeter lens at F2.8. The depth of field is diminished drastically. In order to get a 2.8, I am stacking an NB2 and an NB4. This is the equivalent three stops, it’s divisible by two, so NB2 means one stop. NB4 divided by two is two stops. I use these a lot to cut down the exposure when shooting in sunlight.
Let’s take a look at a 100 millimeter lens. I’ll try and keep her the same size in the frame, so I’m going to move back. Here’s a 100 millimeter lens at F22. The background had been pulled in a little closer to us, but it’s mostly in focus.
Here’s a 100 millimeter lens at F8. The background is much less in focus now.
Lastly, the 100 millimeter lens at F2.8. These are much more out of focus than the 50 millimeter lens, but still very discernible.
Let’s go to the 200 millimeter lens and see what we get. This is really a great look, I think. Here’s the 200 millimeter lens at F22. The perspective is very narrow now, we see much less of the background compared to our 50 millimeter lens. I’ve had to move back in order to keep her the same size in the frame, but in doing so I am stepping downhill, which means the background drops below her head slightly. If I’d have been able to keep on the same angle of view, then that hill would have been above her head.
Here’s the 200 millimeter lens at F8. Focus drops off very fast.
Here’s the 200 millimeter lens at F2.8. Great look, and one that’s been used in the fashion industry for years. The background is very much out of focus. The problem is, with a 200 millimeter lens, you’ve got to get a long ways away from your subject, so you need a lot of room to work in.
Let’s take a quick look at the three 2.8 images together. This information will help you decide what lens to choose and the focal length to accomplish your goals. There’s no right or wrong choice, just another tool to be used to communicate and tell your story. I happen to love depth of field because I like locations as an element. I want to see the rocks back there, I want them to become a part of the image. So a lot of times I’ll shoot with deep depth of field, it’s just the way I shoot. But there’s no right or wrong choice in this case, it’s a matter of what will communicate your story. Let’s take a look at some of the other images we created that day, we’ll put on the screen, the lens, and the aperture so you can see how they affect the image. I tried to change things up using different lenses and different apertures to give us a variety of looks.
Every time I do a lesson where I stop and look at a basic principle of photography, I learn something, so I hope you’ve learned something as well. Even though I have shot for years using different lenses and different apertures, it’s just good to step back, look at the basics, understand them a little better. Then you can apply them more effectively with the images you’re making.
I hope you’ve learned as much as I have today, so keep those cameras rolling and keep on clicking.
Big thanks to our great sponsors!
www.kesslercrane.com
www.tamron-usa.com
www.dynalite.com
www.photoflex.com
www.rosco.com
www.azdencorp.com
www.glidecam.com
www.vanguardworld.com
www.triplescoopmusic.com