

In today’s Slanted Lens lesson we are out on location at Vasquez Rocks in Los Angeles, California. We are going to share some tips on how to successfully shoot on location and make the day go more smoothly. This will break down how to be prepared to shoot and support a crew on location. We will also break down the lighting and physical logistics of shooting our warrior princess. There will be air cannons and a suspension rig that many of you have seen before. Let’s look at shooting on location.
Keep those cameras rolling and keep on click’n!
Video Transcription:
While we’ve been shooting out at Vasquez Rocks, it gives us a perfect opportunity to look at shooting on location and how we can make that a very successful experience. So on today’s Slanted Lens Lesson, we’re going to look at shooting on location. We’re going to be shooting a woman dressed as a warrior princess with her bow and arrow. And we’re going to use an air cannon to create an instant layer of smoke that will help blend the background with our talent. But before we get started on all that, let’s talk about some of the things that will help us be ready to shoot on location.
The foundation to every good shoot on location starts with going out and scouting the location ahead of time. You know, that’s it’s imperative that you go out before the day of the shoot and see the things you’re going to encounter and come up with a plan in order to make that day go very smoothly. It doesn’t matter if you’re doing a large production or headshot. You need answers to these following questions.
(1) The number one question is, where is the sun? You have to know where the sun is and how you’re going to light the shot. You’re going to need to go and scout at the very same time of day that you’re going to do your shoot. For me, that’s imperative. Locations change with sunlight throughout the day and so I want to see it in the light that I’m going to encounter when I come shoot. When I scout a location, I’m looking for interesting, graphic areas to shoot in that will not have the sun at my back. I can work with just about any kind of light as long as the sun is not coming straight over my shoulder. When the sun is at my back, you have to use it as a key source and there are very few options. It’s just not a look I really enjoy.
This location we’re using today is great because we’ll have a nice rim [SP] light throughout the afternoon and move into a back light or sunset as the day ends. I want to select ahead of time the place we’re I’m going to shoot so the client’s not watching me wandering around, wondering where I’m going to place my camera. I want that decision done ahead of time so I know exactly what’s going on. It makes me look more professional.
(2) Question number two is always, how will I power my equipment? You know, is there power at the location? Can we get an extension cord to plug into power? How far is it? If I don’t have power available, do I need to bring generators? Can I use portable power? What do I need to do to get power to my equipment?
(3) The next question is, where is the bathroom? You know, the shoot comes to a quick halt when there’s no facility. You’ve got to find a restroom or bring a restroom. Whatever you need to do to make sure there is a facility on site. That’s a key element to a good production day.
(4) Directions. How do I get everyone there? Check the address and decide how to explain to people where to meet. You know, using Google Satellite is really a big help with this. Identify a place ahead of time where you’re going to stage your equipment, or your base camp. This is important to know so that as you arrive you can set everyone up; you know exactly where they’re going to be.
(5) Where is lunch going to come from? When you’re out on location, the question needs to be answered ahead of time. Are you going to bring lunch in? Are you going to cater lunch? Are you going to send someone out to a restaurant close-by? So that people can have food on time and the production can move ahead.
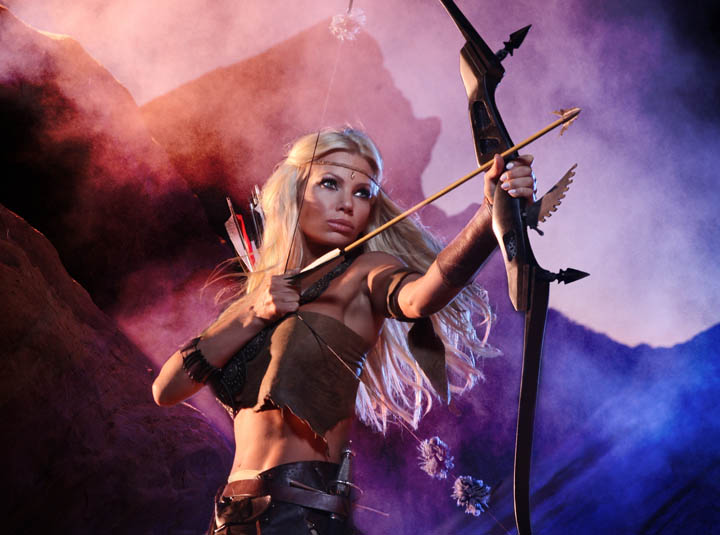
Let’s move on to our production and see how we set up our shot. The idea is to set up a structure for the talent to sit on. This is going to give her the look of shooting the bow and pushing off from the rocks. This gives us the option of moving her legs around and doing something interesting things when she’s in the air. We’re going to get everything set up in daylight but then we’re going to shoot at sunset. We wanted to have smoke in the background, but it’s not allowed at Vasquez Rocks. So we’re going to use an air cannon to blow dust into the air. This is going to give us the same look as smoke.
One thing I always bring when I’m on location is a tilt-up. It’s a great place to keep everyone out of the sun and a place to change clothes. For our clothing, we are going to dress her in very primitive clothing but use a very modern bow. I like the modern versus the primitive juxtaposition.
Let’s take a look at the lighting breakdown. We first set a head with a reflector up on the rocks. It’s going to have Rosco CTO on it. It’s a very warm light. I do this often so I can correct the warmth out of the image and make the background blue. Here’s our image with just the rim light. Now we’ll add a key light. It’s a octodome with a grid. This also has a Rosco full CTO gel; so we have that warmth that we can correct out and make that background go a little blue. Here’s our image with both the rim light and the key. We are now going to add a head in the background that has a reflector and a full CTB on it. I want that to be very blue. That’s going to light the rocks up behind her and backlight the dust or dirt we’re blowing into the air. You can see the blue light on the rocks in the background now.
Next we add the air cannon to the image. It’s a slow process compared to using a smoke machine. Each frame, you got to reload it, reset, and reshoot. We’re going to have to work with this air cannon to get the right amount of dust in the air. But we’re doing what we have to here because that’s the limitation of the area.
Here’s our image with the final lighting in place. It’s now time to start work with our talent and move ahead.
Let’s look at some of the final images that we shot today. Julene retouched and cleaned up a lot of these images. It was a great look; fun to be here; thought everything came together really well.
I thought it’d be interesting to end with a list of things you should bring. This is a list of things that you might not have thought of, but would really help the day go much smoother.
(1) Bring sunscreen. It’s a life-saver. Most people will end up without it there and it’s nice to have some on-set so everyone is taken care of and we don’t get sun burnt.
(2) Bring a tarp; a plastic tarp. You can lay it on the ground. It really makes for a nice clean place to put your equipment so you don’t get dust in it. It also helps if it gets a little windy to fold it over your equipment so the dirt’s not blowing into the equipment laying on the ground.
(3) Something I’ve found invaluable over the years is that I keep a head lamp in my camera case. Then when I’m cleaning up, I can put the head lamp on, I can use it to get all of my equipment into place because it’s usually pretty dark when we finish up.
(4) It’s important to have plenty of water on hand. That keeps everybody hydrated that that makes for a successful day.
That’s just a few tips that I hope you find helpful. It really should give you a foundation for making a successful day as you go out to shoot on location. So keep those cameras rolling and keep on clicking.
Special thanks to:
Gabrielle Tuite Talent
Teri Groves Make-Up
Julia Perry Stylist
www.kesslercrane.com
www.tamron-usa.com
www.dynalite.com
www.photoflex.com
www.rosco.com
www.azdencorp.com
www.glidecam.com
www.vanguardworld.com
www.triplescoopmusic.com
www.photographytalk.com