

In today’s TSL lesson we are out on location shooting a rain shot on the new Canon 1DC that Lens Pro to Go delivered to us. Our goal today is to shoot all video on this new 4K camera and pull still images from the video. We are going to test different shutter speeds and see how they affect the video and stills. Rain is the perfect subject to test this concept of pulling stills from video so let’s see what we can do.
Keep those cameras rolling and keep on clickn’.
Video Transcription
In today’s Slanted Lens Lesson we’re out on location shooting a rain shot with the new Canon 1DC that Lens Pro to Go was nice enough to deliver to us. Our goal today is to shoot video on this new 4K camera and to pull still images from that footage. We’re going to test the different shutter speeds and see how they affect the video and the stills. Let’s go ahead and get started, see what we can do.
You know, rain is a perfect subject to test this concept of pulling still frames from video. Before we get started we need some technical background. Video is a series of single images, each frame blurring into the next frame is what creates that look of motion. Stills, on the other hand, are single images that have very little motion blur. The shutter speed in video is just like the shutter speed in stills. It’s the amount of time the shutters open during each exposure. We’ll be shooting at 24 frames a second, which means that there will be 24 exposures, images, or frames, each second. The normal shutter speed is 1/50th of a second, or twice the frame rate.
Let’s look at two different pieces of video with different shutter speeds. The first is at 24 frames per second and a shutter speed of a 50th of a second. Each image, or frame, is blurred. Now, at 400th of a second, each image, or frame, is sharp. Let’s see them rolling side by side and how they differ. The video with the fast shutter speed is pretty choppy and not really good for general purposes. 1/100th or 1/200th of a second will give us sharp images of the rain and the people, but may not make the best video. If the shutter rate is too fast the video starts to look choppy, but the stills are more likely to be in focus. If it’s too slow, the video and stills are going to be just too blurry. Unlike stills, video needs motion blur to look good. So that’s our challenge here, a balance between those two thoughts.
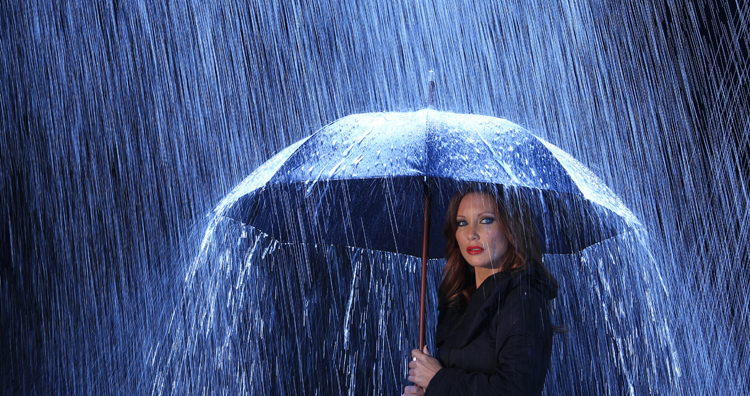
Before we do our shutter test let’s take a look at how we set up our rain shot. We’re shooting outside, so the rain can run down the driveway and not cause a problem. First, we’re going to put up two 12 by 12 duvetyne side by side to create a black background. Duvetyne is a black fabric that doesn’t really reflect much light so it’s a perfect background if you wanted to just go black. Using Sun Seeker, I know the sun is going to be in a back light position between 2 and 4 p.m., so I position the duvetyne’s in a manner that will allow me to use the sun as a back rim light for those two hours.
For our rain we went with our tried and true fanned spray nozzles. You can see all about making rain in an earlier video we did called “Creating Rain: a Special Effect“. These will both be placed on the camera right side shooting up and allowing the rain to fall on our umbrellas. It’s nice because our frame is pretty tight, so these two will cover the area pretty well.
This is supposed to be at night, so I’ll set color balance on the Canon 1DC to tungsten, or 3200 degrees. This makes the sunlight very blue. Here’s our first shot with the rain and sunlight only. For the camera left side we added a 1K Fresnel to be on her face. This is a tungsten light, so it will be neutral on her face. We’re trying to compete with the sun as our backlight so we need a lot of light on her face. We’ll add another 2K, and that looks much better. Our last light is going to be a fill light on the camera right side. We used a Photoflex P22, and pushed that right up to the edge of the frame. We used a large golf umbrella covered with plastic on a C stand, to keep the water off the lights.
Now that our lights are in place let’s take a look at the different shutter speeds. These first tests were all shot at 24 frames a second, at an F13. We first shot at 1/50th of a second, this gave us really nice blurry rain but our talent was a little soft, sometimes, when they moved. Our next test was at 1/100th of a second. The rain drops are shorter lines in each frame and don’t blur together as well as video. They also don’t look very good as still images because the rain just comes out as small dashes. We’re now going to go to 1/200th of a second. The rain drops in each frame are very short lines of dashes and don’t blur together well in the video. When we go to stills the rain is just small dashes and doesn’t look very good, but his face is sharp in just about every frame.
Here’s a split frame of the 1/50th of a second next to the 1/200th of a second. Again, if you shoot with too high of a shutter speed there is no motion blur on individual frames, and when viewed at normal speed the video looks choppy and stuttery. The was used very effectively in beach landing scenes of “Saving Private Ryan”. It creates an action look because things are kind of jumpy and stuttery. For us, we’re going to use 1/50th of a second with our rain. It just looks better. It looks better in the video, it looks better in the stills, we are just going to lose a lot of images to motion blur on the face as she moves around.
We added smoke from our Rosco 1700 in a lot of the images just to add another layer; I thought that was very effective. Here is some of the footage we shot at 60 frames a second and 1/125th of a second shutter speed. This is one of the stills we pulled from that slow motion footage. This is a fast shutter speed so the stills are a little sharper, the downside is you’re shooting slow motion. It’s very beautiful, but you can’t shoot in slow motion all the time.
My conclusion about this process of pulling stills from video with the intent of using both the stills and the video is that it’s pretty difficult, and only good for certain things. If you’re shooting wildlife and outdoor things I think this could be a great option, it has tremendous possibilities. The problem is that you’re going to lose a lot of frames to motion blur, especially if you’re shooting something moving like an animal. As for advertising, when you’re shooting something you have complete control over it just doesn’t make very much sense to me. I found the process of pulling frames was kind of like a shotgun approach. I kind of felt like we were just letting the camera roll, having her move, and did we get something? Was it right? It just felt very distant and not comfortable to me.
The shutter speed is really an issue that can’t be solved right now. 1/50th of a second is what looks best at 24 frames a second, it gives too much motion blur. Now, I shoot stills at 1/50th of a second all the time, but they’re not moving through the frame. They’re in position; it’s much more controlled. That said, I love the Canon 1DC want to buy one. I see times when it would be a great value to be able to shoot video and pull the stills. I’ve personally learned that this process has limitations, but there are times when it will be extremely valuable. So keep those cameras rolling and keep on clicking.
Special thanks to our great sponsors!
www.kesslercrane.com
www.tamron-usa.com
www.dynalite.com
www.photoflex.com
www.rosco.com
www.glidecam.com
www.vanguardworld.com
triplescoopmusic.com
www.lensprotogo.com
www.PhotographyTalk.com

