

Today on The Slanted Lens we will use a continuous three light Setup with Special Effects Lighting to create lighting for a superhero shot using a simple set, smoke and cookaloris or cookie. We will demonstrate the different hang times of the three Rosco smokes. We will show how to make a clookie or cookaloris and how to use it. We will show our lighting breakdown for the shot. Last of all we will show a very simple way to fly a cape. This has been a great shoot. I have a better understanding of the different Rosco smokes and how to use them. I hope you will find this helpful.
The Lighting Breakdown

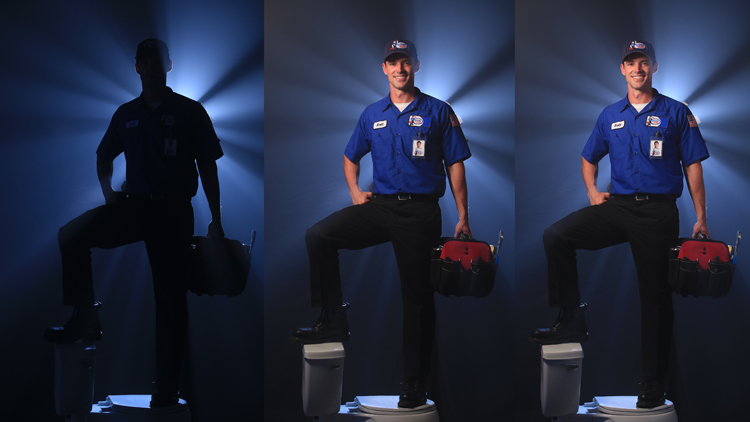
#1 Let’s look at how we set up our scene today. First we rigged 2 12′ x 12′ duvateen pieces side by side to create a large black background. At the seam in the middle where the two duvateen pieces meet we rolled the edge with the grommets away from the camera and clamped them together. Then we brought in a toilet for him to stand on. This is our entire set. It’s very simple.

#2 The first light that we set was the 1K that we aimed at our talent’s back. He literally blocked it from the camera view. This light was pivotal to the shot and everything else we did depended on it, so it’s the first light up. We next set up our Rosco smoker and proceeded to create a cookaloris or cookie to shape the 1K that we aimed at our talent from the background. The goal of our cookie was to create light streaks that emanate around our talent making him look like a super hero. Our cookie was cut out of Foam Core.

#3 We used Rosco’s original Academy Award Winning Green fluid – It’s a very thick, opaque, and billowy smoke with a long hang time. This smoke hangs in the air for a long time and creates a great effect. It can be overpowering to the shot. You see that you can hardly see the talent’s face. We used this smoke for our shot but used short bursts followed by fanning it to thin it out and clear the face of the talent.

#4 We started with a 1K as a backlight to create our smoke effect. It’s working with the cookie and looking great.

#5 We next added a medium soft box on our talent. This is a Photoflex medium soft box with a starlight tungsten light. It is boomed overhead and feathered up just slightly so the light falls off the pants and concentrates on his face. He needed to look up to keep the brim of the hat from casting a shadow on his face.

#6 Next we added a 39 X 72 inch litepanel as a fill light. It opened up the shadows and made the image a little more pleasing.
#7 Here is our lighting breakdown. 3 lights and some great smoke. In a very real way smoke is a lighting effect. It disperses the light it gives light a way to be seen. Smoke is our 4th light. Keep those cameras rollin’ and keep on clickin’.
Video Transcription
When the smoke clears in the end of the video, make sure you sign up for that Vanguard giveaway.
Hi, this is Jay P Morgan, standing on top of a toilet, bringing you The Slanted Lens. Today, we’re shooting a button for a commercial for Roto Hero. So, we have our hero standing here totally in silhouette, his cape is flowing next to him, and as the lights come on, the cape flies away, we’ll see that it’s Roto Hero, plumber comin’ to save your day. So to make this button happen, it will just go on the end of the commercial during the jingle. We’re going to have a light behind, a 1k, that’ll have a cookaloris or a cookie. That cookie is gonna break up the light, make shafts around our talent, make that really kind of cool look from behind. And then we’ll break the cape loose with a little special effect. And then last of all we’re gonna look at the different smoke solutions that Rosco makes. They have three different smokes. We’re going to look at each of them, do a bit of time lapse to show how long they last and just how that smoke looks on camera. This will help us to understand a little better about the different smokes we can use and what the application is. So, let’s get started and see what we can do.
Let’s look at how we set up our scene today. First we rigged two 12′ x 12′ duvateens side by side to create a large black background. At the seam in the middle where the two grommeted edges of the duvateens came together we turned them away from the camera and clipped them together at the back. These blended the two duvateens together, giving us a nice, clean seam there that will disappear when we light our scene, especially when we add our smoke. We brought in a toilet for him to stand on. I mean, it’s Roto Hero. He needs to be standing on a toilet. This is our entire set. It’s very simple. It’s just a black background and a toilet that our talent’s going to stand on. The first light that we’re going to set up is the 1K. That’s going to aim directly at our talent’s back. He’s literally going to block it from the camera view. This light is pivotal to everything we’re going to do. It’s going to determine how the cookaloris or the cookie looks, it’s going to show us the smoke we’re going to use. So, it’s important to get this light up first. We now set up our Rosco smoker and proceeded to create a cookaloris or cookie. We wanna shape that 1K that’s aimed to our talent’s back. Our cookie is going to be cut out of foam cores. Let’s get that started and see what we can do.
The goal of our cookie is to create light streaks that emanate around our talent, making him look like a super hero. At first for our cookie, we start cutting long triangles, the points kind of coming to the center area like the spokes on a wheel. The idea was will these are like spokes that give these streaks that come around him. That really didn’t work at all. A more traditional method was a lot more effective. We cut just random holes that allowed the light to pass through in some areas and not in other. Several pieces of cookie were clamped together to create the light streaks. If we needed more light in an area, we would cut pieces of the cookie away. If we wanted to block the light we would just clamp or tape pieces of cookie in place that would block the light in that area. It really became an experimental process, where we’re cutting and taping and just trying to work to a point where we like the look of the smoke. With our cookie creating the look that we want, we’re really ready to test the perfect smoke for the shot. Now, I’ve wanted to test the three types of Rosco smoke for sometime so this is the perfect time to do that. We need to know which one of these three smokes is best for our shot but more importantly, I wanna have a deeper understanding of what each of these three smokes do and how they relate to one another. We’ve been running smoke for a while, testing with our cookaloris, so we’re going to first bleed all the smoke out of the machine. Then we’re going to run fluid in the machine for one minute, see what kind of smoke that produces. We’re going to run the camera for 10 minutes and see how long the hang time is for that particular smoke. We’ll time lapse that to show you the result.
This is our Rosco light fog fluid. We’re going to see what this does with our test. This fluid is a more translucent fog effect that disperses into a haze much quicker than the original fog fluid. It’s great for just putting a nice haze in a room where you don’t really see smoke, but just gives you atmosphere. It does disperse very quickly, so it needs to be replenished often. We now move to the Stage & Studio fog fluid. This is thick. It’s a billowy fog but it has a very short hang time. It’s good for creating fog for one single shot and then it disperses quickly so you can move on to your next shot that’s smokeless. This is also the fluid they use to create a low lying effects indoors. That way the smoke is dispersing before it rises up too far in the shot. So, it’s a great smoke to use with your chill box. We are now going to test Rosco’s original green fluid. It’s a very thick, opaque, and billowy smoke with a very long hang time. Let’s take a look at that and see what it does. It could be a little overpowering to the shot sometimes. In our case, you could almost not see the talent’s face. We’ll use this smoke for our shot but we’ll use bursts followed by fanning to kind of thin it out so we could see the face of the talent very clearly. It gives you a great smoke effect that you can work in for a long time. There are great applications for each of these fog effects. The Rosco light is great to get a shot and be able to move on. It’s also great to create atmosphere in the room and not overpower the set. You could run the smoker on burst every few minutes and create a constant, subtle atmosphere in the room. The Stage & Studio is great to get heavier smoke but then it clears quickly so you can move on. The standard green stuff is a great smoke that is thick, it hangs in the air a long time. I love this smoke outside because it’s thick and even if there’s a little bit of wind, it’s gonna hold together. So, there’s a quick look at the three Rosco fog fluids. It’s time to finish our lighting.
We started with a 1K as a back light to create our smoke effect. It’s working with the cookie and looking great, so here’s our 1K. We’ll now add a medium softbox on our talent. This is a Photoflex medium soft box with a StarLite tungsten light in it. It is boomed overhead and feathered up just slightly so the light will fall off on the pants and concentrate on his face. He will need to look up and keep that brim of his hat from creating shadow on his face. Here’s our softbox as the key light. We will now add a 39 X 72 inch light panel as a fill light. It’s going to open up the shadows and make the image a little more pleasing.
Here is our lighting breakdown. We have three lights and some great smoke. In a very real way, smoke is a light. It disperses the light and gives light a way to be seen. Smoke really is our fourth light. Here’s some of the images we shot on set. Now, we’re going to move on to video. Our biggest challenge in motion is that we need the cape flyin’ in the wind and then be released and fly out of the shot as a light comes on to reveal our plumber. To make this cape release, we cut the ties off the cape, then we took a straight pin and pinned the cape back on to our talent. The head of the pin was aimed down towards the floor and pushed up to pin the cape together. Then a piece of brown fishing line was tied to the head of the pin. Now, as the pin is pulled down, it releases the cape and it flies off. The cape is turned slightly to his left shoulder so the fan can catch it and let it fall out into the camera. To help the fan out, we add the fishing line to pull the cape up into the air and catch the wind, with the second fishing line to pull it down in the back. This second line helps create almost like a sail for a boat to catch the wind to make it billow out into the shot. We have four people running the shot. One releases the pin on the cape, one holds the cape up with a fishing line from the camera left side to catch the wind and one pulls the cape down in the back with a fishing line. After I roll the cameras, I’m going to run and turn the light on as the cape releases and falls out of the frame. Here’s our final video piece.
I really enjoyed doing this shoot. I have a better understanding of the different Rosco smokes and how to use them on set. The shot went great. We even did a simple effect on set that we can call the flying cape effect. I hope you found this helpful. So keep those cameras rollin’, keep on clickin’.
I hope you enjoyed our lesson today on smoke and cutting cookies, but remember to get yourself involved in the Vanguard giveaway. There’s many different ways you can enter to win one of these piece of equipment from Vanguard. So go to TheSlantedLens.com. You have until midnight on the 20th of December. Then we’re gonna give this all away for Christmas. So go to TheSlantedLens.com and enter to win one of these great pieces of equipment from Vanguard. Also, don’t forget to like us on Facebook and subscribe on our YouTube Channel. Keep those cameras rollin’, keep on clickin’.