
In today’s TSL lesson we are back in New York City shooting in Times Square. I wanted to explore creating Bokeh with all the intense lighting of Times Square. Not to mention the incredible energy you feel just being there.
The term “bokeh” comes from Japanese and means “blur” or “haze”.
In this lesson we will take a look at different lenses and aperture settings to see how they create this cinematic look called Bokeh. Different lenses create different patterns. We will look at using a long lens at 200 mm and how that compares to a 50 mm lens. Before we head out on location to Times Square let’s take a look at how to create Bokeh. Keep those cameras rolling and keep on clickn’.


Creating Bokeh in New York City – Times Square
Video Transcription:
In today’s Slanted Lens lesson, we’re back in New York City, shooting down in Times Square. You know, I wanted to shoot in Times Square because I really wanted to explore the world of shooting Bokeh. With all the lights there, it’s a perfect place to do this. We’re going to look at the simple principles that help creating a really good looking Bokeh and how that applies to video
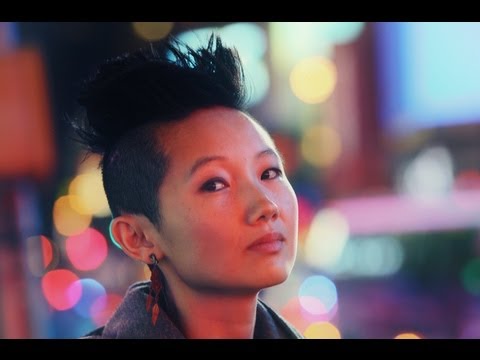
and stills. The term Bokeh comes from a Japanese word that means “blur” or “haze”. In this lesson we’re going to take a look at the different lenses and aperture settings and see how they compare to create that nice looking out-of-focus background. We will look at using a long lens, 200mm, at different apertures, and then we’ll look at using a shorter lens, 50 mm, at different apertures. Our talent, Ying Yang Lee, is very cool, has a great look. We booked her through an online casting service in New York called “New York Castings”. She was very professional, showed up on time, had a great wardrobe; she did a great
job. Before we get too far into this shoot, let’s go back to the studio, look at some of the principles that will make a really nice looking Bokeh. With white Christmas lights strung on a white wall, I shot this first image using a 50mm lens at 2.8. The lens is three feet from the subject, and the subject is three and a half feet from the background. The lights are not very blurry. This is the same lens and same distance. The opening on the lens now is at F1.2. There is a huge difference here. That’s two stops. It really makes the background focus look a lot nicer. The blur is going to increase as we move away from the background. Here we are seven feet from the background using that same 50mm lens, and we’re back to 2.8. Obviously, that background at 2.8 was much nicer when we were seven feet from the background than it was when we were three and a half feet. But when we go to 1.2, this blur looks really nice. If I move the camera in just six inches closer, it increases the head size obviously, but at 2.8, the blur on that 50mm lens looks very similar to the 1.2 inch blur that we got when we were just six inches further away. As we step closer to our subject and focus, it’s going to decrease the depth of field, making the background look better. This image is shot with a 100mm lens, eight feet from the subject, and 13 feet from the background. Our aperture is 2.8, and the lights are creating a very similar size circle that we got with that 50mm lens, but we’re a lot farther away from the background. I pushed in with a 200mm lens, eight feet from the subject, and 13 feet from the background. Obviously, the head size increases, but we get a wonderful Bokeh. It looks really nice around her. So, there’s several things we’ve learned in this experience: get as close to the subject as you can, and as far away from the background as possible. Then shot with a wide open aperture. This will give us the most Bokeh, or blur. We’re back on our location now here in Times Square. It was wonderful because this morning, our Kessler stealth slider showed up, which was shipped to us by LensProtoGo. I’m truly in love with that service. I get my equipment drop shipped to where I’m at. So, this is great. We’ll use it tonight, package it up, ship it off in the morning. You know, we’re using a very similar, portable setup to what we did on Wall Street. With the exception, that we’re not using grid, we’re using an OctoDome as our light source. We’re going to hang that Dynalite 800 pack on the stand with the clamp that Dynalite makes for that purpose. We’re going to power this with the battery power source that Dynalite just released. It’s a great lightweight solution that you can take your power anywhere you go. Let’s take a look at our lighting setup. This is our image with only the artificial light that’s coming from all the billboards around us in Times Square. It’s a little tricky because the light’s changing because those billboards are flashing and changing all the time. But first off, we look at that ambient light. It’s a little dark on her face. That’s just our ambient setup. I’m shooting an F4.5 in a sixtieth of a second. My ISO is 320, and I’m about ten feet from the subject. I’m shooting with a 70-200mm zoom. I’ll be shooting mostly at 150-200mm on everything that I shoot. I can get away with 4.5 because the lights are so far away from us. Here’s our shot with the OctoDome coming in from our camera left side. This is our key light. The face is still very dark but the Bokeh is very strong. It looks wonderful because the distant lights are pinpoint, and a great light source for this. The big light screen on the right really doesn’t do much for us. When we shoot this kind of Bokeh, we really want pinpoint light sources, so that’s what’s we’re looking for. Not fluorescents or big billboards, but more pinpoint: things like stoplights or lightbulbs. Our last light source is a popup Photoflex reflector. Ling iss going to hold that and bounce some of the OctaDome light back into her face. I really love this soft key look on her face as we bounce that light in. Sometimes if I’m trying to balance between my OctoDome and my fill light with that pop up reflector, I will just kind of feather the OctoDome to the right, slightly off the talent so that it becomes a little darker on her and I get a stronger light on the fill card. So the light on her face becomes brighter and the light on her shoulder becomes just slightly darker. Feathering lights is probably one of the strongest principles of photography. You have to really pay attention to which part of the circle of light you’re using. This light setup really gives me the option to move the talent into the light as well as away from it. Here are some of the images from Times Square. Like I said earlier, I’m keeping my aperture almost wide open at 4.5. The 5D has such shallow depth of field with that 200mm lens; I want to have some of her face in focus. Otherwise, I’ll just get her eyes and her nose will be out. So, I opt to go with 4.5. I’m getting a nice Bokeh and it’s working out well. One thing to add to our list of things that we’ve learned is to shoot small light sources. That’s one of the reasons why this is so popular during Christmas time. Over the holidays, I took advantage of that and did some shots of my grandkids just for fun. I even did a few shots using the Bokeh kit that is made by DIY Photography. It’s amazing to me that you can put an opening that small in front of the camera and still get a clean image. Rachel, my daughter-in-law had a great time with this Bokeh kit. She’s just learning and her stuff’s starting to look really good. As a recap, we learned several things: stay close to the subject, far away from the background, use a wide open aperture, and shoot small light sources. I hope you found this helpful. Keep those cameras rolling and keep on clicking.
Special thanks to our great sponsors!
www.kesslercrane.com
www.tamron-usa.com
www.dynalite.com
www.photoflex.com
www.rosco.com
www.azdencorp.com
www.glidecam.com
www.vanguardworld.com
triplescoopmusic.com
www.photographytalk.com
www.lensprotogo.com