


Today on The Slanted Lens, I am going to walk you through batch processing RAW time-lapse images, and then how to create video sequences with those images. I am also going to talk about how to deflicker a time-lapse video when you shoot on Aperture Priority.
If you have not done so yet, I recommend that you check out my tutorial from August about shooting time-lapse photography at night. In this lesson, I will be processing the images I shot out at Mono Lake in northern California.
This has been a lot of fun to be able to go out to Mono Lake and put together these time-lapse tutorials. My goal was to put everything together in two lessons so that you have the information you need to be able to find the Milky Way, go out and shoot a time-lapse, and then the post-process to put a video together. I hope you learned something and that you see how easy it is to do on your own.
Thanks for watching. Keep those cameras rollin’ and keep on clickin’!
Don’t forget to enter our November 2014 giveaway to get a chance to win a 150-600mm lens for Canon or Nikon from Tamron!
Processing Breakdown:
Video Transcription
Hi, this is Jay P Morgan. Today, on The Slanted Lens, we are going to walk you through the process that we use to batch process raw images and then to create time lapse sequences in QuickTime. We’ll also talk about how to de-flicker your images when you shoot on aperture priority. so let’s go ahead and get started and see what we can do.
Okay, first off, I’m going to put all my raw images in a folder and then we’re going to open that up in Bridge. In Bridge, I’m going to go to file, opening camera raw and open up all these images. Now, this is like 400 to 500 images that we’re opening up here at once. So we’re going to put all those images into camera raw and I’m now going to go over and just process the first image.
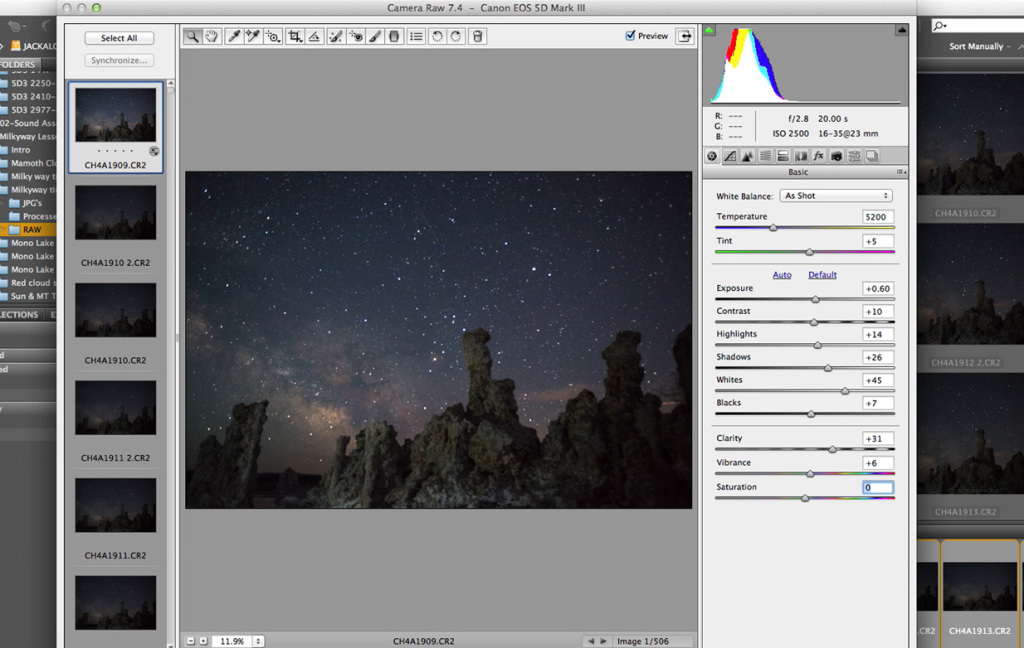
Now sometimes, you may not want to do the first image, you may want to go a little later, do one of the later images because you’re going to have a lot of blue in the first one, from the sun going down in the blue sky. So we’ll start off with our exposure, I’m going open up the exposure a little bit, about plus 60, then I’m going to mess with the contrast. I may push the contrast up just a little bit, about plus ten. Now, I’m going to push the whites up to about 45 and push them up pretty far, open up the shadows a little bit. So push the shadows back, can end up being somewhere around, I don’t know, that looks fairly good. Let’s say about 25 or 26.
Now our highlights, we’re going to go back, we’re going to open them up to the plus, about 13 or 14, it’s going to look nice. Our blacks, we don’t want to darken the blacks too much, so we’re going to just a little bit, just a little bit like five or six to give us a little bit of a contrast there, it’s about plus six. And I like the clarity a lot. So I’m going to push that up because it makes the clouds a little more sharp, it makes the image in the foreground a little more sharp, so I’m going to push that up pretty high, somewhere in the 30 to 40 range. [[00:02:01]] You know, I probably won’t mess very much with the vibrancy and saturation, I may push the vibrancy up just a tiny bit, maybe plus five or six just to give a little bit of color vibrancy and I’ll leave the saturation alone. At that point, I hit select all and I synchronize and when I synchronize, it’s going to synchronize all those images to that first image that I processed.
Once I’ve done that, I’m going to save my images, going to go back to the same folder, select a folder, here we go, sub-folder called processed in my time labs and I’ll select that. Then, I’m going to want to make an extension in JPEG and I want to make it a maximum of 12, so it is large as possible. I want to move all the metadata so I just hit save. Now it starts to process those.
It’s going to take a little while, so I’m going to want to go out and do something else. I’ll get that started and come back to it after a while. Now that I’ve processed my images, I’m going to turn them into time lapse videos. There are a couple of different ways to do this but I prefer to do it in QuickTime. It’s just easy and quick to do.
First off, I’m going to go up to, in QuickTime, open ME sequence. When I click on ME Sequence, it’s going to bring a dialogue box up, I’m going to go to the images that I processed. I’ll go to my time lapse, time lapse one. The first thing I’m doing is at very bottom. I’ve got my processor folder, I’ll click on that, I’ll click on the first image at the very top of my processed folder and I click to open.
Now, here, I can choose the number of frames per second. I’m going to choose around 24 frames a second. If the time left is a little slow, I can choose 60 frames in a second to speed it up. Now, when it comes up, I’m going to get this large images, it’s a very large, full-framed image. I’m going to go into the view and I’m going to bring this back to a fit screen size so that I can see information in front of me.
Now, I’m going to go up to file, export, so, I’m going to export this movie to QuickTime movie and I’m going to save it, create a new folder called Final Outputs, not with a large “u” but for the little, there we go. I’m going to call this Milky Way Number One.
And it’s saved. Now that’s going to take a while. It’s going to go into an export phase, which may take 20, 30 minutes, maybe not quite that long but it will take quite a while to export it and then we’ll our final MOB file.
We shot on manual exposure but if you’re going to try tracking sunset in the stars at night, you’re going to have to do that and let the shutter drag. In doing that, a little bit of flicker’s going to be present in your final piece. To clean this up, we use a de-flickering software. There are many of them out there but the one I use that I like the most, is called Granite Bay.
This has been a lot of fun to go out to Mona Lake and really put together these timeless pieces. My goal in this was to get all the information together in two lessons and to give you the information you need to be able to shoot, the stars, find the milky way, be able to expose at night, and then all the post process to be able to ;put your time left together. So I hope you found this valuable. So keep those cameras rolling, keep on clicking.