Today on the Slanted Lens we are shooting two camera interviews with executives at East West Bank. We will look at the process of mixing daylight with LED light as we shoot executive interviews. Because we are working with daylight, we will need a daylight balanced light source. In the past we used HMIs. The reason that LEDs have become so popular is that they have become a reasonably priced alternative to an HMI daylight balanced light source. HMIs were very expensive and had a huge balance you had to lug around. The early LEDs were large panels of multiple LEDs to create a light source. My favorite were the ikan panels which I used for several years and have been very happy with the ease of use and the way LED mixes with daylight. They were, however, hard to modify and large to move around and ship. When single light LEDs came onto the market, it was a huge leap forward. Now you have a single light source in a mono blockhead that is cool enough to attach any strobe soft box or modifier to. Today, as we are on location for East West Bank where we will show how to blend this single source LED with window light. See the images from the lighting breakdown at www.theSlantedLens.com By Jay P. Morgan The Slanted Lens
Today on the Slanted Lens we are shooting two camera interviews with executives at East West Bank. We will look at the process of mixing daylight with LED light as we shoot executive interviews. Because we are working with daylight, we will need a daylight balanced light source. In the past we used HMIs.
The reason that LEDs have become so popular is that they have become a reasonably priced alternative to an HMI daylight balanced light source. HMIs were very expensive and had a huge balance you had to lug around. The early LEDs were large panels of multiple LEDs to create a light source. My favorite were the ikan panels which I used for several years and have been very happy with the ease of use and the way LED mixes with daylight. They were, however, hard to modify and large to move around and ship.
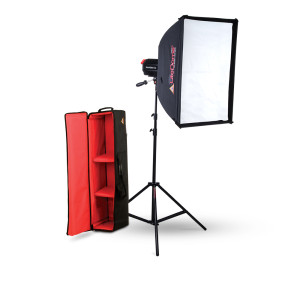
When single light LEDs came onto the market, it was a huge leap forward. Now you have a single light source in a mono blockhead that is cool enough to attach any strobe soft box or modifier to. Today, as we are on location for East West Bank where we will show how to blend this single source LED with window light.
The Final Image
The Lighting Breakdown
Mixing Daylight with LED Breakdown
Mixing Daylight with LED Breakdown
#1 Let's look at our lighting set up. Window light is a wonderful light source and gives a pretty light on the subject but has some disadvantages. Here is our first shot with just the window light.
Our camera settings are at 1/50th of a second and f 3.5 on a focal length of 175mm on a Tamron 70-200mm lens. I want the aperture almost wide open because it allows the background to fall out of focus.
As nice as this window light is by just adding a large Photoflex soft box coming from the same side as the window light we can clean up the light on his face and make it look a little more pleasing. We also added a lite panel reflector to open up the shadows on his face.
#2 Using a soft box to augment window light gives us 3 main advantages:
First, I can place him wherever I want and don’t need to be restricted by having to use the window to fully light his face. By keying with the soft box, I can move him around and get the frame I want and not be restricted by where he is in relationship to the window.
#3 Second, it allows me to control the background. Using a light source I can select the best exposure for the background and match his face to that exposure. If I use the window to light his face I’ll need to open up until his face is correct and this can blow the background out or make it brighter than what I want.
#4 In this example we wanted the background to be dark. His face does not get enough light from the window and we will need to open up to brighten his face and make the background brighter then we desired.
#5 Adding the LED on his face allowed us to get a nice light on his face and not have to brighten the Background. The color of the NorthStar blends with the window light beautifully.
This is a simulation of what the image would have looked like if we had opened up the exposure. Its nice enough but feels flat. This brings us to the third advantage for using an LED with window light. You control contrast.
#6 A simple light close to the subject will give you more contrast and make the image look better. Now having said that someone will write in and say I like the low contrast. That is a personal preference and fine, but as for me I like the higher contrast and especially like to have the option to go either way. That is what a secondary light source does for you and a single light LED is, in my opinion, the best option out there.
To wrap this up let’s just say that I love this new generation of LEDs and have a kit with 5 of them in it. They are daylight balanced and can be modified with grids, soft boxes and barn doors. It’s a low cost solution that gives me more control on set and that is why I love them. Keep those cameras rollin’ and keep on clickin’.