Today on The Slanted Lens, we are shooting out at the Orange Empire Railway Museum. They gave us access to their steam train and WW2 passenger cars. We will use this setting to look at the process of mixing HMI and LED lights. We are lighting a very large area. It’s three train cars long, and we are going to need some serious power to make this happen. Because we are shooting both stills and video, we will need to light everything with constant light sources. The area to cover is very large, and we will require a strong instrument to serve as the backlight. We rented an Arri M18 HMI. It’s 1800 watts and runs off a single 20-amp circuit. We will set up the M18 deep in the shot and layer smoke from the Rosco 1900 in the background between the light and the scene up front. I’m okay seeing the light in the scene and will let it be in the frame in most of the shots. On this light we added a 1/2 blue Rosco gel to cool it off. I will be shooting at 1/50th of a second and f5.0. I will push the ISO to 1250 to get a proper exposure. Thanks to the Orange Empire Railway Museum for allowing us to work at their museum. It was very cool. Remember, I’m a train nerd. Thanks for watching. Keep those cameras rollin’ and keep on clickin’. For the full lighitng breakdown visit https://theslantedlens.com/2014/mixing-hmi-and-led-lights/– Don’t forget you only got ’til February 26 to enter the the win your north star lite go to TheSlantedLens.com. Enter the win for your northstar lite. – Hi This is Jay P. Morgan. I’m at a location with Caleb and Lars, and we’re going to show you how to turn a bedroom into a home studio. We’re going to show you how to create a very simple backdrop holder. You could put it on the wall. That takes a very little space. We’ll show you how to control the window lights that comes through the windows and last of all some lighting. Things you could make at home. They’re going to show you how you’re going to set up your lights for a two lights video interview and we’ll finish with that. Let’s get started, see what we ca do. Just a couple of things to think about before you start your studio interview is your extra bedroom. One is the color of the walls. If you got walls like this, which are great, they’re neutral that’s not gonna bounce any color back into your image that perfect. If you got room that has very heavy color, greens or reds, those kinds of things. They’re gonna bounce right into your shot. They’re gonna kill your color balance. So the first thing I do, I get paint roller, I roll some paint on all over the walls. You got neutral room, neutral color. Secondly, I’m gonna put up a tarp on the floor, just to protect hardware floor. Laid on the floor, it’s all gonna be brown, and that’ts gonna give us a nice neutral color. It’s not gonna bounce any blue back in the shadow of green so those are our first principle in getting our home studio started. In my hand, I have a very simple backdrop holder way to hang your backdrop on the wall. Well this is a half inched galvanized pipe. You’ve got a plate, which you’re gonna screw it onto the wall. We simply screw in a three inched pipe and now screw in an elbow, and now a six inch return or we can make this longer. That’s a very simple one half of our backdrop holder, so you could put this against the wall like that and you could put your seamless on it. Put on the ceiling. Put you seamless on it It gets everything out of the way. You don’t have to have stands on the floor that create a big problem on the background. – This makes this very easy. You also could put on here a one inch conduit. That one inch piece of conduit is very rigid so as much as heavier or stronger that PVC or rubbery items items but this gonna give you a great hold of your backdrop on as this hangs on the ceiling. Now unfortunately because we’re in someone else’s apartment here we can’t shoot this into the ceiling but if I was doing this in my house, I would shoot this onto the ceiling or onto the wall. Once you got your two backdrop holder, your going to get the right distance from each other. Obviously, you kind of understand this principle. We have our one inch conduit, just few down on your’s there. On my end, I’ll bring this out , towards it’s gonna go on there. I can slide that back far and then we’re gonna put an A clamp on each side to keep this from falling on. Again, we would have this up onto the ceiling against the wall so it’s a great way to get your backdrop up and now we have C stand on on the floor. It’s gonna eat up all the space on the floor of the room. Great for tight areas. Now, next thing that we’re gonna do is put our backdrop up. This is a cheap backdrop that I got up from Amazon. It’s a white backdrop and is like 30 bucks. It’s got a pocket in one end. There’s our pocket. It’s been sawed on the one side and it drop itself, I think it’s 20 feet . So it’s gonna give us a long area. I can run that pocket on here, and that’s great because it hangs very nicely. One of two things, either saw a new pocket on the other end but then you got a sawed up pocket just just enough distance to fill the distance right before. So I’ll do the opposite I’m gonna put the pocket on the floor with another pipe in it. I’m gonna drape the drop over this and then A clamped into this bar in that way I could use the pocket on the bottom with the pipe in it that create weights so it take out all the wrinkles on the backdrop. Then if I wanted to, I could flip around and hang a pocket here and I could sweep without as seamless. We used the whole piece. Now we got a lot of wrinkles on this backdrop. It’s little hard for that to be really smooth, We may have to steam it out a little bit. For one thing you can do if your just going to use this as backdrop. You’re not gonna sweep it, just take this a little pole, and Cail gonna grab it for me and we’re gonna put this, we’re gonna role our backdrop up on the pipe. So this will put your wrinkles start to go away. One of the first thing you need to get for your studio is a stool. You can get this at Walmart, Kmart Target any of those places. They use to have a three foot stool, get wood one, a metal one what ever you like but you’ve got to have something to sit down . Now you can already take a picture with our naturalized studio. So let’s put in up a fabric backdrop. The problem with fabric backdrops is they wrinkle. You got to try to keep it straight but their long unless you can curl them out. Their very nice in that way, but a simple solution, you got a savage or serve it like a seamless. A nine-foot wide seamless or a 12-foot wide. 12-foot is very expensive. A nine-foot wide seamless is perfect. Just put it there, drop it down, build a backdrop behind them or you can roll them down on the floor to undo full length. So let’s put up a seamless just to see how that works on backdrop set up. So you can see up there, I put the cast back on so you can see that’s the way that will be hanging up back there. All you could see is that pipe on the ceiling. So those are our seamless. You’d have to set your backdrop holder on the ceiling distance to make that cardboard work. Just easier to have the seamless on this pole, in that way you can slide it out backdrop their gonna last a lot longer. They can get dirty so you have to wash them at times. But the disadvantage is they’re harder to keep them wrinkle free, they’re harder to roll up an they’re barely used. Where the seamless rolls out very easily, goes up very easily but things like this start to happen to them. They don’t last forever. But you do have a synthetic call out the paper more paper out and you’ll get a new one. This is all thesame as seamless there. This time let’s have a couple of shots and let’s see. We got a window light from the right hand side of the frame but now what we’re gonna do is were gonna control that light from the window so we can either have it as part of our shot or we can get rid of it completely. So we’re gonna put some eclipse blackout curtains which you can get from Amazon. They’re really really quite inexpensive, 20 or 30 dollars. This you can put up on your window. It will give us the ability to either use this. Open up and use this or close it off and use it to completely controlled light in this room in this room. If I were doing this, I didn’t have to set this up on the side, I would put this on another bar and put this bar up on that wall. You can hold them up or you can put them on the curtain. Rods are already there. Just somewhere to put this blackout curtain on there . Usually, I want them to exceed the frame of the window cause if you just get it on the frame of the window lights still beams through. So’ I will exceed the frame and very close and it would blacken out. We blacked out the window and that’t why you you can’t see me. Where am I? That’s pretty effective. Those blackouts curtains called eclipse are just heavy and take all the light out. Another thing is that we added light here on the camera left side it’s not gonna bounce out into our white wall over here. So it’s going to give us the ability to add more dramatic, little more creative lighting. This room, ceilings and all , walls are closed when you put one light up, it’s bouncing everywhere. So at least, it takes us one wall out f the way. If you put your light on the camera left side, I mean most of your light will be out of that camera left wall, it’s going to be hidden in this black curtain and it’s going to give us a nice shot of a person without a lot of fill. Now you can control the fill, you can bring it up or down whatever you wanna do. So now, we need to have lights. We’re gonna show you some simple things you can build and you know those are interesting and kind of beginning place but they’re gonna show you using just same really decent lights. We’ll give you a good light on you person. Now we’re going to talk about lighting, we’re gonna talk about home made lighting. You know, there are several things you can do. Everyone starts up with this little baby thing right here. They go to Home Depot. they buy all this things at and they plug it in, put the diffusion on the trunk. Back this on to an inexpensive stand. – You got a light. It’s a simple very easy to start. This things you can put up a 100 watt bulb into them. Actually have a 300-watt at home depot. I don’t think they’re ready for that. But they do have a 300 watt bulb at least give you an starting place for light. The hard thing about this is there reflectors are very hard and it’s very focused and it’s just seems like everywhere. So not my favorite solution but it’s not terrible solution. For eight bucks, it’s not horrible. So now let’s go on to making a softbox. A softbox is simply a four sided container that keeps your light around your light and then nice soft diffusion at the front. So you can put your light well controlled. It gets light away from the light bulb the diffusion material, and lets the light bounce inside the soft box so you get a softer light as it comes out. It does a directional quality about it cause you are looking straight at the light you can feel the diffusion so you can diffuse accross the fuse and focused light source at the same time. So lets talk about how to make a soft box. I have three different options, I have a plastic detergent container here, we get from a plant in here in California. Just a normal everyday laundry detergent. This is a little heavy , but in my work I have a cooler which is styrofoam. What is interesting about styrofoam is that styrofoam set is an incredible diffuser as far as bouncing light. Bouncing light out of this piece of foam they call it.. This set has some quality. This is going to be soft and a light nice coming out from his cooler and it comes with a reflector. I’ve got a Bakers box which again is a soft box with a detachable reflector. So let’s put up these together and just see how successful they are. Let’s start with an inch a little bit. It’s very very simple , gonna stick this, gonna pull at back of my plastic container. Drill a hole Now, we have a hole attached to our light box. I’m gonna start to this light and Gail is gonna hand me the yellow handled thin snips out of the tool bag. So what I’m gonna do is I’m gonna take and cut this little tin part of in front of here. Like this. The reason why I’m doing this is because I want this little ring and it’s going to and around my container for my soft box so we’re gonna disregard this. Now I got a ring here, I’m gonna cut my hand. So this is gonna go through this opening. I’m gonna move this clamp here from the front to the back and I know that’s exactly that way it meant to be is used, but quite frankly, as a soft box holder, it’s not exactly what it meant to be either. So we’re tighten up in there , so now this can go through the hole like this. Perfect, and this will twist on the front. So hold it in place, with that 300 watts light bulb in there. I’m gonna take a diffusion paper on there and then we use an A clamp to help hold a little bucket, gonna hold on to stand, because that’s not very tight at the back. it doesn’t work very well. So you could A clamp on there. You got a nice little light coming through the light and also gives us a little glow around which is something we didn’t really anticipated but kind of a cool thing so let’s put a piece of diffusion on the front so there you have it. A 300 watts light bulb in a laundry detergent basket and quality light look on my face. It has a little bit of an over all fill on the room because the bucket itself is glowing. So you got the key light on the face. A little bit of glow in the room which is interesting look. You make that for about 9 dollars and 50 cents. 15 dollars with the label and we got laundry detergent so you get clean clothes. – Option number two, is the start from cooler. I think this has a lot of promise and we’re going to draw a hole at the bottom of the cooler. Now for our Styrofoam Cooler Softbox, we’re going to take again a metal container. Put that in there. We’re gonna cut this open again. All right and I’m gonna slide down at the front here, attach right under the front just like what we did before. Now this is much lighter than our plastic tub because the cooler was just so so light. Look inside here, we’re gonna put our 300 watt light bulb in there. Now, another option that we have here, I bought this on the internet, bought everything on the internet and there’s an adapter we could twist this in and this will give us the ability to use this for regular household light bulbs and that would be put on this like that which really makes it nice, we’re going to use regular household light bulbs. We could use four, four hundred watts. Right now, we could just use a single and put 300 watts so we could compare of what this one looks like. Put it on to our stand. This seems to be a little bit of a glow around this. Well, not as much as the last one. So lit by the Starlite Cooler Softbox. Pretty light. It doesn’t bounce as much as the other one did. The back of the cooler is more secured. Also the front diffuser is a little further away from the bulb which gives us a little more directional light. For 300 watt light bulb, you buy from Home Depot for 499, this is a pretty decent setup. Okay, now we’re going to make a soft box out of a Baker’s box. The reason we’ve chosen baker’s box is because it’s white. So the first thing that we’re gonna do, separate on that edge right there turn it over and reattach it, so it’s going to be inside out. So now as we turn our stuff in, we’ll separate the box here like that, and now we’ll reverse our box to a white interior. The problem that we have is that it flips on the other side so we’re gonna tape that down. So again, we got the baner’s box, we’ll take and we will do a hole on the box . I’m gonna cut a little off like this. Okay this is a little easy. I’m not gonna have to move that bracket back at which is a better place for bracket to me, because the cardboard is so much thinner. Print softbox assembly instruction is on the inside. So we could use that for later so we’re gonna attach our soft box to the stand and clamped on the back. We got to tape and use and use an A clamp for security. And now we’re going to tape long. Actually, we’re going to put a 300 watt light bulb. on the front and there is our Bakers box . It’s a very soft light actually and I think it’s because it doesn’t bounce around as much as it did in the styrofoam and the plastic was harder in the surface and not the light out of the front of the box a little harder. This seems very soft , it’s actually not a bad light at all. So let’s wrap this up. We’ve got a soft box made up of a bakers box is very soft. We got a box as soft made up of soft detergent box and that was kind a little more illuminate but still very soft. Our start from cool is a little harder and a little brighter almost brighter , but in the end when you look at all the different lights the colors off it’s kind of are all over the place. This is fun. We’re gonna light our transits. Whatever our transits would be just because its a fun thing to do. But in the end, if I’m gonna work and take this on sets somewhere the one they’re not gonna transport because they’ll gonna fall apart in two. I can’t walk into a CEO’s office with a detergent soft box. It just makes you look like you aren’t really a working professional videographer photographer so you need an entry level kind of trans light and even if you do now home studio. Get a good set of entry level transit lights you could set up. Bigger lighting just right and really become workable situation. You can use for years and years and years . Great one is Starlite by Photoflex. You get a great set up. You put those, you could use on location. A very durable great soft box that are really on color white and easy to transport and still a way to go but anyway the box is made up of a detergent box and you know a bakers box are fun. You got a set of lights up so it’s a easy to do and we’ll get to show how to set our lights up. We’re gonna wrap up what we’ve done today We talked about creating a studio in your home, a small room you’re going to make into a studio a. The principles I want you to understand from this are- 1. make sure the walls are of neutral color , 2. You put up black out curtains to cover your window which kills some of the bounce in your room. You can really get a little more dramatic light but give’s you the option of opening all those curtains so you can use window light if you wanna do that as a light source really gives you different options there. Two, that you can create a drop holder for your ceiling . You get out of the way. You don’t have to have expensive stands, you don’t have the floor spaces stands that takes up. Get all those stands. Rid all those stands. Put those drops from the wall on the ceiling. Very easy backdrop container to make . You know making things. I’m not a huge fan of making things, I’m just not. But when they work and that backdrop holder really does work then it’s worth it. There’s no other else out there. I mean for other things, you get little pleasure rolling up there’s a lot of steps out there. But that one is cheap and easy and it really works so it’s worthwhile. The soft boxes were great. They have great light. They’re fun but we did our transfer and they were starting to fall apart a little bit. They disintegrate a little bit. I expect them to burst them to flame at any moment. So but anyway, it was an interesting experience but again if you want to get into decent light, you’re gonna get something like the starlite. It gives you a decent light you can use to travel with. It really becomes a professional piece of equipment. – Don’t forget you only got ’til February 26 to win your north star lite go to . slanterdens. com. Enter the win for your north star light. I hope you enjoyed our lesson on creating a studio out of your spare bedroom. Kick your dog out of he spare room or your husband, or your wife or whoever is in that spare room and make yourself a home studio cause it’s a great thing to have. We wanna welcome our new sponsors Squarespace, they are great web platform, great for hosting, for galleries, for videos. Check it out. They have excellent templates. They’re new sponsors of ours. We’re gonna talk about a little more about web designing in the future. So check out Squarespace. It’s a great platform. If you like us on Facebook, give kisses for Valentines Day. He’s not kissing me.
Today on The Slanted Lens, we are shooting out at the Orange Empire Railway Museum. They gave us access to their steam train and WW2 passenger cars. We will use this setting to look at the process of mixing HMI and LED lights.
We are lighting a very large area. It’s three train cars long, and we are going to need some serious power to make this happen. Because we are shooting both stills and video, we will need to light everything with constant light sources.
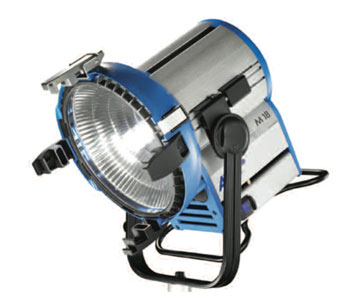
The area to cover is very large, and we will require a strong instrument to serve as the backlight. We rented an Arri M18 HMI. It’s 1800 watts and runs off a single 20-amp circuit.
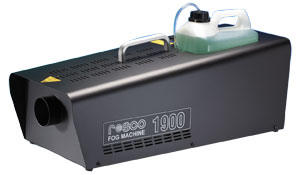
We will set up the M18 deep in the shot and layer smoke from the Rosco 1900 in the background between the light and the scene up front. I’m okay seeing the light in the scene and will let it be in the frame in most of the shots. On this light we added a 1/2 blue Rosco gel to cool it off. I will be shooting at 1/50th of a second and f5.0. I will push the ISO to 1250 to get a proper exposure.
Thanks to the Orange Empire Railway Museum for allowing us to work at their museum. It was very cool. Remember, I’m a train nerd. Thanks for watching.
Keep those cameras rollin’ and keep on clickin’.
The Final Images
The Lighting Breakdown
Mixing HMI and LED Lights
Mixing HMI and LED Lights
#1 Here is the first image with just the HMI. You can see that we have an angle of incidence problem. The light is on the angle to reflect into the side of the train car. If we had a lift to get the light higher we could get rid of the reflection but because we do not have one, we will have to retouch the high light out or cover it with smoke.
Now that the broad strokes are laid down with the HMI, we will add LEDs to paint in the image. The nice thing about single light LEDs is that they allow us to use a single light in many different ways.
#2 For our first light, we will place a NorthStar Lite inside the second car in the background with just a 7-inch reflector. It’s aimed out the window toward the ground to create window patterns on the walkway and create light shafts in some of the images. We will add a 1/2 CTO or warm gel on this light.
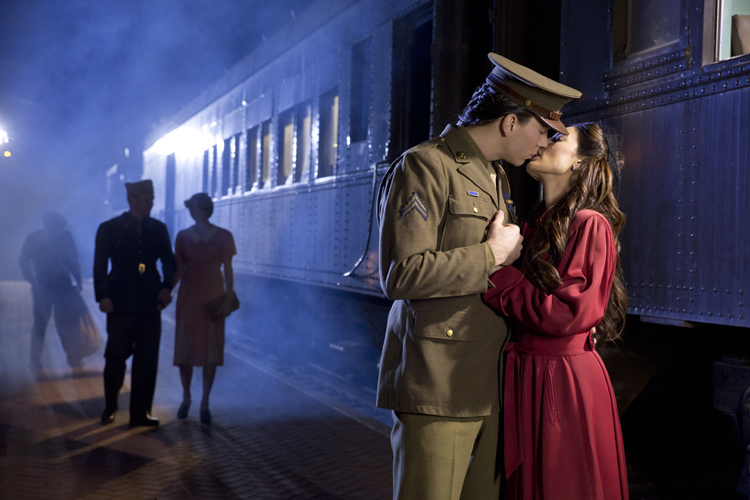
#3 We will now add a NorthStar Lite with a 7-inch reflector on the camera left side to rim the couple and imitate the look of the HMI in the background. The HMI is just too far back there to rim the couple up front. We will add a 1/2 blue on this light. This is the image with the rim light.
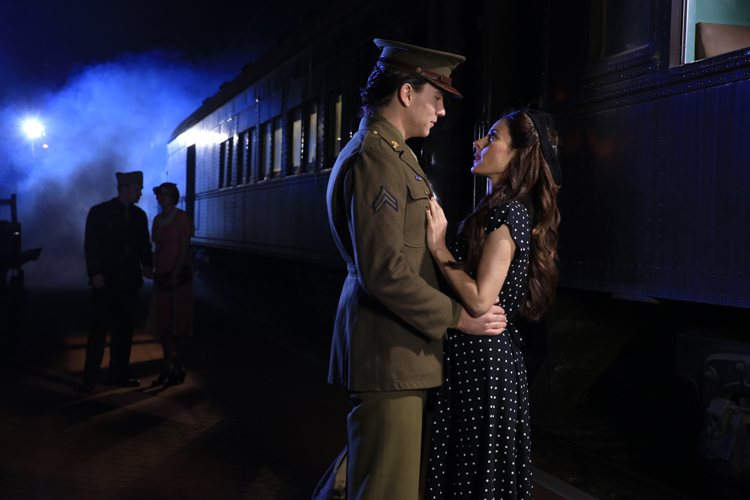
#4 Now, as a key light we will add a NorhtStar Lite in the car just ahead of the couple. We will place the light just back from the window so it will see the couple but will cut off the people in the background. The windows are very dirty so it will soften the light coming through. This is our image with the key light.
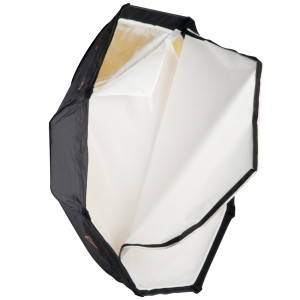
#5 Our last light is an OctoDome just on the right side of the camera. I’ll pan it in to open up the shadows on our talent. Here is our final lighting setup.
This was an epic shoot and a lot of work. After this shoot, I feel more comfortable mixing LEDs and HMIs. They work very well together and create a very cinematic look.
Stick around at the end of the lesson ’cause we got a great giveaway for you this month.
Today on The Slanted Lens, we’re out shooting at the Orange Empire Railway Museum. They gave us access to their steam train with those World War II passenger cars. Very excited about shooting here. I’ve wanted to do this shot for a long time and they are nice enough to give us access to their trains so we can do it. You know if you wanna really make their day, like them on Facebook, it would really be a great boost for this little museum out in the middle of nowhere. It’s called Orange Empire Railway Museum. It’s Facebook at Orange Empire Railway Museum. Anyway, make their day.
More importantly than where we’re shooting is how we’re shooting tonight. We’re going to combine HMIs with LEDs. I’m in love with this thought of LEDs and HMIs working on the same set together. You know how much I love LEDs, I wanna see tonight how they work when you got a big gun HMI on set. So let’s get started to see what we can do. We’re lighting a very large area tonight. It’s three-train cars long, we’re gonna need some serious power to make this happen. Because we’re shooting both stills and video, we’re going to need light everything with constant light sources. Like I said, the area of coverage is very large. It’s gonna require a very strong instrument in the background as sort of the back light. We rented an HMI Arri M18, it’s 1800 watts seconds and runs up a single 20 amp circuit. This is one of the most powerful HMIs out there that runs on a regular Edison 20 amp circuit. We’re going to set the M18 deep in the background and rake it along the side of the train car. We’ll then put the Rosco 1900 smoker up and put a nice layer of smoke between the light and the foreground. This is how you get some great deep background and it will look excellent. I’m really okay seeing the light on the scene which it’s gonna let it be in the frame in most of the shots. The light has 1/2 blue on it to kind of cool it off, that gives us a starting point for our shot. I’m going to shoot a 150th of a second at F5.0 and I’m gonna push the eyes on a 1250 to get the proper exposure to make all this lights work together.
Here’s the first image with just the HMI, you can see that we have an angle of incidence problem on the car. The light is on an angle, it’s gonna reflect right into the side of that train car. If we have a lift or some kind of a way to get that light higher, we’d wanna get it higher to get rid of that angle of incidence but we don’t have a lift so we’re gonna have to live with that angle of incident and hope that the smoke diffuses enough that it won’t be a problem in our shot and I think that will be the case. You know now that the broad strokes for a lighting set-up tonight are laid with that HMI, we’re going to add LEDs to kinda paint in the image. The nice things about single LEDs is that they allow us to use a single light in many different ways. For our first light we’re gonna place a NorthStar Lite inside the second car in the background which is just a seven inch reflector, it’s aimed out the window towards the ground to create light window patterns on the walkway and it give some nice light shafts in some of the images. We will put 1/2 CTO or warm GL on this light just to warm it up a little bit. In this image you can see those nice shafts of light coming through the windows in the background. I love this look, this is kind of a nice dreamy background for images.
We will now at NorthStar Lite with the seven inch reflector on the camera’s left side to rim the couple. It’s going to imitate the look of that HMI in the background but we need that strength up front. The HMI is just too far back there to rim the couple upfront. Again we’re gonna put 1/2 blue on that light just to cool it off. I love lives in a motivated by something that feels real on set. In this case, we’ve got rolled windows that are going all the way down the train. I can put my key light inside the train car just off the camera right side. You don’t see this train car but we’re going to use the windows to restrict the lights with only light certain areas and then light our couple. Again it’s an LED with a seven inch reflector. We’re shining it through the windows and they’re very dirty so it softens the light up a lot and gives us a nice look on their faces. We’ve got a nice light on his face because it keys to the window from the train on the right, we’ve got a nice rim on her. But still a little too dark upfront, we’re gonna need to add one more light.
Our last light is an OctoDome on a NorthStar Lite just to the camera right side. I’m gonna pan it towards them just open up the shadows a little but and ten a little bit of that light open up the side of the train. Our talent, she’s in a black dress. It’s a little dark, his uniform is dark, she’s dark, kinda makes the whole seen a little difficult to put together. And so we had a red jacket there that we put on her, it gave us a good color contrast, it really helped her to stand out. Let’s see how that changes the image. So here’s some of the final images with that red dress. You know it’s now time to shoot some video for our shot. I really like to motivate the camera moves on action so I’m going to have a person walk into the frame on the camera left side, cross the couple and get on the train. This means I can pan down low and pan up to the couple off in the action of the individual walking in and then I can settle in to see our couple as they have their intimate moment. I don’t know how intimate it was but as they have a moment as they kiss. You know switching back and forth of the two couples I have like shoot some of the times one couple on the front and then the next time the other couple. So we got a few shots of each of them. I love the idea the old shots I saw people kissing out the windows of the train as they are leaving so I got the camera up high to get a look at this couple kissing and be able to see the couple on the background. It was a really great look.
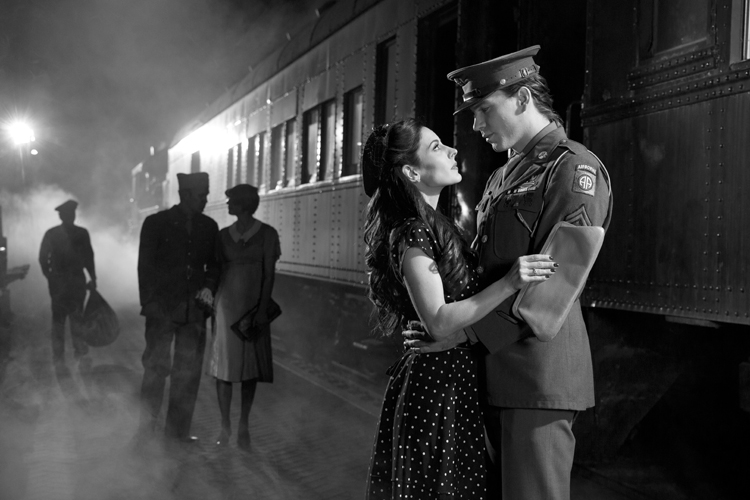
I took some of the images in the Photoshop and change it into black and white just for fun. You know I went to image adjustments then selected black and white, this brings up a panel with different color sliders representing the different colors in the spectrum. I pushed the magenta to 135% or even more and some of the images, this brightened up her face and brightened up her dress and helped her to stand out in the foreground of that black and white. As you push that yellow up, it brightens at the background, helps him stand out better. This was an epic shoot, there was a tremendous amount of work but after the shoot I feel very comfortable mixing LEDs with HMIs. They are both daylight balanced, they just work very well together. HMIs lay down those big lights to give you the big look and then the LEDs go in to give you the little touches that kinda light the shot and make it really work. You know I must say I’m spoiled because we run six or eight of this LEDs off from one circuit. It’s just so nice and you can run six lights up from a single 20 amp circuit. That’s unheard of in the past. Now the HMI different story, it’s gonna have it’s own generator.
Again I wanna thank the Orange Empire Railway Museum for allowing us to work on their museum. It was very cool of them, we appreciate it very much because remember I am a train nerd. So keep those cameras rolling and keep on clicking.
So this month we’ve got an incredible giveaway for you. We’ve got Lens Pro To Go that’s gonna give you like $300 with a Lens Pro To Go bucks. We’ve got Spider Holster too that’s going to giveaway their SpiderPro single camera system. We also have Photoflex, it’s going to give away a speed light kit which is a great little set with two OctoDome for your speed lights and an incredible kit take out location and last of all, Squarespace is going to give away memberships on their website so check this out. All four of these things go to the TheSlantedLens.com, you can sign up there, can win in anyone of four different ways so don’t miss out on this giveaway this month.