

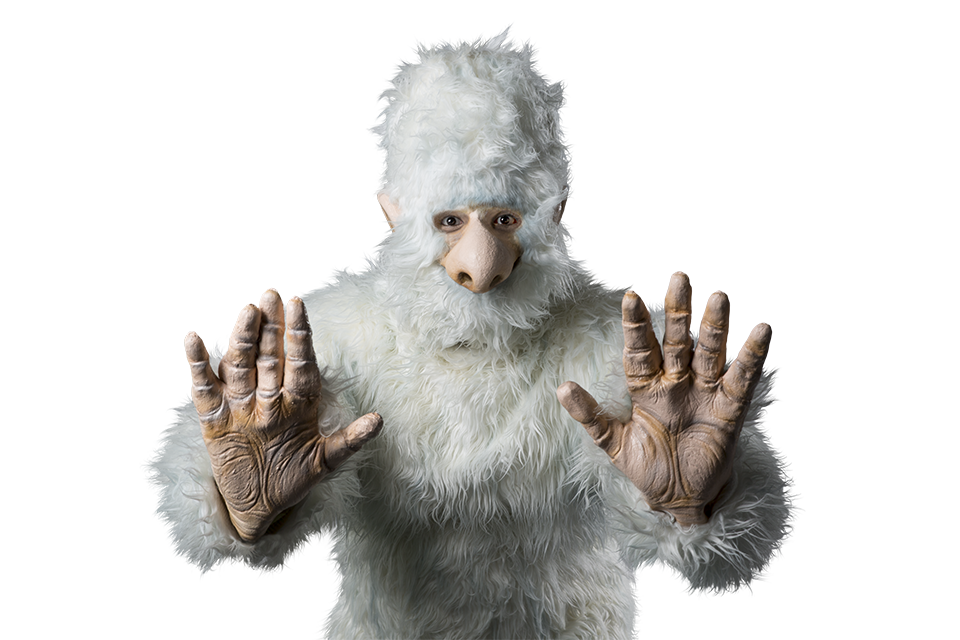
Today on The Slanted Lens, I am going to show you how to do a simple light setup for a person (or two Yetis) in order to be able to outline the subject from the background. We chose a dark gray background so it would be easier to outline the white fur. We are then going to take the image into Photoshop and remove the background so that the image can stand alone as an individual piece.
There are just three simple steps to follow when outlining a subject:
- Step 1: Camera Settings
It is very hard to separate hair when it is out of focus. It can be done, but it is not simple. - Step 2: Choosing the Right Background
If the person you are photographing has blonde hair, you will want to choose a gray background. Alternatively, if your subject has dark hair, you would want to shoot with a white background. You will be able to see through the hair so it will need to contrast from the background. - Step 3: Light for Separation
It is important to light the background to separate it from the subject. In doing this, you will still want the subject to look interesting. It becomes a balancing act. Let’s take a look at how I am going to light these Yetis.
We had a lot of fun shooting with these Yetis. The costumes are so funny looking that I just had to laugh. Every day brings something different in this industry, so keep those cameras rollin’ and keep on clickin’.
Don’t forget to enter our October 2014 giveaway to get a chance to win a tripod and bag from Vanguard!
The Final Image

The Lighting Breakdown
Jay P Recommends for this Shoot


Video Transcription
Check out the end of the video. Vanguard is giving away a ton of equipment this month.
Hi, this is JP Morgan. Today on the Slanted Lens we’re gonna show you a simple lighting setup, so you can light an individual, or two Yetis, to be outlined off from the background. We chose a gray background today, because it’s going to be a white Yeti on a gray background. Make it easier for us to outline them. Then we’re gonna take them into Photoshop, clean that hair, or that fur up, and show you how to do that, so you get a finished piece, that’ll float as an individual piece you can use anyway you’d like. So let’s go ahead and get started. See what we can do. What are those guys doing back there, anyway? Using out the Yetis is just a humorous way to show how to photograph an outline hair. Shooting our subject properly will set the stage for the person who’s gonna do the outlining later. If we photograph them properly than the outline is gonna go much smoother.
Step number one: it’s very hard to separate hair when its out of focus. You know it can be done, but it’s just not very simple. I’m gonna choose camera settings that are going to keep the Yetis, and their hair, in focus. That’s gonna be critical. I’m shooting at one sixtieth of a second at F8. I chose one sixtieth of a second, because the flash will sync with my camera at that speed. I chose F8, because there’s plenty of depth of field there that’s gonna hold my Yetis in focus from the front to the back, and it’s gonna make it easier to outline. I’m going to use 100 ISO, because I’ve got plenty of power in the Flex Flash units that I’m using on set today, so I don’t need to raise my ISO any higher than 100.
Step number two is choosing the right background. If a person has blond hair, then choose a gray, or a dark gray. Our Yetis have white, so gray is the best choice. You’re going to see through the hair, and it’s really important that the contrast from the background doesn’t blend in. If their hair was black, then I would definitely shoot on white.
Step number three is lighting for separation. We’re gonna light the background to give separation to our subject. You know in doing this, we still want our subject to look interesting, so we’re gonna have a bit of a balancing act here while we’re trying to make an interesting light on our subject, but still get separation from the background.
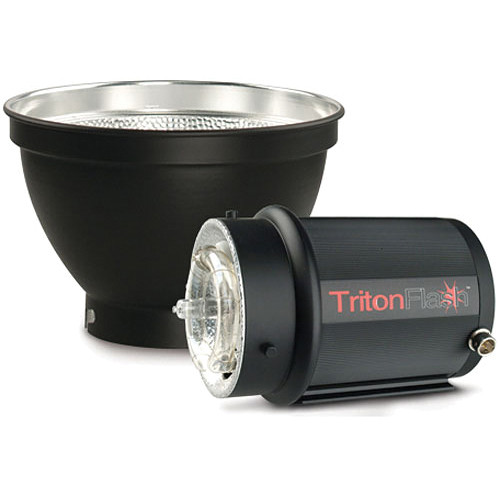
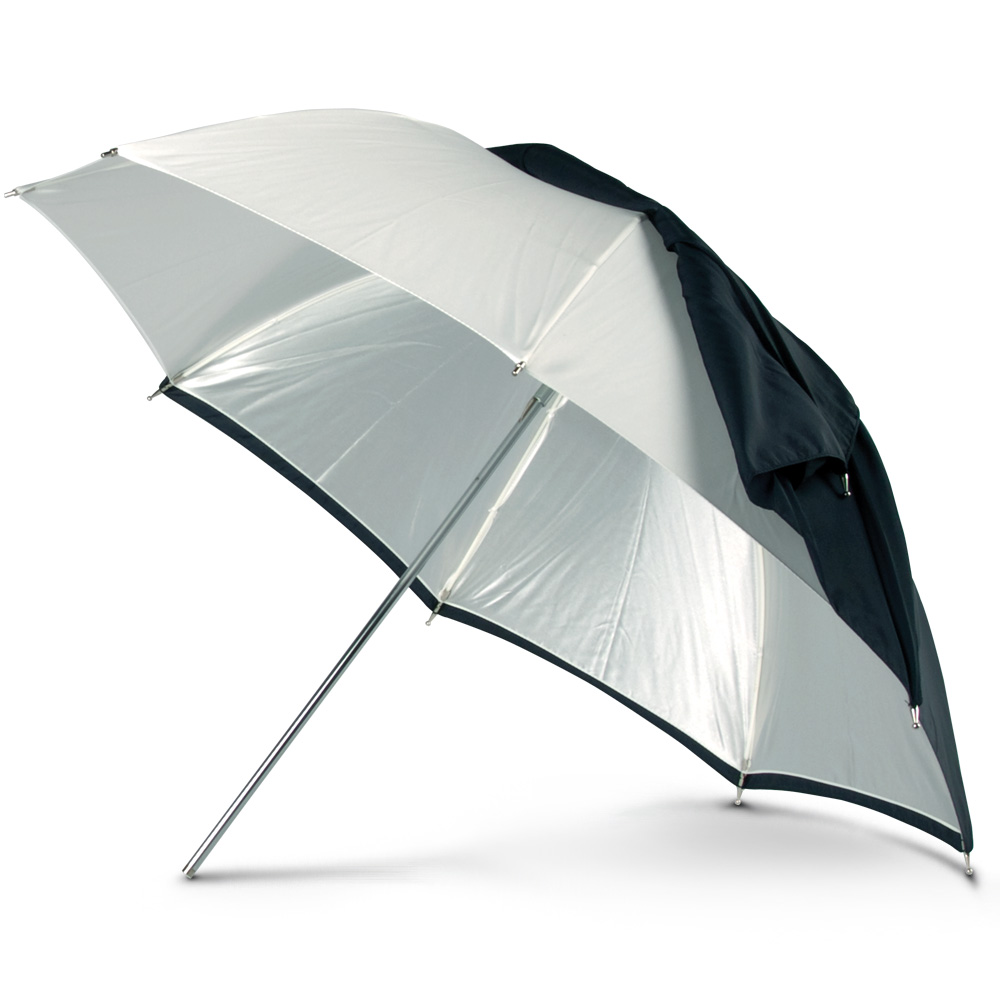
So let’s look at how we light our subject. We’re going to key with a 400 watt second Flex Flash, that that has a medium Photoflex softbox on it. I chose a medium, so it will still have a little bit of shadow on the fur, and not become too soft. A large softbox is going to wrap around them too much, and there will be no shadow in the fur. I’ll add an umbrella on the camera left side to open up the background a little bit, and to give us some rim. It will separate his legs and his feet from the background, because I can tilt the umbrella down just a little bit, and give us a little more light on the ground, and on his feet, that’s gonna help create separation. I’m using black backed umbrella, so I have more control, and keep the light from spilling all over the set, and all over the Yeti. A white umbrella has no control, and allows the light to shoot everywhere. So the black backed umbrella is gonna be key for me to control my light, that’ll light the background, and separate the way I want it to. The next umbrella’s really important. I wanna open up the background on his shadow side, and separate him from the background. This is the old principle of highlight side — dark background, shadow side — light background. Opening up the background, so its lighter, and creating separation. My last light is a creative choice. I want a bit of rim on his head and shoulders. I’ve got a trident with a grid on the camera right side. I’m just gonna open up his head and a little bit of his shoulders to make it just a little more interesting. I don’t want this to be too bright, or it’ll start to blend into the background. So just a little bit of light on his head and his shoulders to make it more interesting, but not making it to lite in order to cause problems. So, once again, here’s our lighting breakdown.
We had a lot of fun shooting with these guys, and here’s some of the images we got.
This is the image that the client chose to have outlined. We’re going to let Julene show you how she outlines his hair, and blends it, so it looks just right.
[Julene] Hi, everyone. This is a quick little lesson on how to outline, or cut out, a figure from a background when hair is involved, like this Yeti. Clients often want an image retouched with the background, and then another option of the person, or object, cut out of the background. So I first start out cleaning up the background. Make sure you create a new layer, and name it for everything you do. Next, I touched up the areas where the firm met the costume using the clone tool. Adjusting the opacity of the clone tool helps you blend and shade areas when needed.
After retouching the eye sockets with the clone tool, the shadows of the Yeti’s left eye especially needed to be brightneed. I like to use a curves adjustment layer, and create a mask, where I slowly paint in the lighter detail where I want it. Here again it works out great to adjust the opacity of your brush to blend the shading. Next I needed to fix the edges where the firm met the skin. I used the clone tool, and the healing brush, for that. I next painted in hair around the eyes, by using shape dynamics in the brush presets, and selecting fade. Here again, adjusting the opacity of the brush, and the size of the brush, and the length of the fade, allows you to make more realistic looking hair.
Next I duplicated the hair paint layer, and blurred it with Gaussian Blur to make it as soft as the surrounding hair. When the retouching of your figure is finished, it is time to cut it out. First I make a new merged layer, and then turn off the other layers. I like to use the quick selection tool first, going around the edges to make sure I include all the details I need. Then I create a mask from my selection. Next I went to the layer mask properties to refine the mask by clicking on mask edge. The edge detection brush allows you to paint over the edges to include fine details. Than I make sure the output has decontaminate colors, which gets rid of the background colors around the edge details in the hair. It is good to check your mask against white, black, and another bright color of background, to make sure it is clean around all of the edges.
After I clean up the edges of the mask, I usually do some hair paint, like I did around the eyes. There always seems to be some bleed from the background that needs to be blended, and also, areas that look too cut out that will need the edges fixed with some hair paint.
After I do the hair paint I duplicate the layer, and then I blur the layer using Gaussian Blur to make it match the surrounding hair. Then I often duplicate the hair paint layer again, and blur it a second time even more. This makes the edges of the hair a little softer, and a little more realistic. I turned on the opacity of this layer just to give a little more softness to the edges of the hair. I turn off the original hair paint layer, because it is usually too sharp. That’s it. Take your time. Practice makes perfect. And remember: Yetis are real. For real in-depth lessons I suggest you go to sites like Kelby Training, lynda.com, or NAPP, N-A-P-P, National Association of Photoshop Professionals.
[JP Morgan] This is our final image. And that’s how you’re shoot and outline hair. You know Julene is very self conscious about showing her skills. If you liked what she had to say, give her some encouragement in the comments. She’s a world class retoucher, and there’s great information that she can give to us. And, hopefully, we can get her back do some other pieces. Thanks to Joel Ackerman, and Ackermenia, for allowing us to use this segment from the Yeti pot shoot. So, keep those cameras rolling. Keep on clicking.
Hi, this is JP Morgan. I can’t remember the equipment, that Vanguard’s giving away, so Kay’s just gonna put a list on the side, but there’s tons of it. We’ve got bags and tripods, three different place winners, so checkout what we’re giving away. Check it out at theslantedlens.com.
– Put it in your nose, make a real noise. I ain’t even player. I had to get a facial. Never with the Yeti pie. Cut it with my Yeti pie. You don’t think it’s really hot. Cooking like a crack pot. We didn’t say nothing. We did say in Russian. Singing me it sounds like my name is David Roughlin, and I got my partner, and we got it poppin’.
– Right.
– And we showed up, getting pop nonstop. Nonstop.
– Nonstop.
– Nonstop.
– Take top.
– Nonstop.
– Take top.
– Crack pot with a Yeti pop.