


For today’s lighting tutorial lesson, we are shooting publicity shots for world famous trick roper Will Roberts. I goal today is to show freezing action with speedlites. For our shoot we came across four obstacles.
- We are shooting in direct sun.
- We want to freeze the rope.
- We want to blur the rope.
- We want interesting light.
The Solutions
I have chosen to place the direct sun as a rim light. In doing so, I have turned the negative of direct sun into a positive rim light and my first light in the lighting setup. When I get a proper exposure for the rim light, it darkens the sky and helps it turn dark blue.
I don’t want to see so much of the ranch house, so I will get low to give me a simple blue sky as the background. Choosing a 24mm lens also allows for a very dramatic action filled frame. I’m using the Tamron 24-70mm lens at 24mm. I love this look.
For my light source today LensProToGo sent us two Speedlights to use for our shoot. I’m using the Speedlight because it’s portable and will sync at 200th of a second and freeze the action of the rope. Most strobes will not sync at this speed.
To soften the light I am using the Portable Speedlight Kit by Photoflex. It gives me 2 OctoDomes, stands, and brackets to shoot with Speedlights. Adding this one light to the rim makes a more interesting image. It opens up his face and body. I am using the Speedlight on manual and set it to full power. This gives me a correct exposure. I am syncing with pocket wizards.
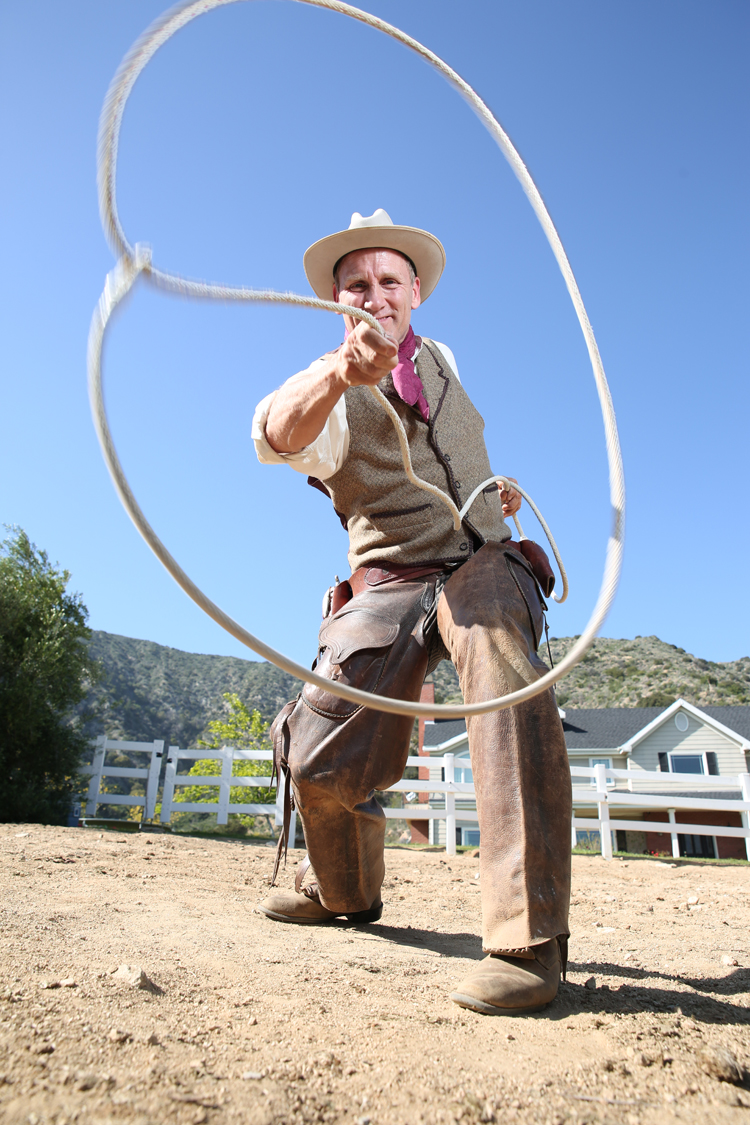
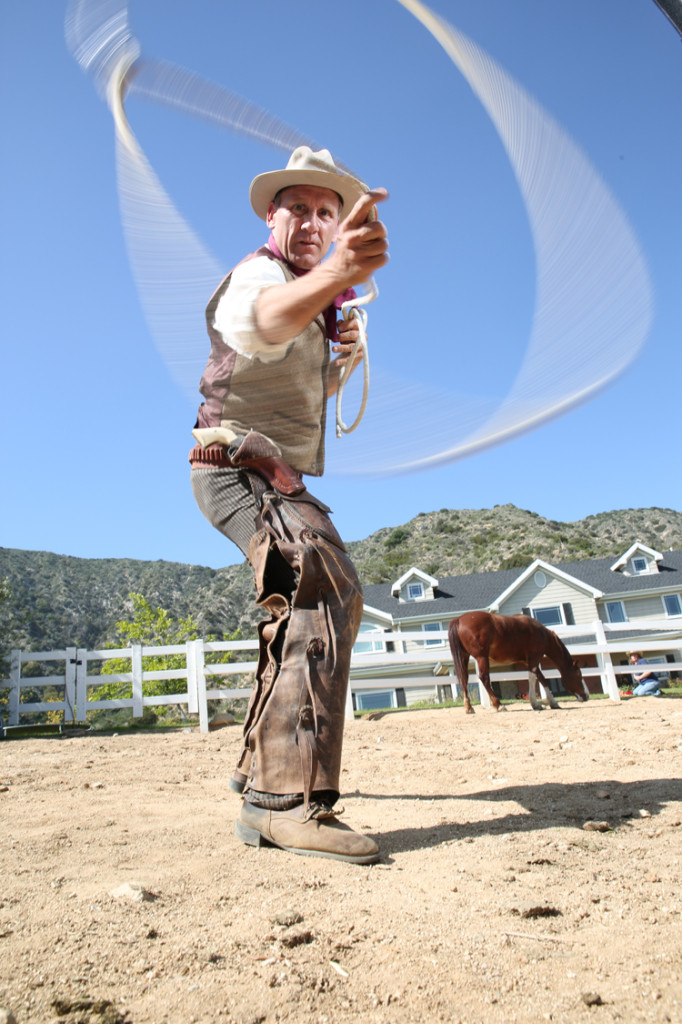
Shooting at 200th of a second and f6.3 we got some great shots of him with the frozen rope. The Speedlight did its job.
Now I will move the shutter to 1/50th of a second and the aperture to f13. I dialed the Speedlight down to 1/4 power and moved it out slightly. This gives me a correct exposure and allows the rope to blur.
Here is the difference between 1/200 of a second and 1/50th of a second. The Speedlight has a fast sync speed and allows me to shoot at 200th of a second. This gave us the ability to shoot both blurred and frozen rope action.

The Recap
We had to shoot in direct sun, wanted nice light, and needed blurred and frozen shots of the rope.
To overcome these obstacles we shoot with the sun as a backlight, and used a Speedlight to allow us to shoot at 1/50 and 1/200 of a second, giving us blurred and sharp rope effects. Last of all we used a Photoflex Portable Speedlight Kit to get soft, nice light on his face. Will was great to work with and a very talented man. Good luck with the Speedlights. Keep those cameras roll’n and keep on click’n.
Don’t forget to enter our May 2014 giveaway to get a chance to win one of three Glidecam XR 2000s!
Video Transcription
For today’s Slanted Lens lesson, we’re shooting publicity shots for world famous trick roper, Will Roberts. Let’s take a look at the obstacles we’re gonna face. We’re shooting in direct sunlight. We wanna freeze the rope and we also wanna blur the rope. Two different directions. And we want interesting light on our subject.
Here are the solutions. To overcome the sun, I’ve chosen to place the sun as a rim light behind the subject to camera left just a little bit. In doing so, I’ve turned the negative of the direct sun into a positive rim light and becomes my first slide in the lighting setup. When I got a proper exposure for the rim light, it also darkens the sky and helps that turn very blue. I am now going to need a lot of power from the strobe to brighten up his face. The ranch house and the fence are a little overpowering. I don’t wanna see so much of them behind my subject so I’m gonna get down low so I put my subject into that nice blue background giving me a simple background behind him. I’m using the Tamron 24 to 70 but I’m gonna shoot at 24 millimeters. I really love this wide angle look. It gives me a very dramatic and action-packed frame.
Now, for our next obstacle. Freezing the rope. From my light source today, Lens Pro To Go sent us two Speedlights we’re gonna use in the shoot. I’m using Speedlights because it’s a portable light platform, allows me to sync up to 200th of a second and freeze the action of the rope. Most strobes aren’t going to sync at 200th of a second. This is one of the advantages of the Speedlights. To soften the light and give us a nice interesting light on his face, I’m going to use a Portable Speedlite Kit by Photoflex. It gives me two octodome stands and brackets to shoot with these Speedlites. It’s a great little kit. I’m going to add my Speedlite as a key light on the subject matter. I’m going to add that to the rim from the sunlight and that makes it a much more interesting image. It opens up his face and his body. I’m using my Speedlite on manual and I’m dialing down to one-fourth power. That gives me the correct exposure for this shot. Shooting at 200th of a second and f6.3, we got some great shots of him with the frozen rope.
Now, I’ll move the shutter to 1/50th of a second and the aperture to f13. I’ll dial the Speedlite all the way up to full power and just move it in slightly. This gives me the correct exposure and allows the rope to blur. Here’s the difference between 1/200th of a second and 1/50th of a second. Here are some of the blurred rope shots. There hasn’t been any Photoshop work done on these. – So to recap, we had to shoot in direct sun, wanted nice light. I needed blurred and frozen shots of the rope. That was our challenge today. To overcome all these obstacles we shot the sun as our backlight as a rim, we then took an Octodome Portable Speedlite Kit from Photoflex. Put a speedlight in it, use that as a key light up front to give us nice light on his face. That speedlight allows us to go up to 200th of a second to freeze the rope but then we can always go to 1/50th of a second to blur the rope. So, we overcame our direct sun. We were able to get blurred rope and sharp rope. And we got a nice, soft light on his face using that Portable Octodome Kit from Photoflex. So keep those cameras rolling, keep on clicking.
Big throw in front of you. Yeah, you know. – Nailed it. – You set the camera. – For the whole month of May until June 3rd, we’re givin’ away three GlideCam XR-2000. Don’t forget, three Glide Cam 2000s. You have until June 3rd. Go to theslantedlens.com where you can sign up and enter to win.