

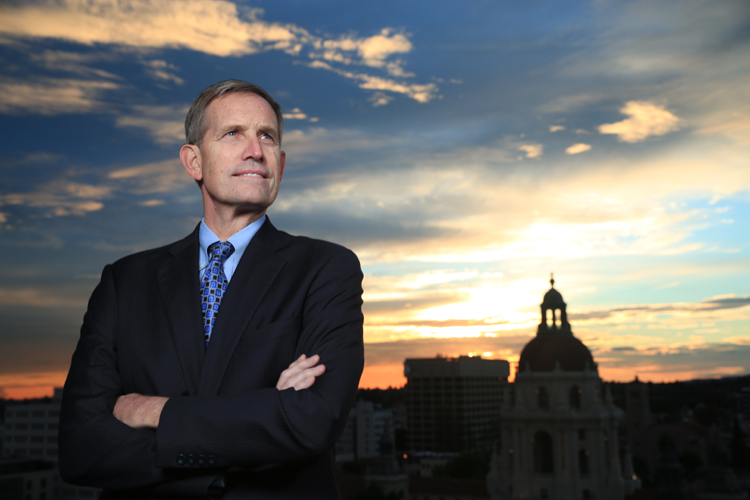

In today’s Slanted Lens lesson we set up on top of the roof of the East West Bank building in downtown Pasadena shooting a two light executive portrait. I wanted to get some unique portraits. I asked if we could get on the helicopter pad and shoot back at the Pasadena cityscape. It took some doing but we got permission. We were looking into the west so the setting sun was dropping into our shot. Adding strobes to light my subject, I balanced the sun and strobe light and made the sky darker by speeding up my shutter speed. We started shooting a one light portrait and then progressed into a 2 light portrait as the ambient light faded. The second light became our fill light to open up the shadows. Keep those cameras rollin’ and keep on clickn’.
Jay P Recommends for this Shoot


Video Transcription
[Jay P Morgan] Hi, this is Jay P Morgan. Today on The Slanted Lens, we’re on the top of this roof downtown in Pasadena with East West Bank. Wer’e gonna shoot these three executives in a one light portrait. We got a great background behind us. As the sun is getting a little lower on the horizon, it gives us a little brightness because I’m looking straight into the sun that starts to silhouette the buldings behind us. So, what I’m doing is taking my shot. I’m going to speed it up. I’m gonna make it a little quicker so I can make it darker on the background but that gives me a silhouette of the buildings. I’ve added a second light so our one light setup has gone to a two light setup. We got a nice key light on the right side with a nice fill on the left side. That kind of gives us a working place here as the sun starts to go down. This is gonna start to change completely every few seconds as we go in to sunset. We’ll be taking our shutter, making it longer and longer, to be able to get us the correct exposure. So, you guys ready?
[together] Ready.
[Jay P Morgan] Let’s get started. Now, our shots start out as a one light portrait but as the sun starts to fade and the ambient goes down, we’re going to add a second light as a fill and our one light executive portrait turns into two light executive portrait. I really wanted to shoot something unique with our bank executives, so I asked if we could get up on their helicopter pad and shoot back towards the Pasadena cityscape. It took some doing but they got permission. So up we went to get ourselves all set up. The railing was pretty high and it kind of made it hard to see the city. So, I was maybe a bit concerned as we started to setup. So, we set a time lapse up on the helicopter pad. We started recording our time lapse and forgot about it and just went to work. You know, I really couldn’t find a good spot. I couldn’t find a good angle that I liked. I hate that when it starts to happen. I start to stress because I can’t find the place. I know our executives are comin’. I start to feel the pressure of gettin’ everything ready to go. There’s a tall roof over the stairwell that was higher than the helicopter pad. The suggestion was made, let’s go check that out. I had seen it earlier as we walked by and looked up the ladder but there was a padlock up there. So I thought well, we can’t get in to that. But as it turned out, when Lars went up there to check it, sure enough, the padlock wasn’t locked. So we popped it open, jumped up on the roof. The minute I hit the roof, it just felt perfect. I was up high enough to be able to see straight into the city, there’s no railing. It was just the perfect setup. For me, until things feel right and I can see the image, I just have to keep looking. I walk around with the camera in my hand, looking for my shot, you know, before any lighting goes up, I’m gonna do that. When I pack the car, the van, or the truck, the thing I want on top is the tripod and the camera. So, that’s the first thing I can grab. I can get out, set it up and find my shot. Later, we looked down and there was a time lapse going of the empty helicopter pad. But you know, we found a great spot, we got a great shot, and that’s all that matters. So, this is kind of my process as we did the shoot.
I start out with a single key light and I’m gonna use the ambient as the fill light. My exposure is about an 80th of a second at F-11. The key strobe light is very subtle. It’s just meant to open up the shadows on his face, kind of clean the light up. I shot a series of these images using this set up. I quickly found that I really need the background a little more out of focus. To accomplish this, I added a three stop ND on the camera. You know, on a 24 millimeter lens, you can drop the background very far out of focus. But it helps to kind of soften it and I’m gonna shoot stuff long and short. As I shoot longer lenses, it’s going to make a huge difference. A 135 or 200 mm lens is gonna fall way out of focus on the background. Here’s some of the images that we shot, which is that single light setup. You know, I shot high, medium and low angles. I love to do that. Different perspectives, different images. The whole shot changes when you change perspective. So, here’s several different angles with different lenses. I added a key light slightly off from camera left, be the main light on their faces, and then added a fill light for the camera right to open up the shadows. The ambient is too far gone, I’m trying to balance it with the sunlight, so I need that fill light now. I now move the guys to the edge of the building to look right into the setting sun. You know, I kept that ND on and here’s my ambient exposure. I’m shooting at F5.6 to 60th second. Really, the light is dropping now. I move the guys to the building edge, kind of this little corner that was really cool. This made for a great setup for the end shot. Here’s our first shot with just the ambient. Both strobes are re-positioned, camera right key, camera light fill, and we started shooting. We’re looking right at the sun as it’s setting, so the sun’s coming in and out of the clouds. It gives us a really great flare, very fun. Here’s some of the final images from our shoot today. I took the opportunity to take some shots at the very end. It was a lot of fun. You know, looking for the right place, with the right light at just the right time can make a huge difference. It’s really important to not just take whatever you’re given, but make sure you find what you want. Look hard. Have that camera on hand, search the area, find a place that’s going to work for you. Don’t give up till you got what you want and then go after it as hard as you can. It makes for a great image. Keep those cameras rollin’, keep on clickin’.
Hi, this is Jay P Morgan. Today on The Slanted Lens, we’re going to review a new strobe head by PhotoFlex called the FlexFlash. This is a monobloc, which means you have your power and your strobe head all in the same housing. You just plug it in, turn it on, you’re ready to go. The ease of these is just, they’re simple. They’re lightweight, they’re simple to carry with you, you put them into a case, you take it with you. They have a 200 watt version and a 400 watt version. The 400 watt version is about 5 pounds and change. The 200 watt is about four pounds and change. The 400 watt second unit will give you up to 1/800th of a second in flash duration, which means you can freeze action very easily with these. That makes it extremely valuable. They’re one, very consistent. We got the same light out of it each time we used it. And two, it’s small enough, I put it in the cauldron. It was easy to use in that way. So, first off, it’s set up on a bowling’s mount, which means you can, reflector is gonna work with all the other bowling’s mount equipment that I got from several generations. Softboxes and reflectors, everything goes in seven inches reflector for grids. That bowling’s mount is really easy to use. Just put on there and it clicks into place. Let’s flip this thing around, take a look at the controls on the back. We’ve got a button here that turns on our modeling light on or off. We’ve got the ability to turn the sound on and off. Do we wanna hear it cycle and that little beep when it comes up to full cycle? We can turn our slave on and off, be able to use with slave eye on the back or turn that slave eye off and use it either with a pocket wizard or as a direct connected cable. And then, of course, we have the ability to ratio our light up or down. It has a test button right here. You’ll be able to test the flash when you’re using it. And it’s pretty much ready to go. There’s not a lot that you have to know, which makes this really valuable to me. Two or three of these in a case with an umbrella or a softbox and you’re good to go to do a three point light set up. So, FlexFlash by Photo Flex. Take a look at and see what you think.
Thanks for watching The Slanted Lens. We really appreciate your support. Make sure you follow us. Go to our webpage TheSlantedLens.com, sign up for our newsletter. We got great information comin’ about our business coaching class. You’re going to want to make sure you know about that. Follow us on Facebook, follow us on Youtube, like us on all those places. We’re on Twitter. We show some great images on Twitter, Instagram. I think I posted two images on Instagram, two in my life. But we’re starting. That’s two, two more what we had last year, or the year before. So, check out those places, like us, follow us, love us. The Slanted Lens.