

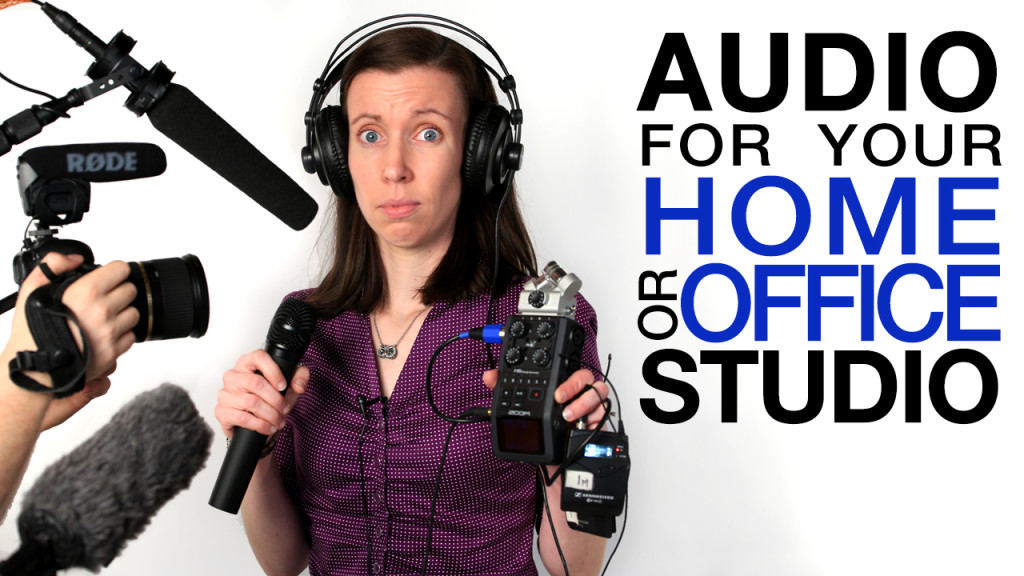

We have had a great series on home studios from setting them up to how to light in them to what equipment you need. Today we are going to show you some options to get good audio in your home or office studio. Audio is sometimes the last thing we think about, but the first thing that people notice.
1) Built-In Camera Mic
The microphone that it built in on your camera is definitely the cheapest option, but the quality of the audio is pretty terrible. It sounds fine if I am standing right next to the camera, but it is hard to work like that. The number one rule of audio is never use the microphone in the camera.
2) Shotgun Mic on Camera
We put a small Rode Videomic Pro on the hot shoe of the camera. This plugs right in to the camera and while the audio quality is better, it still isn’t great if the subject is any distance from the camera. This is a good solution to keep on your camera as a backup in case something goes wrong with your other audio device.
3) External Recorder
Using a small, off-camera recorder such as a Zoom or a TASCAM will capture the audio at the source. The device can be put on a stand or held very close to the subject and the built-in microphone will record a stronger audio. These recorders range in price from about $100 to $250 so you can find one that will fit your budget. The disadvantages of an external recorder capturing the audio is that 1) the microphones still are not high quality, 2) you have to get pretty close to the subject, and 3) if the subject moves away, the quality of the recording will drop off.
Keep in mind that once you are no longer using an on-camera mic, the video and audio will need to be synced. Plural Eyes by Red Giant is a great program to help do this, but you can also use a slate at the beginning of the recording.
4) Lavalier Microphone
A lavalier (or lag) is great because it is on the person’s body, they can move around and the mic stays with them. We are getting a little more expensive here since with a lav you, will still need an external recorder. The disadvantage is you will need one microphone for each person so the expense can increase there.
5) Shotgun Boom Microphone
This is the Big Kahuna. The Sennheiser 416 shotgun mic has been the one used in the movie industry for years. The term shotguncan be a bit of a misnomer, and to me, a shotgun usually means a wide spread. However, a shotgun microphone is very directional and has a narrow area of coverage. You will not get much external noise, but the microphone needs to move with the subject. The MK 50 has a wider area of coverage and would be a great option when two subjects are speaking. As I mentioned earlier, you still need an external recording device when using the shotgun mic.
The lavalier and shotgun mic are the two solutions I prefer, and those are the two standards in the industry. If you have the money, I recommend stepping up to a lavalier or shotgun microphone. If those are out of your price range, start with a recorder like the Zoom H4n and work toward your way up. So with those solutions, now you can get great audio! When you do, viewers, and clients, will appreciate your videos more. Keep those cameras rollin’ and keep on clickin’.
Don’t forget to enter this month’s giveaway of a PhotoFlex FlexFlash 200W Strobe Light Kit!
Jay P Recommends for this Shoot


Video Transcription
Hi, this is Jay P Morgan. Today on the Slanted Lens, we’re going to show you five options for getting good audio on your home studio. We’ve got a great series on home studios from setting them up, to how to light in them, to now the audio you need to really finish things off to be able to get great video and audio in your home studio.
You know, audio is one of the last things that people think about, but the first thing people notice. We can do some really terrible video and no one seems to ever say anything, but when we do terrible audio, it’s the first thing people mention on Slanted Lens. So, let’s look at some options to give you good audio in your home studio, from really inexpensive to a little more expensive. Let’s get started see what we can do.
I said five solutions for great audio. I lied. The first solution is on your camera. It’s the camera audio that comes with your camera every time you turn it on. It’s terrible for a couple of reasons. For one, it’s a long way away from the subject. So, not being close enough, it picks up everything around the subject matter. So, you can hear me now on that audio from the camera. It’s really not very good. If I get closer, and I talk up in here, all of a sudden now the audio’s not so bad. Of course, I’m extremely close to the camera, and it’s pretty hard to work like this. So, the number one rule of audio is: Don’t ever use the audio that’s on your camera.
Number two. We put a small Rode Video Pro on the hot shoe of the camera and plug it into the mic side of the camera. Now, it’s taking the audio from that shotgun mic and putting it into the camera. Is the audio better? At this distance, not amazing still. It’s a long ways away. Is it better if I get back up here again?
Absolutely, because it’s close to me again. So, this little Rode Video Pro, is a nice solution to keep on your camera. Then, if something goes wrong with your audio device, it’s a great backup, at best.
So, let’s go to number three and see what we’ve got. Okay, so there’s one and two, both of them on the camera. Both not good, not great. They have to be closer to the subject if you really want them to work. So, let’s look at number three. Number three is a small recorder. This is an off-camera recorder that’s going to capture the audio at the source. You can get this very close to the person. You can turn on the mic, so it’s just running off these two mics on the top of it here, and that gives you a much stronger audio source. It’s close to the camera. I put it underneath, or you could put it up on top, if you wanted to, just like a boom mic, but just get in close, so the person is right here. You get the full volume of their voice. This is a much easier way to catch audio, and it’s also simple because you just take it, turn it on, and put it on a stand, and you’re ready to go.
So a little Zoom recorder, like the Zoom N4, is great, or the Zoom N1 is fine, or the N2. One hundred dollars, one hundred fifty dollars, three hundred dollars. So, there’s three different options.
So, we’ve gone to an external recording device. That means we’ve got to somehow match that up to the audio on our video. The way we do that is a program called Pearl Eyes. It basically takes the auddio you’ve been recording with your internal mic and it matches those wave forms up and it says, “Oh, this is where the audio goes,” and it marries those two together, take those clips into Premiere and you’re ready to edit.
So, number three, what are the disadvantages of an external recorder capturing our audio? One is the mics aren’t great on these little external recorders, and you gotta get them in very close for them to work, they’re really not very directional. They’re just not a great source of capturing audio. And some things are going to work, but they’re really kind of cumbersome, a big item you’ve gotta shove in there and follow the person around with. It just doesn’t work that great. So, there’s some real disadvantages to these little recorders. Not my first choice. It’s probably not on my list of choices at all.
Now, for number four. The Lavalier. We’ve probably gotten a little more expensive as we’ve gone along. Cameras cheap because of the camera. A little mic on top of the camera, a little more expensize. A Zoom recorder, or something external, a little more expensive. Now, a lav, because you have to have the lav and the external recording device.
But a lav is great, because it’s on the person’s body. They can move around, like it doesn’t matter if I’m over here doing my audio over here, or if I’m doing my audio over here, it’s all going to sound the same. I’m never going to sound any different when I’m using my lav, regardless of where I go. Heaven forbid, I should go to the bathroom and leave my lav on, because that would be very embarassing.
So, the Lavalier is really nice because you can move around and go do anything you need to. It’s really nice to stay on the person. It’s a very full audio, though. It’s right there. It’s on a person’s body.
Disadvantage of the lav, you’ve got to have one for each person. So, the expense kind of goes up. You can’t get two people using the same lav. Also, it’s a matter of, you’re tying to the person, and some people don’t like it. You’ve got to tape something to their body, you’ve got to put it in their pocket, they’ve got to carry it around with them. It’s not fast, like some other audio methods. So, that’s one of the disadvantages.
Lars taught me a great way to hide your lav. You just take a piece of gaff tape, and you make a triangle, bend it over, and then fold it over, and then fold it, and then fold it, and fold it. You have a triangle. Now, we do it again. A triangle, fold it, and stick it, and fold it, and stick it. Now, we have two triangles. Now we have the lav line and we set it in the triangle just like that so the mic is sticking up, and then we take this here and stick it on the other side. Now, we have a little triangle, sticky on all sides, with a microphone right in the middle. And you just take and stick it on the person. It just sticks to the top of their clothes so they’re not going to rustle to it. Disadvantage to it? It can make your shirt look a little stuck sometimes. Advantage? It hides under the clothing. You don’t even know you have it on. So, a nice little tip on how to rig a lav.
Number five, the big burrito, the Big Kahuna, the number one. This is the microphone and the solution that the movie industry has been using forever. A senmeiser 416 microphone. It’s a shotgun mic, does not make any sense to me because a shotgun mic means spread to me, but a shotgun mic is very narrow. It gives you a very narrow area of coverage. So, it’s going to be very zoomed in tight on the person, but what’s nice about that is that you don’t get external sound. The disadvantage of that is if the person moves over here on the shotgun mic, you’re not going to hear very well, or over here, you’re not going to hear very well.
So, if you’re just sitting right here, and talking like this, it’s going to change. So, a shotgun mic in that way becomes a little more difficult to work with. It’s the solution most people use. They use it overhead like you see here in front of me. A shotgun mic up pointed more at the chest, not at the mouth, at the chest. Get that full volume of sound that comes out becomes a very nice sound.
There’s also the MK50 which is a little broader microphone, so you can get two people in a conversation, side by side with an MK50 and you’ll be able to have that conversation and it won’t drop out one or the other.
Shotgun mic is probably the number one used audio solution, but like any audio solution, you gotta run a cable, you’ve got to run it back to your zoom recorder, you’ve gotta have an external device to capture, and it’s a $1000 for one of them. The really good ones are $1000. If you pay much less than that, you’re probably wasting your money.
So, there’s five solutions for your home audio. Now, out of the five, there’s only two that I really like, the lav mic, or the shotgun mic. Those are the two standards in the industry. If you have the money and you can step up to those, do that. Make that happen. If not, the zoom recorder is probably going to be your next solution which really doesn’t make any sense. The other two? Not that great.
So, with those solutions, it gives you a way to solve your audio. Get great audio. It’ll make it so that people appreciate your videos better. They’re going to not notice the audio, which is a good thing, because it means it’s good. So, keep those cameras rolling. Keep on clicking.
You haven’t signed up yet? We’ve still got the two flex flash kits that we’re giving away on The Slanted Lens. Go to TheSlantedLens.com. Two mild boxes, two soft boxes, two stands and a case. Go to TheSlantedLens.com. Don’t miss out.
For all of our Slanted Lens listeners, we’re offering the first light kit, only on The Slanted Lens website, where you get two lights, two stands, two umbrellas, and we’re throwing in a light disk, a 32-inch light disk for $264. We’re offering that entire kit as the perfect lighting setup. You have your key light, you have a great fill light, and a great light for your background. It’s really everything you need to get started in your first studio. It’s the perfect setup to get started at a price point that makes excellent sense. Get your first studio lighting kit with a light disk thrown in, that gives you everything you need to get started. So, go to TheSlantedLens.com. It’s a great deal.
This is a dead cat. Who cares? What does it do? That’s an audio lesson for another time.