

Today on the Slanted Lens we’re back out at the SKB Factory shooting an industrial portrait. It’s one of the assignments that can go really easy or really hard. So let’s get started and see what we can do.
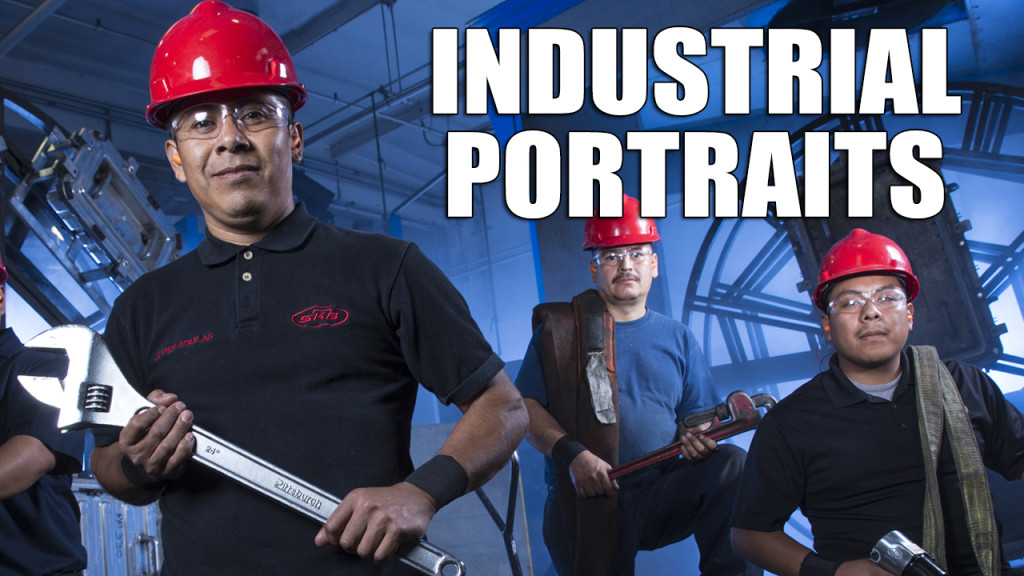
When I say industrial portrait, it’s not a lifestyle portrait. It’s not a documentary style portrait. It’s an industrial portrait. Which is more commercial than it is portrait. It’s about making the factory and the people look good. It’s more the kind of portrait you would see in an annual report or on a company’s website. Something they would use to represent the company. With that in mind, I want the people and the place to look very inviting. So let’s take a look at some tips on how to make that happen.
1. Use Color
Number one, one of the things you can do is to use color to make the drab, ordinary environment you’re shooting in, like the machinery and everything, look more interesting. I’m going to add a blue gel in the background to add interest. I’m then going to add smoke to catch the color and get rid of the ceiling and the parts of the factory that I don’t really want to see and aren’t really that pretty.
2. Wardrobe
Number two, I’m going to dress the workers in company shirts to bring order and uniformity to the guys in the image. This makes the company look like they pay more attention to detail and are more organized and methodical in the workplace.
3. Dramatic Elements
Number three, I want some dramatic element that gives visual interest. I’m going to set a person up front with a great big wrench. I’m going to have him turn into the light so he catches an angle of incident and it gives us a nice glow off of that wrench and kind of gives us a little bit of an item that stands out.
4. Connect to the Job
Number four, I want them holding tools and equipment that they work with so it connects them to the job and makes it feel like they’re all part of this process.
5. Safety Gear
Number five, these guys are working around big machinery so don’t forget to make sure they’re wearing the proper safety equipment-the right shoes, the hard hat, safety glasses, the earplugs, and in some cases, gloves. Just make sure you talk to the people there. Make sure they really represent the company correctly and that they are wearing the proper safety equipment. Nothing kills a shop faster than not having on the hard hat or something makes it unusable for the company.
So let’s move on to our shot now. Time is going to be of the essence. This machine makes money for the company and every minute that it is not working is cases it’s not making for SKB. So we’re not going to have all day to take this image. We’re going to have to be ready in short order. So here’s some tips on how you can be ready to swoop in the second you turn the machine off so you won’t hold things up and you can get your shots as quickly as possible.
1. Set Up Equipment
Number one, I’m going to set my strobes up on stands. I’m going to test them and make sure they’re firing. I’m going to make sure all the radio slaves are working and all the strobe heads are working.
2. Find Power
Number two, I’m going to find all the power outlets that I can and I’m going to run cable and cords to the correct places as close as I can get them, while the machine is still working. So that I can quickly pull power. Always have an extra outlet and extra power because you’re going to need it.
3. Prep Wardrobe
Number three, we need to get the shirts pressed and ready to put on the employees. So that they’re ready the second they are done.
4. Choose Angle and Lens
Number four, I’m going to pick my angle and pick my lens. I’m going to see exactly what I want so that I know when it’s time and I can quickly get my shot.
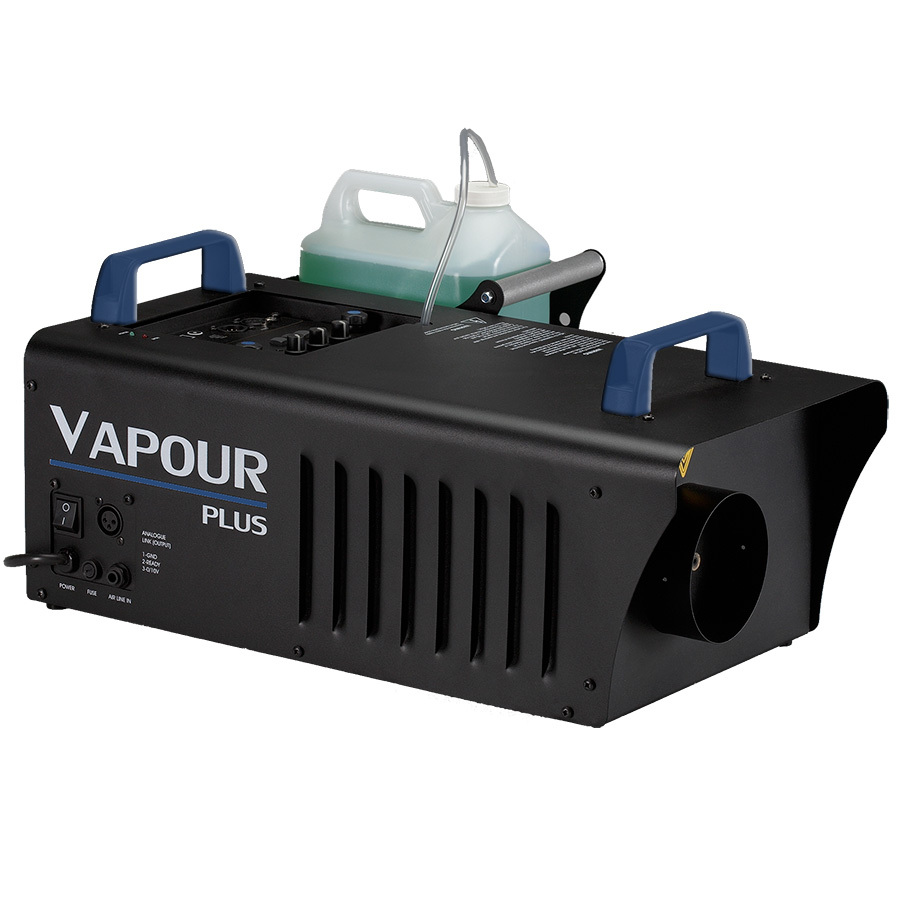
5. Warm Up Fog Machines
Number five, warm up the smoke machine. Don’t wait until they shut the machine down to plug your smoke machine in. Even if you plug it in on the side and let it warm up. Then you can just unplug it and run it to where it’s going to work, plug it back in and it’s ready to go. But if you start those things from scratch they take a little while to warm up.
6. Get Help
Number six, get help from the client or other workers that are in the area. They can help you carry stands and they can help you to pull cords. Get organized ahead of time and say, I need you to pull this and bring it here and I need you to haul a stand in here. You can get things set up very quickly.
7. Backup Equipment
Number seven, have an extra strobe head. Even if you think you don’t think you’re going to need it. Have it up, plugged in, and ready to go. Because then when you’re shooting and you’re going, Uh, I just need a little bit of light on that guys face, you can quickly get that light in place and it helps to solve your problem. Always have an extra strobe head.
So there’s some tips on being ready so you can swoop in and get started. I’m sure there’s a lot of other things you can think of. Put them in the comments. We’d love to hear from you.
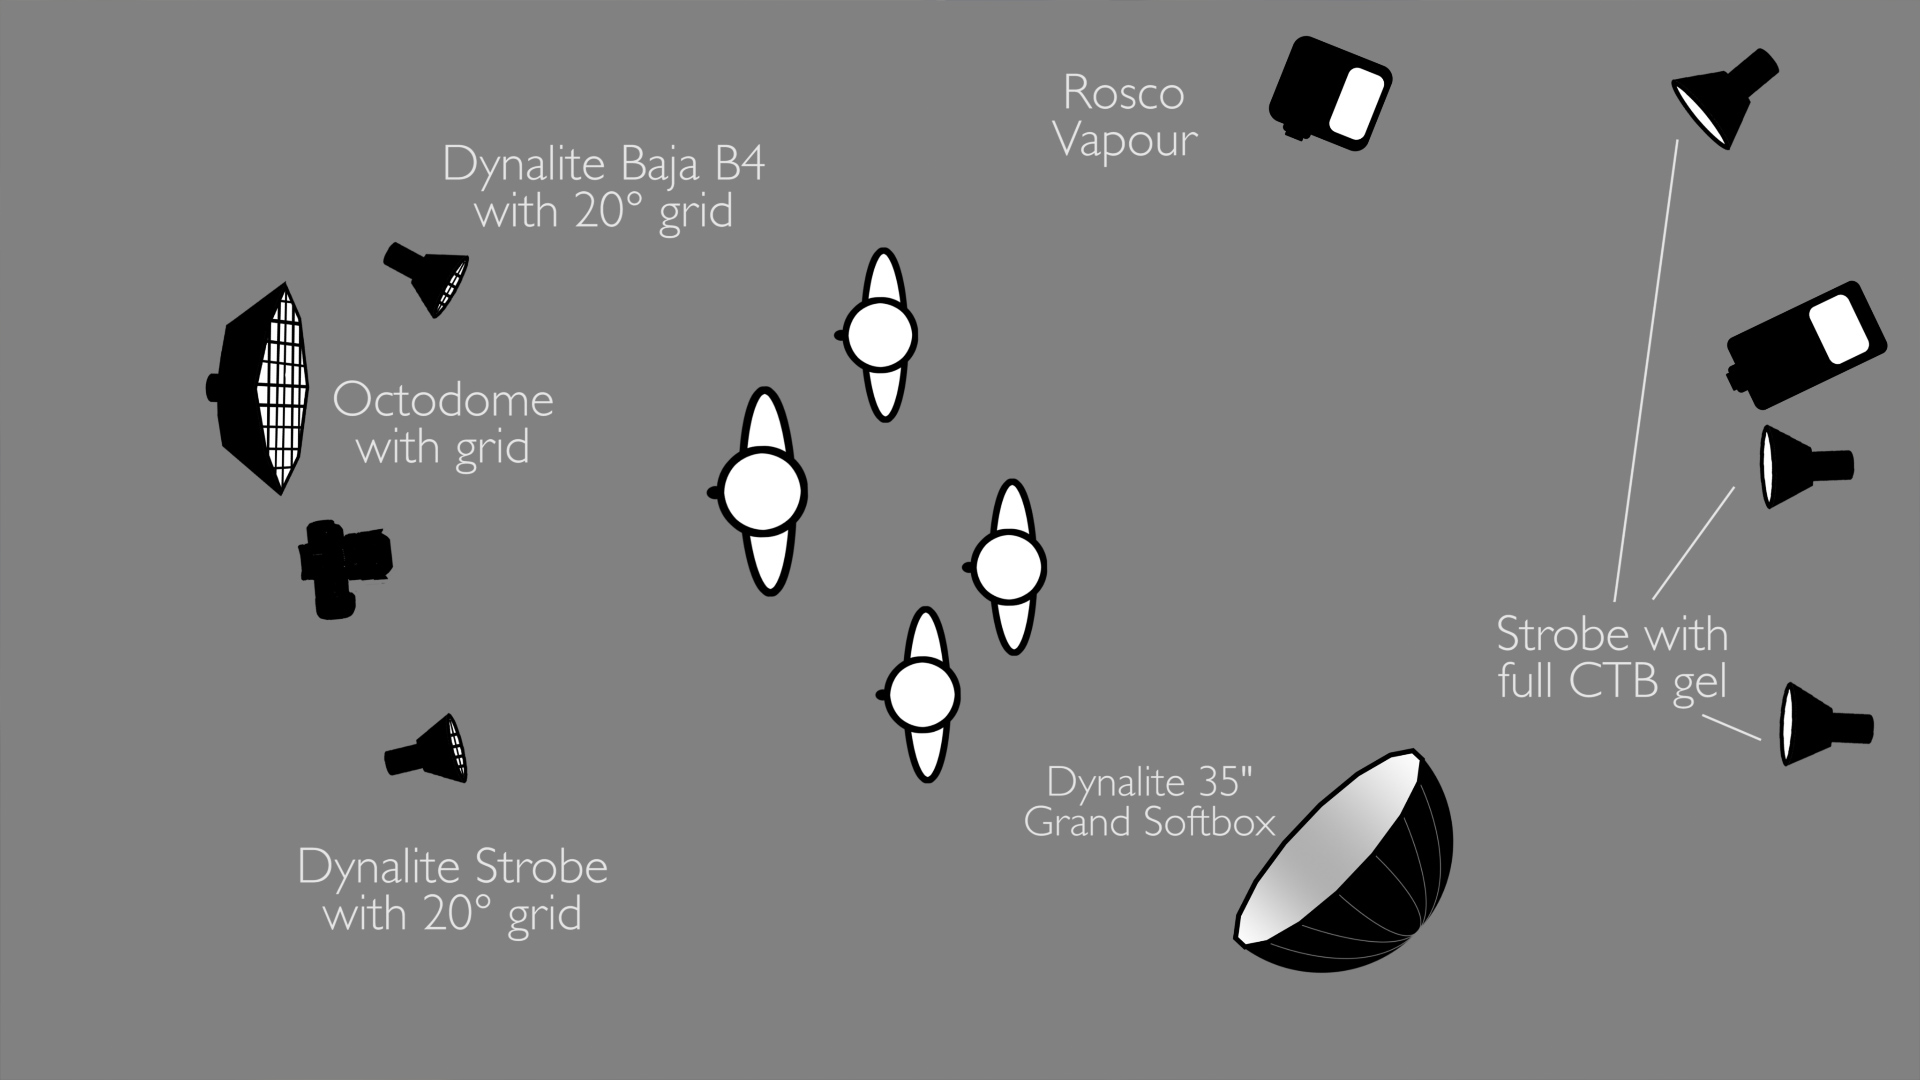
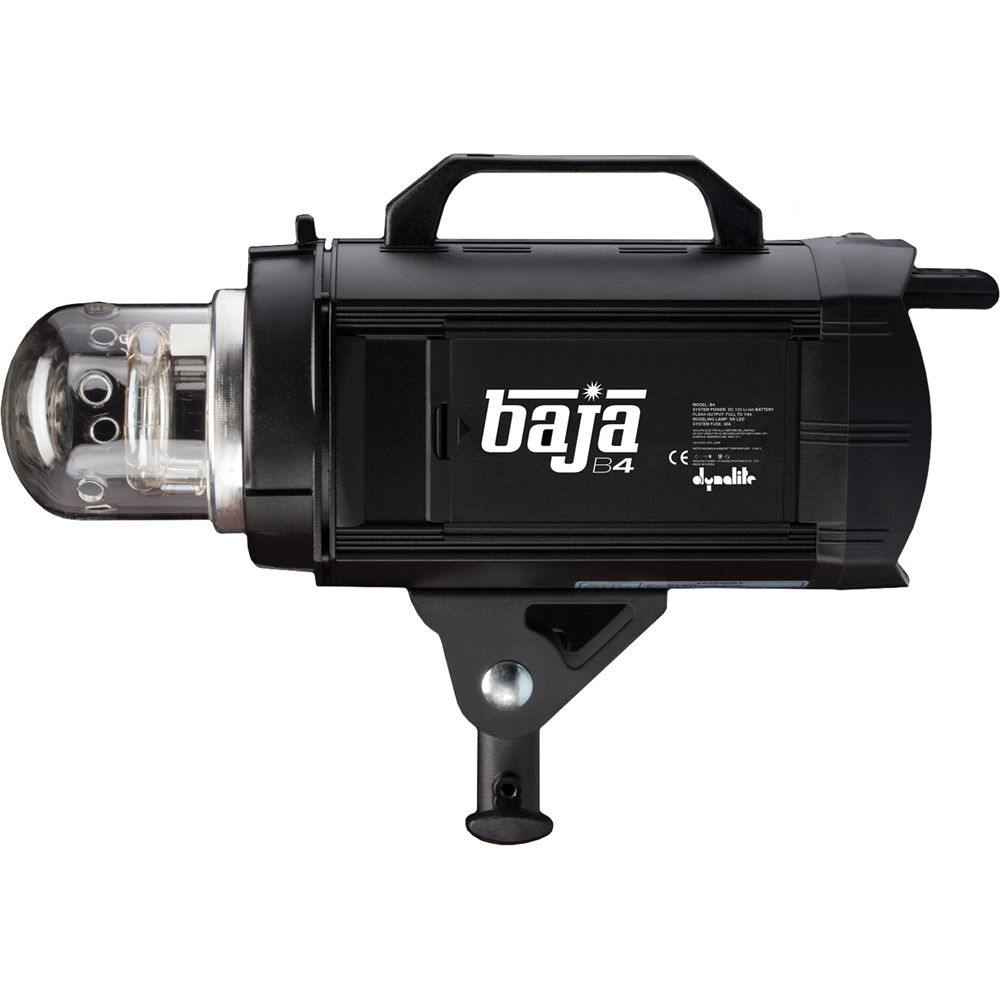
For our first light we’re using a Baja B4 with an octodome. We’ve got a grid on it. This going to light our man’s face up front and by turning that wrench just right we’re going to catch an incident angle and it’s going to make a nice reflection that gives a bright glow on that wrench. Not very hard to do, but you have to get it in the right place. It’s a nice punctuation for our shot.
Our second light was a grid on the camera right side on the two worker’s faces. It’s a 20 degree grade on their faces. I’m going to pan it right and left so it’s not too hot on one or the other. I’ll also tilt it up off the floor so it’s light on their faces and not so much on their clothing.
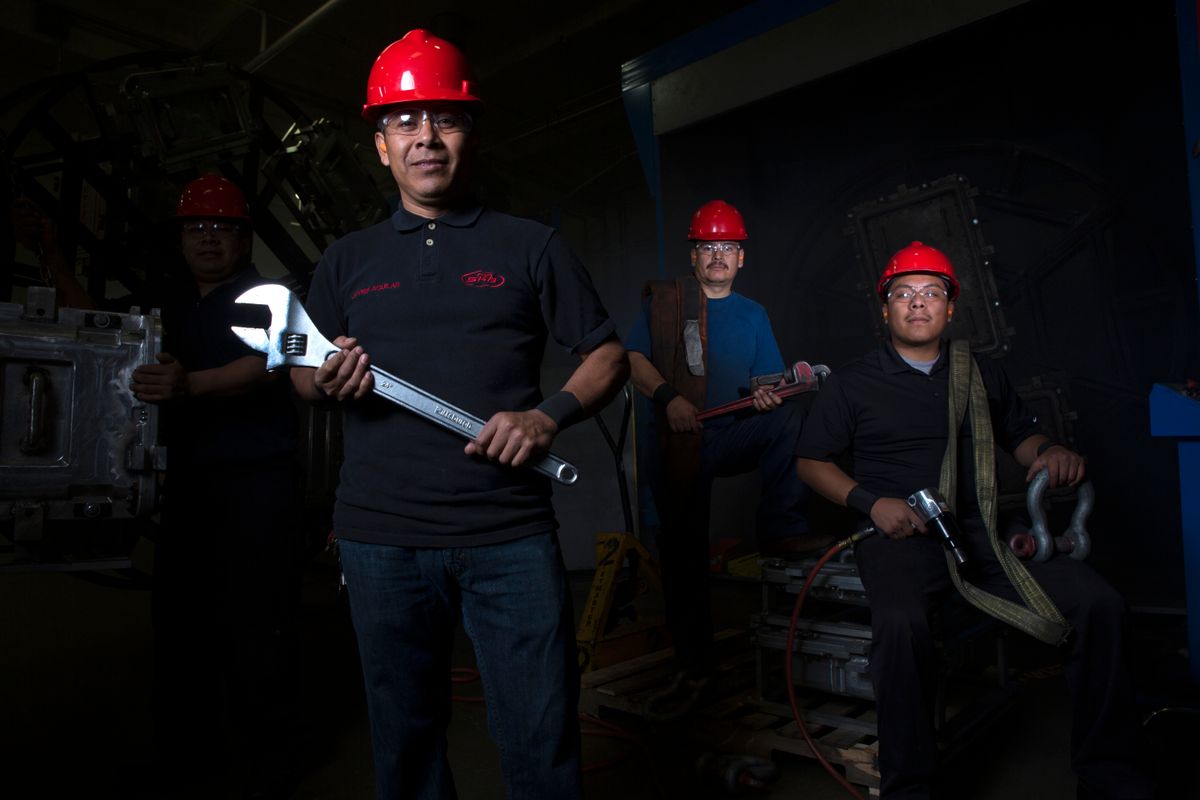
The reason I’m using grids on all the lights is because I want to create a moody lighting situation and I want to draw attention to their faces and really make them stand out in the shop.
Our next light is a grid on the man’s face on the camera left side. It’s a 20 degree grid. It’s set up just to light his face and nothing else. Now our four faces have about the same exposure. It’s a great starting point.
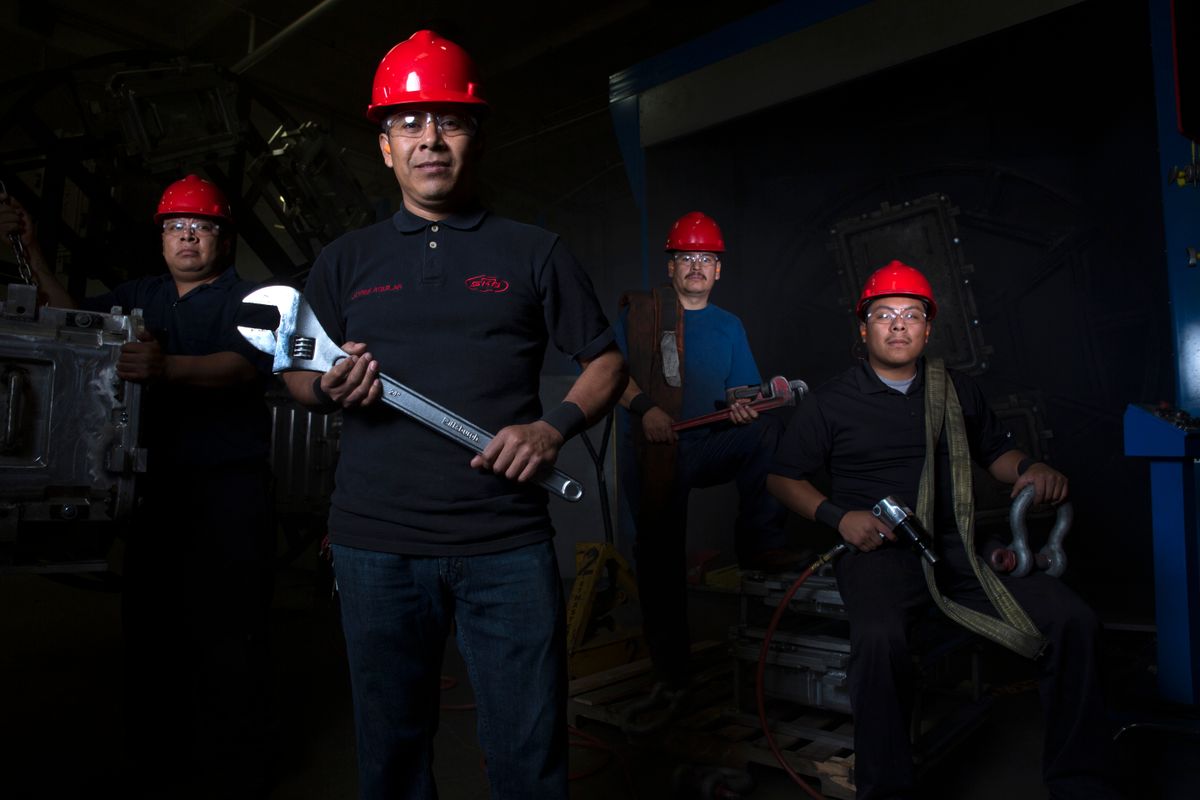
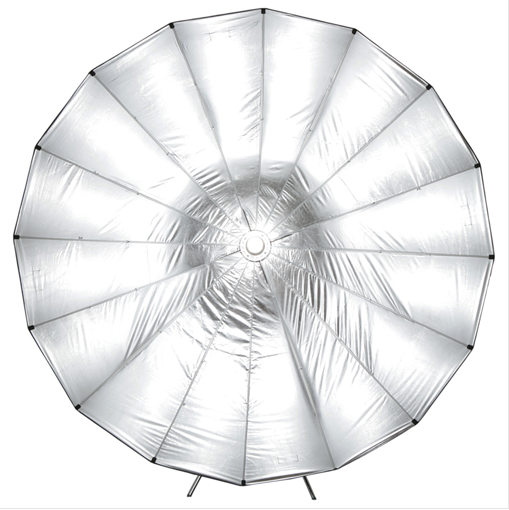
I’m going to add a rim on the camera right side. This is a new box I’ve started to use from Dynalite. It’s an open-faced GRB 35. It’s made by Dynalite and is a 16 sided softbox. It has a diffuser you put on the front. I’ve got that on in this shot. It softens the light out and gives you a gorgeous light. It has that silver lining in the box and it gives us a nice punch. Just a nice, soft overall even light. It’s a great rim light in this situation. It will give me a little light in the atmosphere when the smoke rolls forward as well.
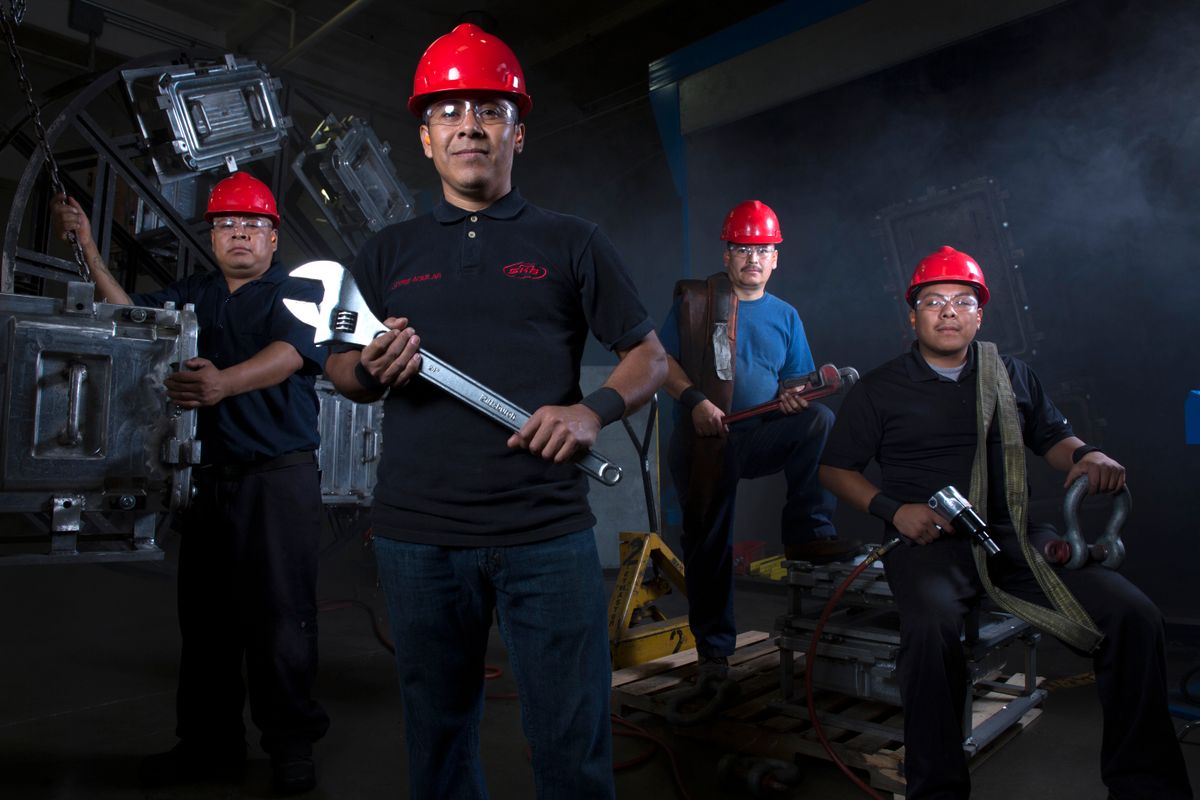
We now add a head in the background aimed straight for the machine. I’m going to put a full blue on that head so we get a nice blue in the background that’s going to shoot through the smoke.

Now we add a head with a full blue again on the camera left side in the background aimed to that machine on the camera left side.

Our last light was a head aimed at the smoke in the background in the middle. It’s meant to pick up all the smoke and the atmosphere we’ll see in the background. We’ve got a full blue on that as well. So full blue on all three of our background lights when we add our smoke to this it’s going to give us a nice look in the background.
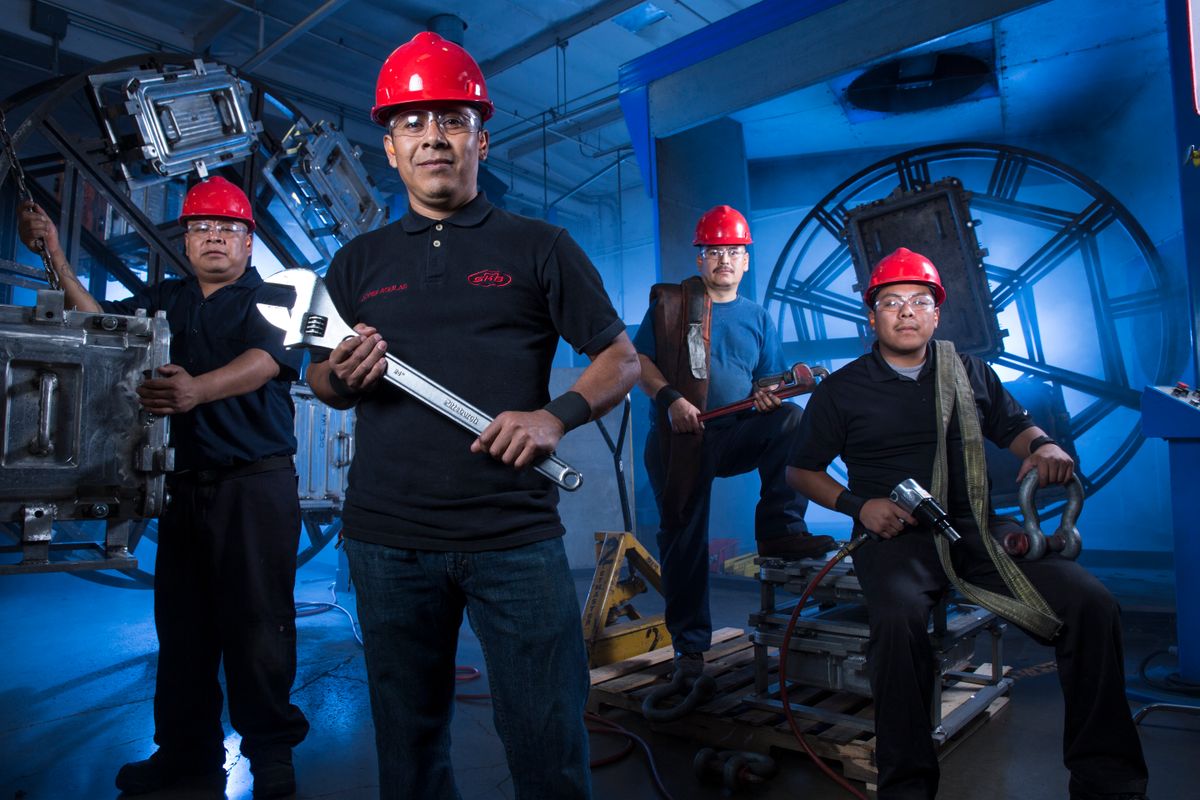
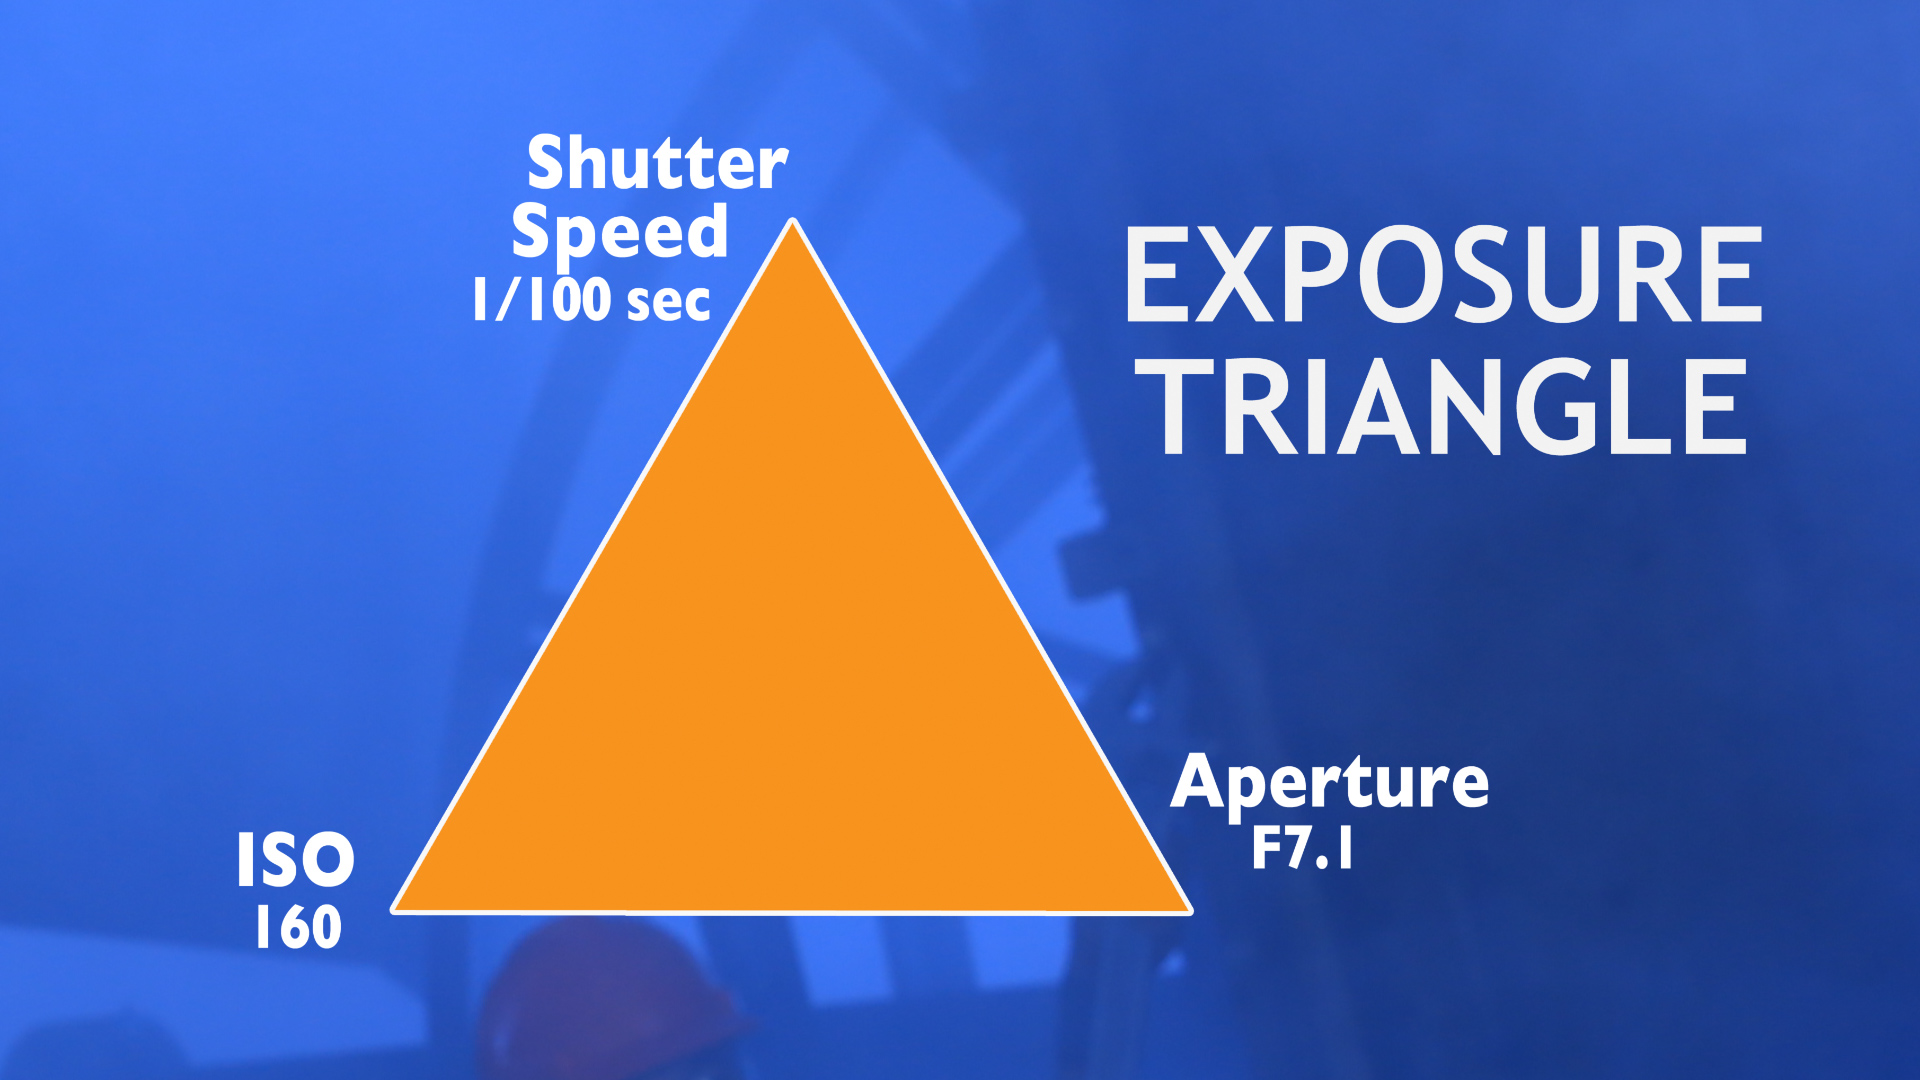
Our camera settings for this shot are 160 ISO, a shutter speed of 1/100 of a second, and an aperture of 7.1. I want a little more depth of field. So there’s our camera settings.
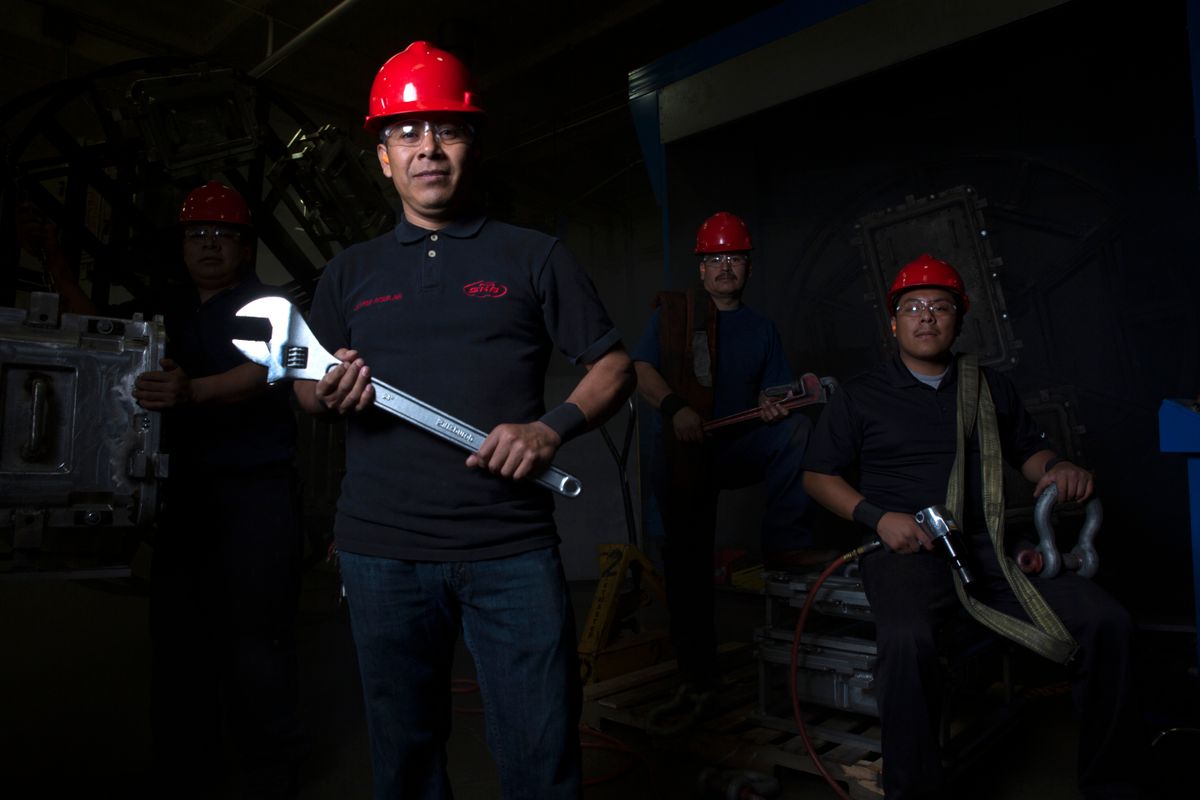
Here’s some of the unretouched images.

I had a great time shooting this industrial image. The guys out a SKB were great guys to work with, it was a great place to shoot, and we got a nice image. I hope this gives you some good tips on how to shoot industrial images, some things you can do to make them a little more interesting, and also some things you can do to be ready so you can quickly get in there, get your shot, get out, and not keep the machinery stopped too long. Keep Those Cameras Rollin’ and Keep on Clickin’.
Jay P Recommends for this Shoot


Video Transcription
Today on The Slanted Lens we are back out at the SKB factory shooting an industrial portrait. It’s one of those assignments that can go really easy or hard, so let’s get started and see what we can do.
When I say industrial portrait, it’s not a lifestyle portrait, it’s not a documentary
style portrait, it’s an industrial portrait, which is more commercial than it is portrait. It’s about making the factory and the people look good. It’s more of the kind of portrait that you would see in an annual report, or on a company’s website. Something they would use to represent the company. With that in mind I want the people and the place to look very inviting. So let’s take a look at some tips on how to make the happen.
Number one. One of the things you can do is to use color to make the drab ordinary environment you’re shooting in, like the machinery and everything, look more interesting. I’m going to do just that with this image. I’m going to add a blue gel in the background to add interest, I’m then going to add smoke to catch the color and to get rid of the ceiling and the parts of the factory that I don’t really want to see that really aren’t that pretty.
Number two. I’m going to dress the workers in company shirts to bring order and uniformity to the guys in the image. This makes the company look like they pay more attention to detail and are more organized and methodical in the work place.
Number three. I want some dramatic element that gives visual interest. I’m going to stand a person up front with a great big wrench. I’m going to have him turn into the light so he catches an angle of incident, and to give us a nice glow off from that wrench and kind of give us a little bit of an item that stands out.
Number four. I want them holding tools and equipment that they work with, so it connects them to the job. It makes it feel like they’re all apart of this process.
Number five. These guys are working around big machinery, so don’t forget to make sure that they’re wearing the proper safety equipment. The right shoes, a hard hat, the safety glasses, the earplugs, gloves in some cases. Just make sure you talk to the people there, and make sure that they really represent the company correctly, that they are wearing the proper safety equipment. Nothing kills a shot faster than not having on the hardhat or something, and it makes it unusable to the company.
So let’s move on to doing our shot, now. Time is going to be of the essence. This machine makes money for the company, and every minute that it’s not working are cases that it’s not making for SKB. So we’re not going to have all day to take this image. We’re going to have to be ready in short order. So here’s some tips on how you can be ready to swoop in the second you turn the machine off so you won’t hold things up and get your shot as quickly as possible.
Number one. I’m going to set my strobes up on stands. I’m going to test to make sure that they are all firing. Make sure that all of the radio slaves are working, that all the strobe heads are working.
Number two. I’m going to find all the power outlets that I can, and I’m going to run cable and cords to the correct places as close as I can get them while the machine’s still working, so that I can quickly pull power. Always have an extra outlet, extra power, because you’re going to need it.
Number three. We need to get the shirts pressed. Going to get them ready to put them on the employees so that they’re ready the second they’re done.
Number four. I’m going to pick my angle, going to pick my lens, I’m going to see exactly what I want, so that I know when it’s time I can quickly get my shot.
Number five. Warm up the smoke machine. Don’t wait until they shut the machine down to plug your smoke machine in. Even if you plug it in on the side and letting it warm up, and then you can just unplug it, run it to where it’s going to work, plug it back in and it’s ready to go. But if you have to start those things from scratch they take a little while to warm up.
Number six. Get help from a client or other workers that are in the area. They can help you carry your stands in, they can help you to pull cords, and kind of get it organized ahead of time. Say “I need you to pull this and bring it here. I need you to haul a stand in here.” Get things set up very quickly.
Number seven. Have an extra strobe head that you don’t think you’re going to need. Have it up, plugged in, and ready to go, because then when you’re shooting you go “Uh. I just need a little bit of light in that guy’s face.” You can quickly get that light into place and help it to solve your problem. Always have an extra strobe head.
So there’s some tips on being ready so you can swoop in and get started. I’m sure there’s a lot of other things you can think of, put them in the comments, we would love to hear from you.
You know when the time comes to turn off the machine and start the setup, my mind just starts to race. You know, first I want to move the heavy parts and machine into place, like I want to get this big crane and this mold into place. I want to get a pilot jack in there for somebody to sit on. I’ve kind of thought about all of these things ahead of time, but now it’s time to get them all into place;everything happening so I can get started.
Okay now for our first slot we’re using a Baja B4 with an octodome, we’ve got a grid on it. This is going to light our man’s face up front and by turning that wrench just right, we’re going to catch an instant angle, going to make that nice reflection give us a bright glow on that wrench. Not very hard to do, but you got to get it in the right place. It’s a nice punctuation for our shot.
Our second light was a grid on the camera right side on the two workers’ faces. Its a 20 degree grid on their faces. I’m going to pan it right and left, it’s not too hot on one or the other. I’ll also kind of tilt it up off the floor, so it’s right on their faces, and not so much their clothing.
The reason I’m using grids on all these lights is because I want to create a moody lighting situation. I want to draw attention to their faces, and really make them stand out in the shot.
Our next light is a grid on the man’s face on the camera left side. It’s a 20 degree grid. It’s set up to just light his face and nothing else. Now our four faces have about the same exposure. It’s a great starting point.
I’m going to add a rim on the camera right side. This is a new box I’ve started to use from Dynalite. It’s an open face GRB 35. It’s made by Dynalite, it’s a 16-sided softbox, it has a diffuser you can put on the front, and I’ve got that on in this shot. Kind of softens the light out, it gives you a gorgeous light. It has that silver lining in the box, it gives us a nice punch. Just a nice soft overall even light. It’s a great rim light in the situation. It’ll give me a little bit of light in the atmosphere when the smoke kind of rolls forward as well.
We now add a head in the background aimed straight to the machine. I’m going to put a full blue on that head, so we get a nice blue in the background. It’s going to shoot through that smoke.
We now added a head with a full blue again on the camera left side in the background aimed to that machine on the camera left side.
Our last light was a head aimed at the smoke in the background, in the middle, it’s meant to pick up all the smoke in the atmosphere we’ll see in the background. We got a full blue on that as well, so a full blue on all three of our background lights. When we add our smoke to this, it’s going to give us a nice look in the background.
Our camera settings for this shot are 160 ISO and a shutter speed of 1/100th of a second, an aperture of 7.1. I want a little more depth to field. So there’s our camera settings. Here are some of the un-retouched images.
I had a great time shooting this industrial image. The guys out at SKB were great guys to work with. It was a great place to shoot. We got a nice image. I hope this gives you some good tips on how to shoot industrial images, some things you can do to make it a little more interesting, and also some things you can do to be ready, so you can quickly get in there, get your shot and get out, and not keep the machinery stopped too long. So keep those cameras rolling. Keep on clicking.
For 25 years I have estimated in the photo industry. In the beginning it was a very daunting and overwhelming task. In times I’ve put together a formula to help me to be able to get the jobs, to estimate the jobs, and make that process not so painful. I’m going to share that formula with you.
If you go to theslantedlens.com/estimating, we’re selling a digital download there that’s going to teach you all the things that I have learned after 25 years in the industry: pricing for both video, for still photography, for weddings, for portraits. Go to theslantedlens.com/estimating. You’ll get all of the information there in that digital download. Don’t forget to subscribe to our channel, and go to the website.