

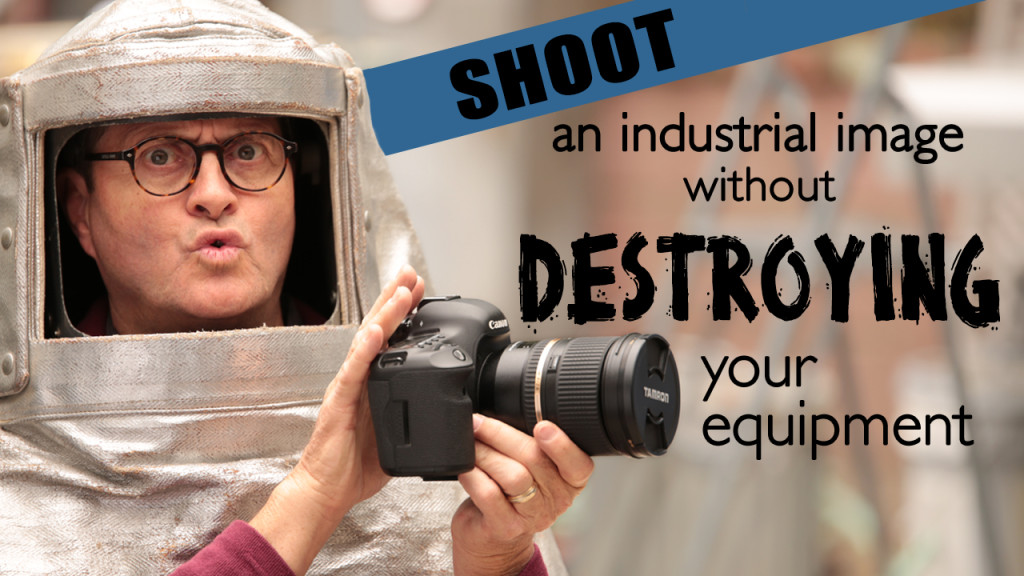

We are out at the SKB case factory again and today on The Slanted Lens, I am going to show you how to shoot an industrial image without destroying your equipment. We are shooting in a spray booth where they blast the case molds with BBs to give the metal enough texture to allow a newly formed case to be easily extracted. I want to get a shot of the spray machine in action, but that means that my lights and camera will be in there when all the BBs are flying around.
The first thing to do in a situation like this is to get an idea of what is going to happen when the machine is running. I wanted to find this out before I brought my equipment in and put it in harm’s way. The operator put on thick gloves and a big helmet/mask that reminded me of something Jules Verne would have written about. I got a hard hat and safety glasses. I was a little worried about going in the booth at first but it wasn’t so bad. BBs were flying everywhere, bouncing off the walls and the ground – this is going to be difficult.
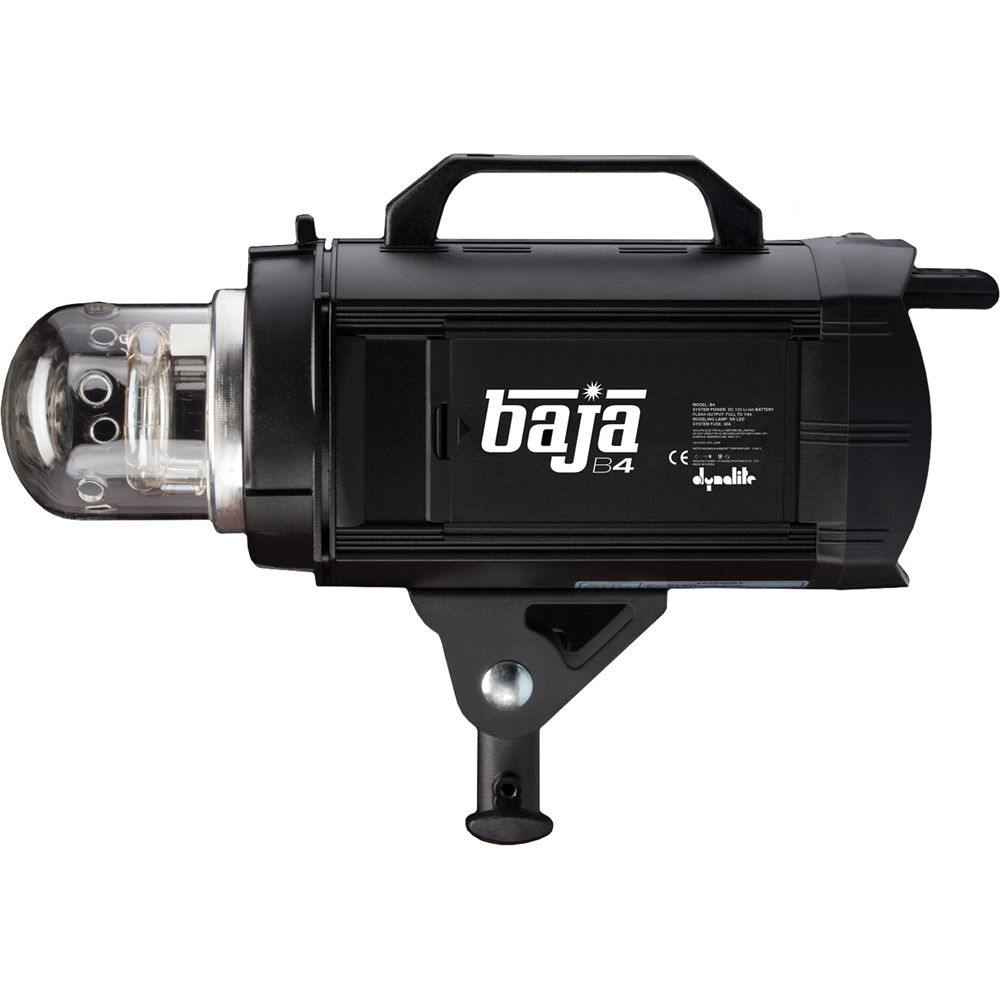
To protect my new Dynalite Baja B4 monoblocks, Lars got some 1’x1’ pieces of plexiglass and taped one on the front of each light. He then taped up all the vents and wrapped each light in a plastic bag. I was worried the lights might overheat but they did not. In this situation, I was so glad I had these monoblocks because I can control them from the remote on the camera. Can you imagine if we had to unwrap the lights to make adjustments? That would have been a mess.
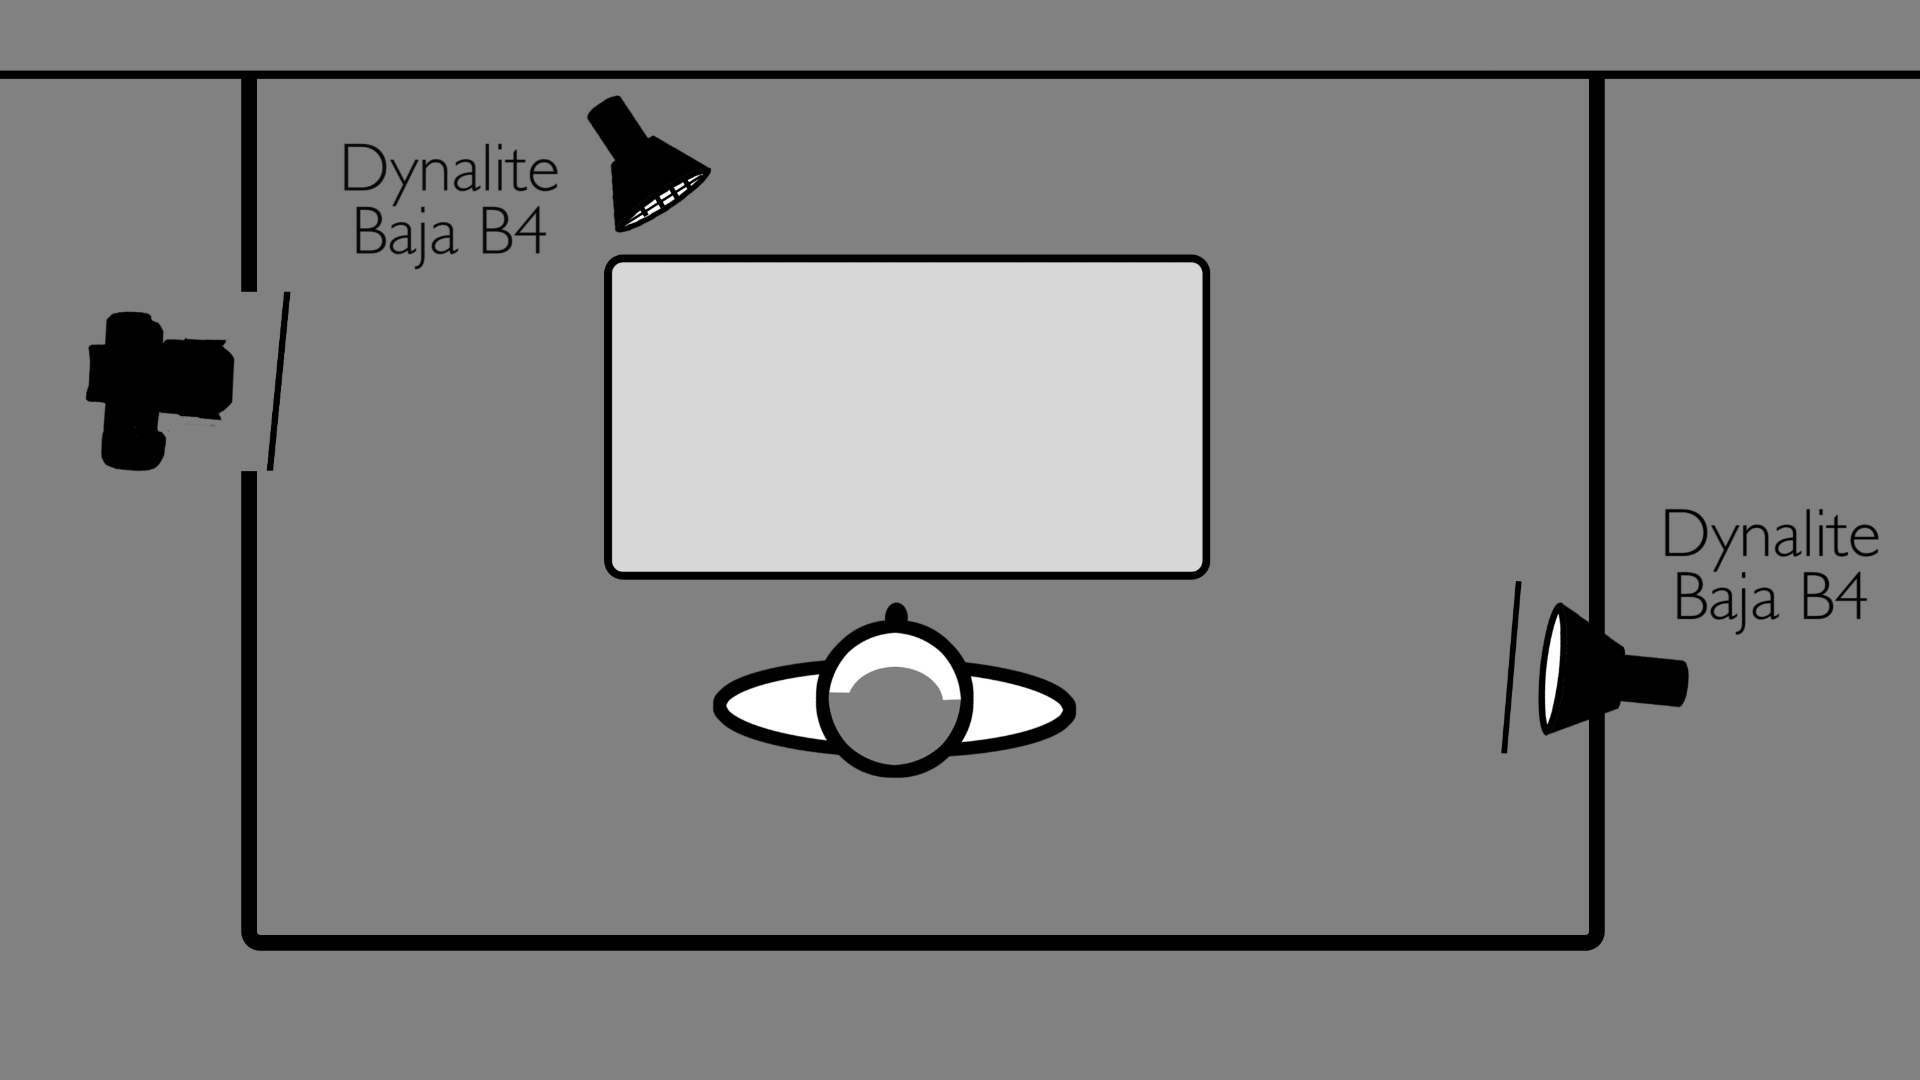
I placed the first light from behind to back light the BBs and act as a rim light on the operator. I will only raise this light up to his height so he blocks the fixture from the lens. The second light will be the key light and in this small space, we had to get creative on the placement. Using a super clamp, I clamped a Monfrotto Magic Arm into it’s jaws. Then, I took a head from a C-stand and tightened the end that goes onto the stand to the spud on the super clamp. The light attached to the Magic Arm and the C-stand head attached to an L-bracket that was sticking out from the ceiling. The key light will have a 40 degree grid to prevent light from spilling all over the booth. Here is our lighting diagram for this setup.
I attached another one of the plexiglass squares to a C-stand to protect myself and the camera. Yes, a humongous 1 ft square piece of plexiglass was all the protection the camera and I will have. I took a couple sample shots before the BBs were turned on to make sure my lights and camera were set correctly. I am shooting at 160 ISO, f7.1 and a 1/100 shutter on my Canon 5D Mark III.
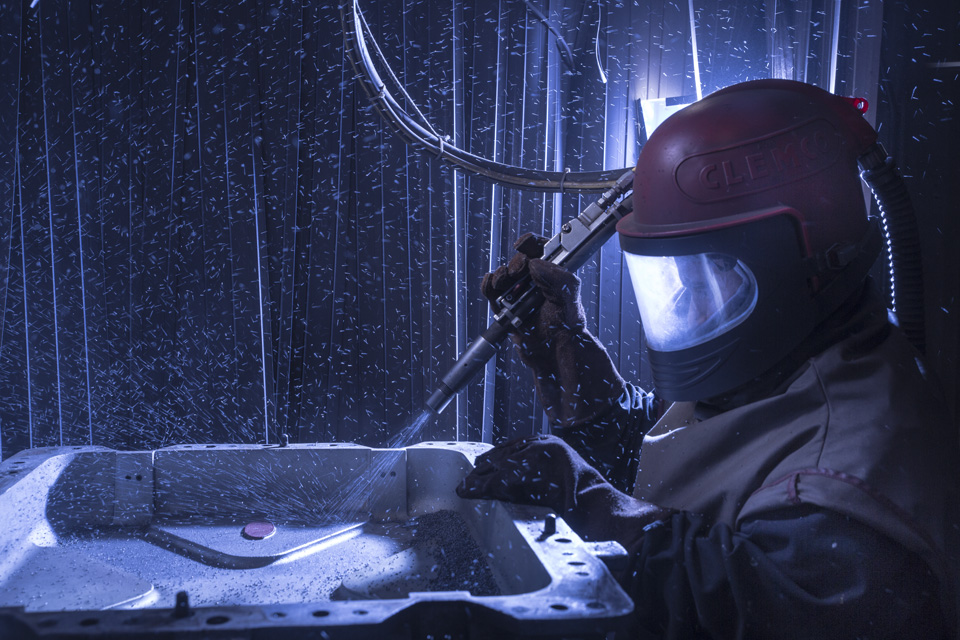
Here is the shot I chose for the final, before any retouching.

I brought this image into Camera RAW to brighten it up and take out some of the blue.
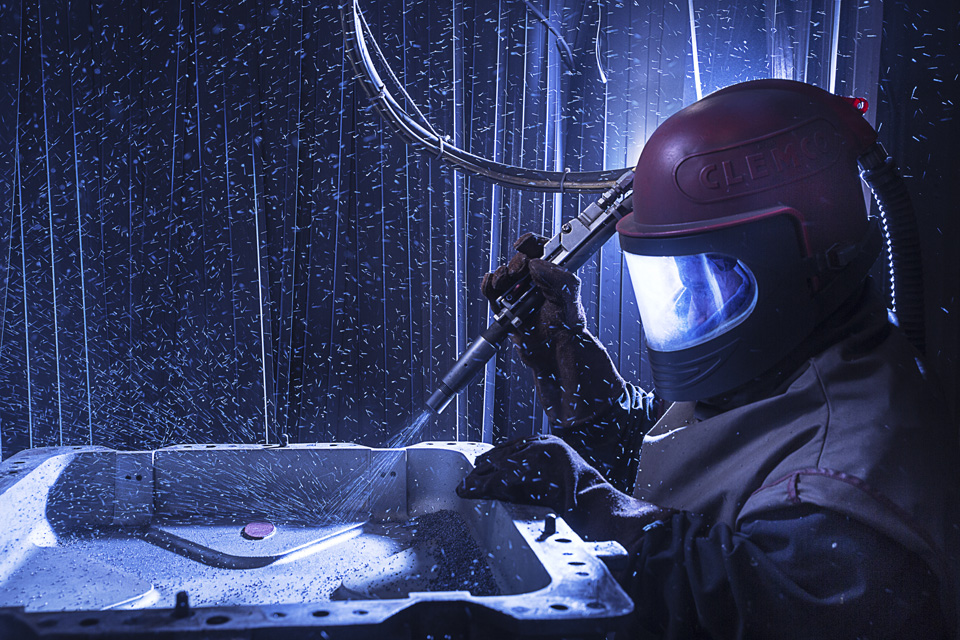
Then Julene did a little touch up to take out the light behind his head and just clean it up a little. Here is the final image.
The images from this shoot turned out really well. I could only stay in the booth for short amounts of time though because the BBs were going everywhere – hitting me from every direction, going down my shirt, getting in my shoes. Meanwhile my assistants all dove outside for cover. Figures. All joking aside though, this was a lot of fun. I was definitely ready for a shower though when it was all over. Take a look at some of the best images from the shoot before retouching below. Hope this inspires you to take new and unique photos now that you know how to protect the equipment. Keep those cameras rollin’ and keep on clicking’.

Jay P Recommends for this Shoot


Video Transcription
We’re out here at the SKB Case factory and we’re going to show you how to do an industrial image without destroying your equipment from falling BBs. We better get started. See what we can do.
Hi. This is Jay P. Morgan. Today on the Slanted Lens we’re shooting out of the SKB factory.
I was not kidding about the falling BBs. We’re shooting in a spray booth where they blast the case molds with BBs to make them just rough enough to let go of the plastic when the mold comes apart.
I’m going to get my camera right in the spray booth and get a really cool shot. The first thing you do when you arrive at a place like this, you’re going to do an industrial shot, is to get a good idea of what’s going to happen inside when they turn that machine on.
I wanted to know that before I bring my camera into the spray booth. Before I bring my equipment into the spray booth I want to see what’s going to happen when those BBs start flying everywhere so I have a good idea of how to protect my equipment. So I put on face protection and headed in to see what’s going on.
The spray master put on his Jules Verne deep sea diving mask and gloves and started blasting away. I was covered in BBs at once. It was just BBs everywhere. This is going to be very difficult to protect this equipment.
The first thing that I do know is that I’m going to want to back-light all these BBs so I can see them just a little bit better. So I placed our first light from behind, to back-light the BBs and to rim light our guy. It was up just enough to back-light the BBs but not up so high that it would reveal itself from behind him. So he’s going to hide it for us.
To protect our lights we take a one foot square Plexiglas sheet in front of the lights to protect the flash tube and the modeling light. We also taped Gaff tape over the top of the vents to make sure the vents are completely covered. We left just a little bit of space so it’ll breathe, but kind of covered it over the top. The last thing we did is we taped plastic around the heads to keep the BBs out.
I was concerned the heads were going to overheat, but it didn’t. It worked out really well. I was so thrilled to have the Baja B4’s in this situation because they’re battery portable. They also give us the ability to dial them up and down at the camera. That’s a dream.
You got a remote that sits on top of the hot shoot of the camera. You can isolate them one or two and dial that head up or down. It gives you the ability to change the power setting on these Baja’s without having to crawl up there and look on the back and I mean that just would’ve been a disaster in this situation.
You know that’s really the future. The Monoblock doesn’t have that feature. I would not buy it at this point. I mean that’s why packing heads was so popular because the head’s up in the air and you can ratio the power on the ground where the pack is at.
Now the good Monoblock’s set up like the B4’s. You’ve got the ability to control that right from the camera any one of your lights on set. That’s fabulous.
Our second light is for his face and the front of his body. I saw an L-bracket hanging from the roof and it gave me an idea of how we could hang this light in this very tight space.
Using a super clamp, you can get these at Samys.com. They’re made by Manfrotto, by Avenger, Kupo. There’s a couple companies that made a super clamp.
So using a super clamp, I clamped the magic arm, that’s made by Manfrotto, into it’s jaws. Then I take the head from a C stand and tightened the end that goes on the stand to the spread on the super clamp. I then used the C stand head to tighten into the L-bracket coming out of the ceiling. The light attaches to the spread on the end of the magic arm and voila.
With a C stand head, a magic arm and a super clamp, we got our light hanging from the ceiling. I put a 40 degree grid on this light to control it a little bit so it won’t spill all over the room.
Again we’ve used that 12 inch piece of Plexiglas, taped to the front, to protect the flash tube and the modeling light. We then put gaff tape on the top to protect the vents and last of all, we wrapped in plastic. I did add a little CTB, just the rim light of the back-light to kind of cool off everything off and make it look interesting.
I put Spencer in to test the lights before starting. He looked great. Using a C stand to hold up a one foot square Plexi shield on the camera side of the blast booth, I was ready to start.
It’s a massive one foot square piece of Plexi to protect me and the camera. If I push the camera close enough to the Plexiglas I’ll not see my reflection any longer. If I pull away a
little bit I see my reflection in the Plexiglas. So I have to get the camera right on the Plexiglas and that gets rid of all the reflections around me.
Okay, when the BBs started they were going everywhere. They were going down the back of my neck. They’re bouncing up from the floor, underneath my mask, into my face. I could only stick in there so long then I’d have to stop and take a break. We’d make some adjustments, change the lights a little bit, look at the images, change some lights, and then I’d go for a another round.
All the crew dove outside and closed the door. I don’t know what I expected. Maybe a little back bone or something. But, no. I got my shot and it looked great. At one point I did lower the light in the background down a little bit so its emphasis was more on the spray of
the BBs coming out of the nozzle and less on the back-light of the person and that helped it look a little bit better.
It was a spray of BBs. It was pretty intense but pretty cool looking. I did go into camera raw and up the contrast and lower the blue here just a little bit to give me my final image before Julene retouches. This was a lot of fun. It was dirty and I was ready
for a shower when we finished but it was worth it. There were BBs everywhere. Even the way we put plastic on the lights and taped the lights, when we took them apart,
BBs were falling out of the tape, out of the plastic. There were BBs everywhere but we had a great shoot, a great image, very pleased with what we got here, and our equipment survived without any problems. So keep those cameras rolling. Keep on clickin’.
So there’s a look at how to do an industrial shot without destroying your equipment from falling BBs. Don’t forget to subscribe.