

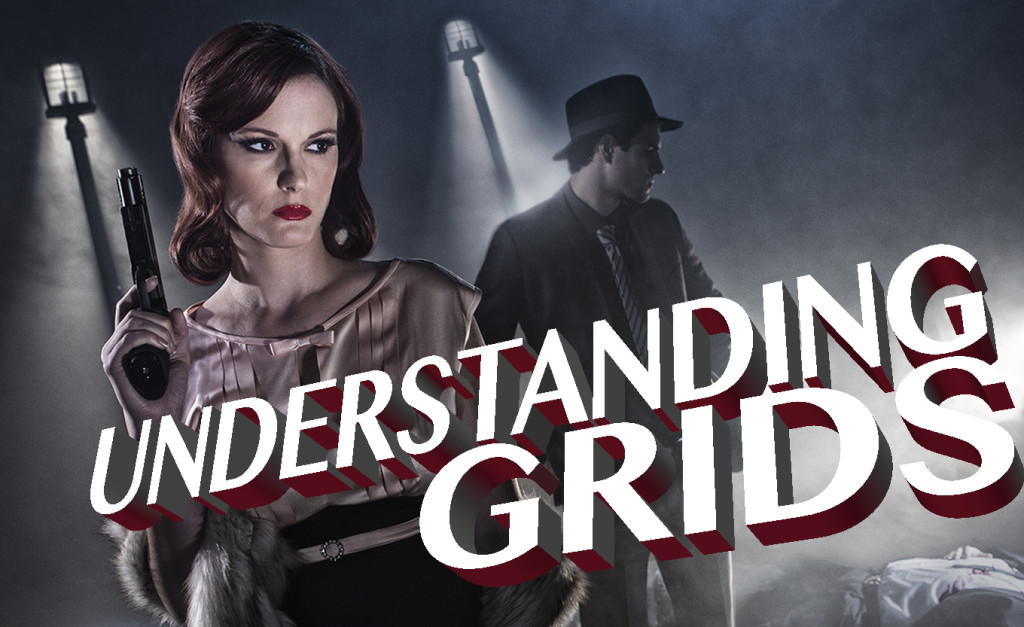

Today we are shooting at the YouTube Space for the first time. It’s a wonderful facility with great equipment and helpful people. I have been looking forward to shooting here for some time and today is the day! We are going to shoot a film noir shot using grids on strobe heads and mix that with a similar looking light from the film world called a Source 4. I want to show how grids work and how you can light with them while at the same time mixing them with tungsten light.
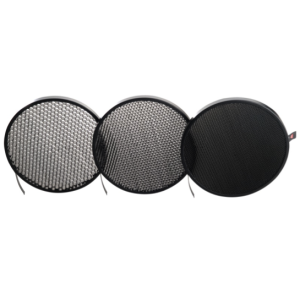
As we have covered in past lessons, grids are a honeycomb metal insert that go into the reflector. They restrict the area of coverage for the strobe. I love them because they help give you more control of the light.
First, let’s take a look at how the different sizes of grid look with our subject against a white wall. The light is six feet from the wall and the camera is set to f6.3 aperture with a 1/60sec shutter. With a 10 degree grid, you get a very small area of coverage. The light does not fill the area outside of the area of coverage. You get about a three foot area of coverage. Each time we step up the grid, we get a larger area of coverage and gain about two-thirds of a stop in exposure.
The area of coverage with a 20 degree grid is about five feet.
It increases to six feet with the 30 degree grid. Less restriction of the light allows more light to pass through and gives us a brighter exposure.
The last grid is the 40 degree. It covers about eight feet and is bleeding into the shadow area more than the other grids did.
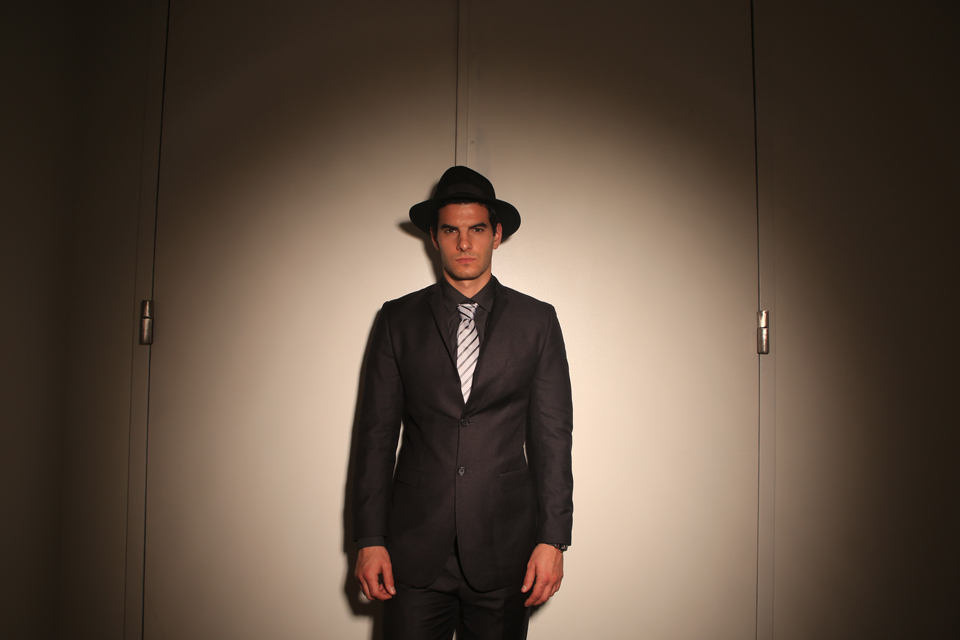

Grid light is very directional and not soft. The spill in the shadow areas of the image increases as you go to larger grids. Grids are perfect for a film noir shoot with hard light and deeper shadows. Let’s take a look at our shoot and how we set it up.
The Set
This is a simple set: a black curtain in the background, and black plastic on the floor with some water puddles to make it look like it just rained. We will now use two DIY street light poles made out of ABS pipes with carriage lights on top. To make the light poles, I took a four inch ABS pipe and stepped it down to two inches using a step down collar. This will give the light some shape. I then bolted an end cap to a piece of 3/4 inch plywood and then just shoved the pole in. The carriage lights came with screws that simply tightened to the top of the pole. There you go for $60 each, we have two DIY street lights.
The Mood
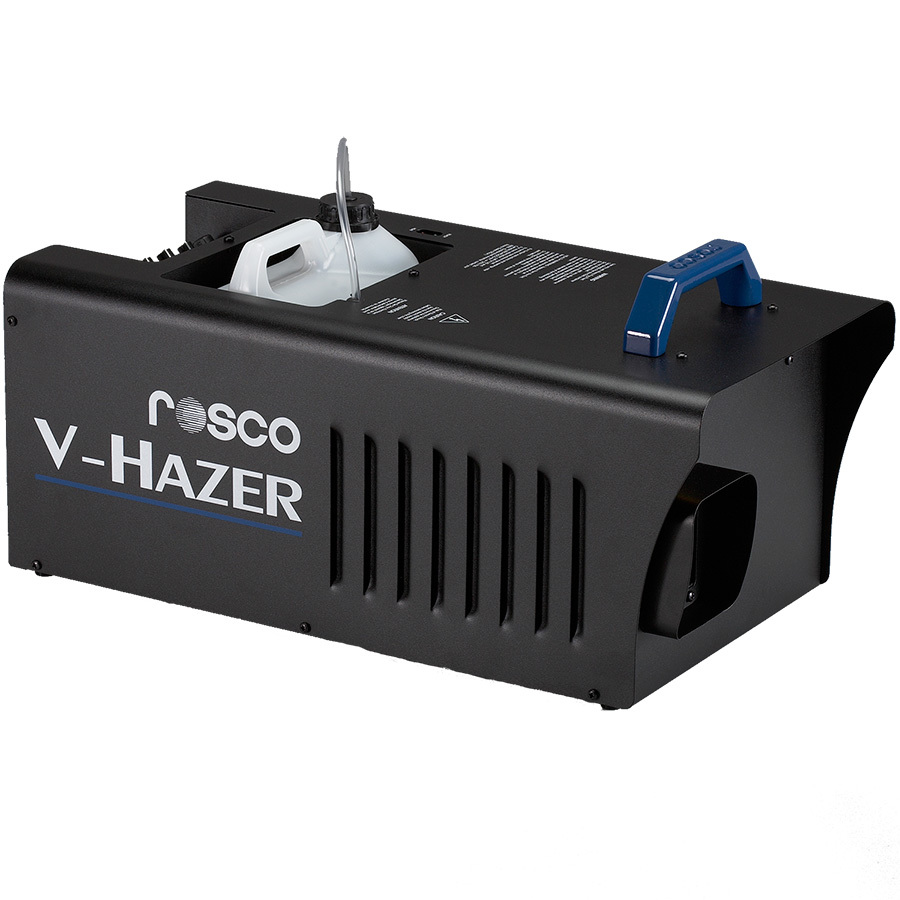
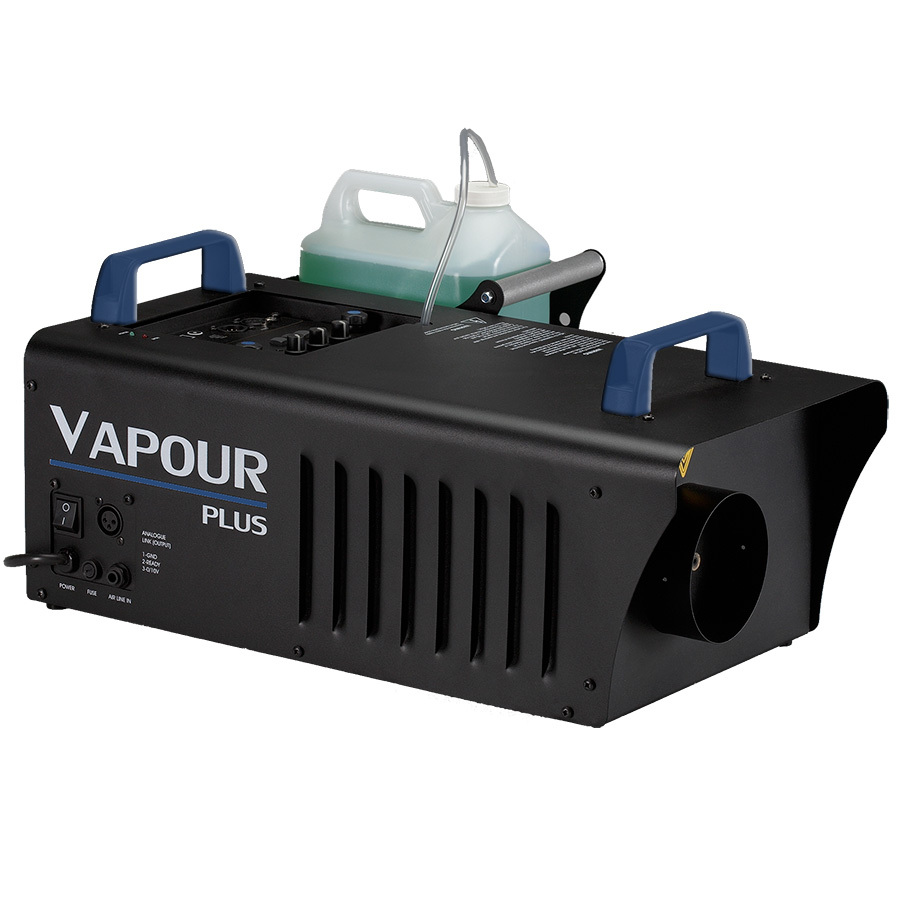
We are going to use the Rosco V-hazer to fill the room with haze and create the mood. It is not an exact science but once you get it balanced, it will give you constant haze all day long on a gallon bottle of fluid. I love this machine! I also used the Rosco Vapour Plus Fog Machine to add smoke at times and give the image depth.
The Light
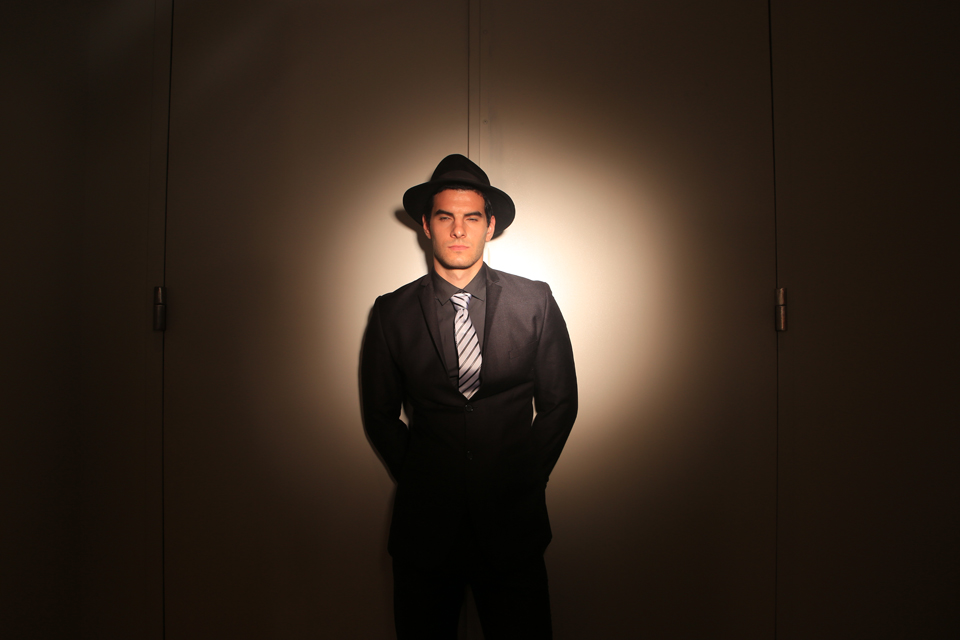
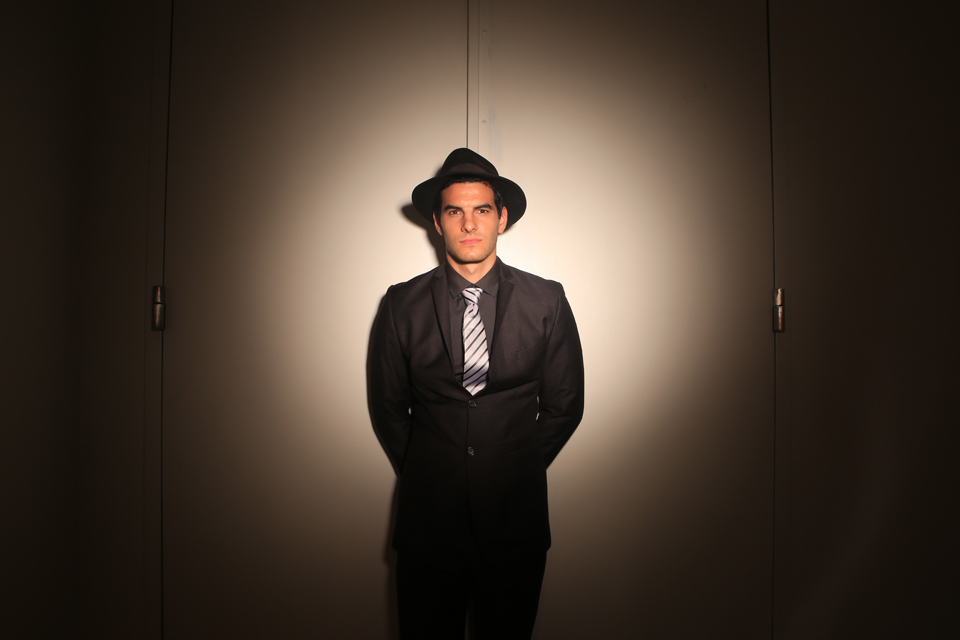
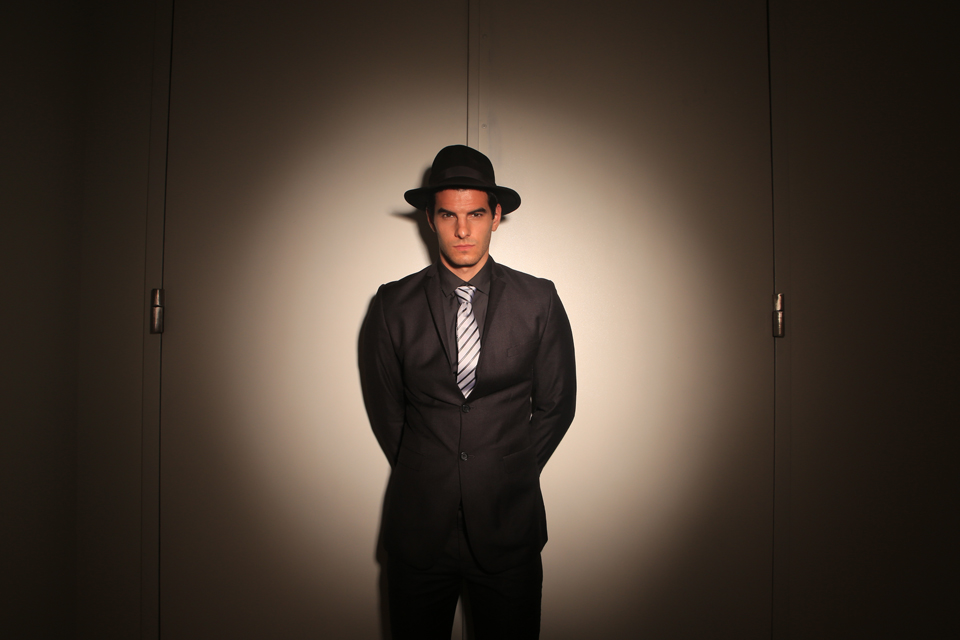
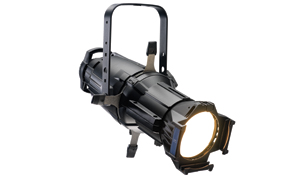
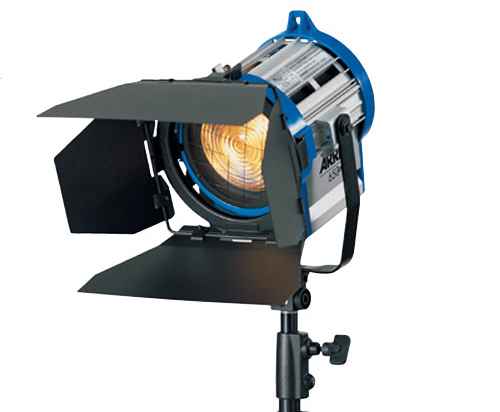
I wanted a car, but it canceled on me at the last minute so instead we took two Arri 650s and put them on a cross bar and used this as our car lights. For our street lights, we will use a Source 4 light on a stand aimed down toward the floor. Source 4 lights are a very pinpoint light source and can focus so that the light shaft will be sharp. We are going to shape the smoke with the shutters so it looks like the light is coming off the street lights we created. We will set our white balance on tungsten and gel the strobes with CTO.
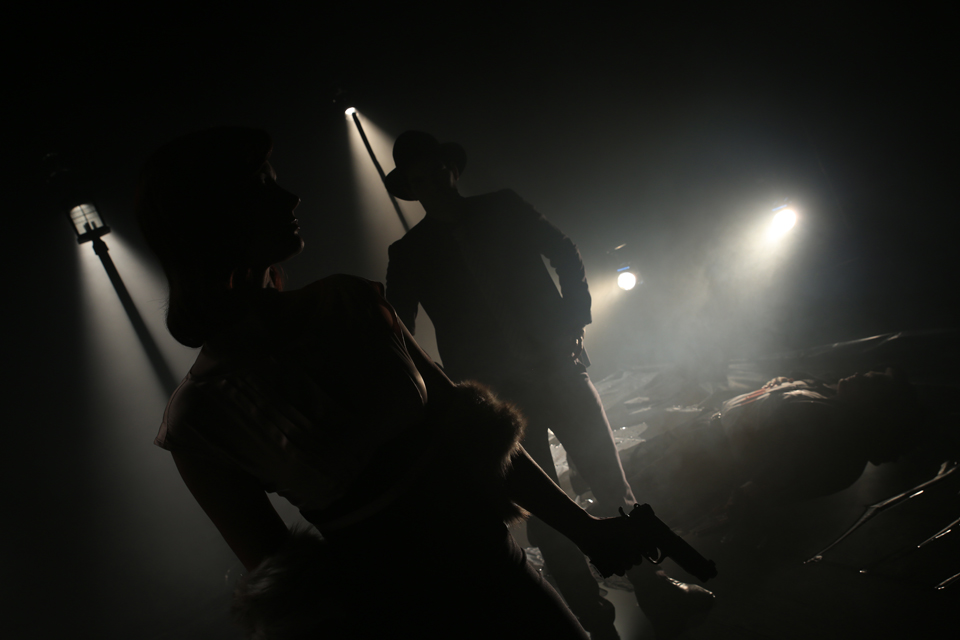
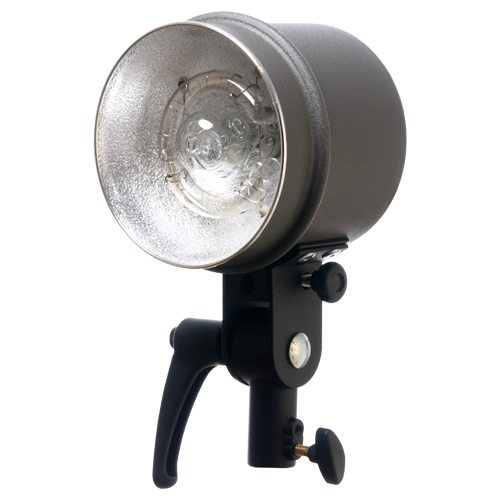
The first strobe is a PhotoFlex FlexFlash in the background. I am not going to put a gel on this light because I want it to go blue and add depth.
The second strobe is a FlexFlash on camera right with a 20 degree grid spot. This will light our dead guy and imitate the light coming off the car. We will add a full CTO or orange to correct the strobe, which is daylight, to tungsten.

Now we will add our key light on her face. This is a FlexFlash 400 watt second light with a 10 degree grid. I will have an assistant hand hold this light and keep it pointed at her nose. That is the downside to grids, they are very narrow in the area of coverage so you have to babysit them.
Next, I will add a Dynalite RoadMax head with ND as a fill from the front and shoot it through a full net.
The last light is a rim light from camera left. It has a 40 degree grid and will rim her hair and cover his face. We can pan it right or left to increase or decrease the light on his face.
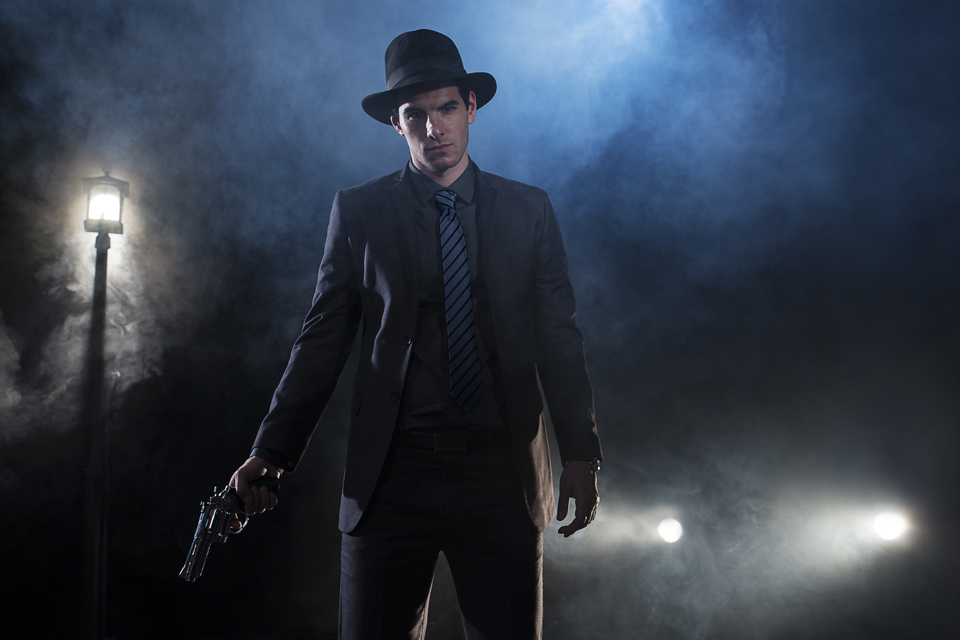
I am shooting on the Canon 5D Mark III with a 24 to 70mm Tamron lens. Using grids for this shoot was the perfect choice. They are directional and hard looking and look more like fresnel hit lights. The different degree grids allowed us to light only the area that we wanted to. A small grid for her face and a broader grid for the rim light that will cover both her and him. This is an effective way to work and can produce some amazing images.
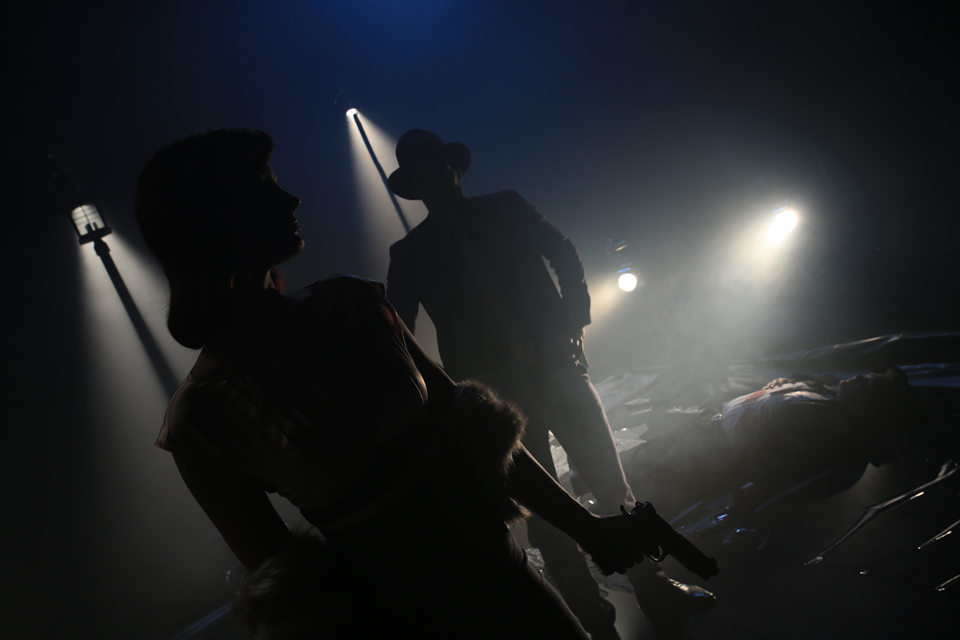
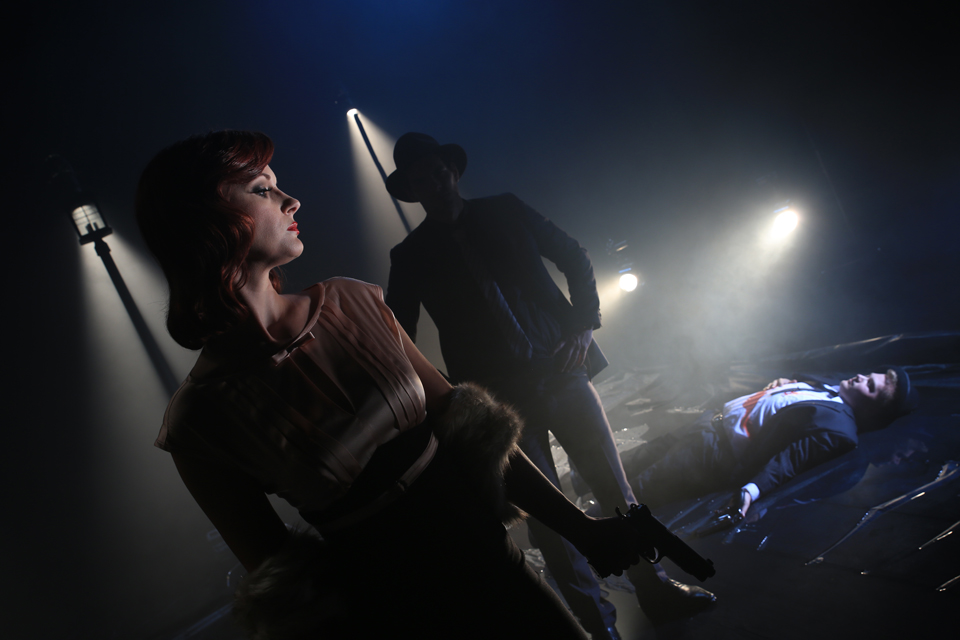
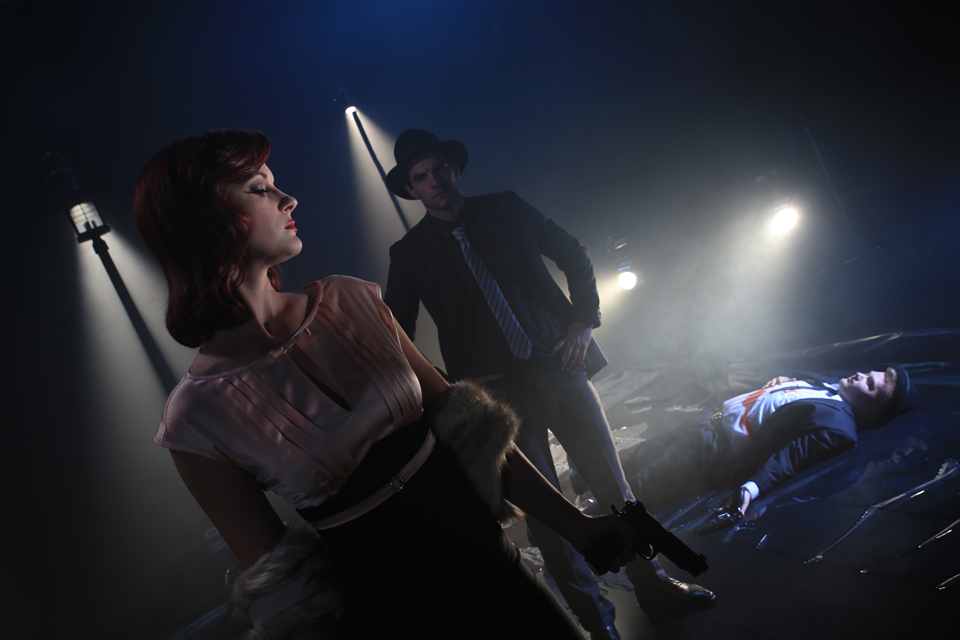
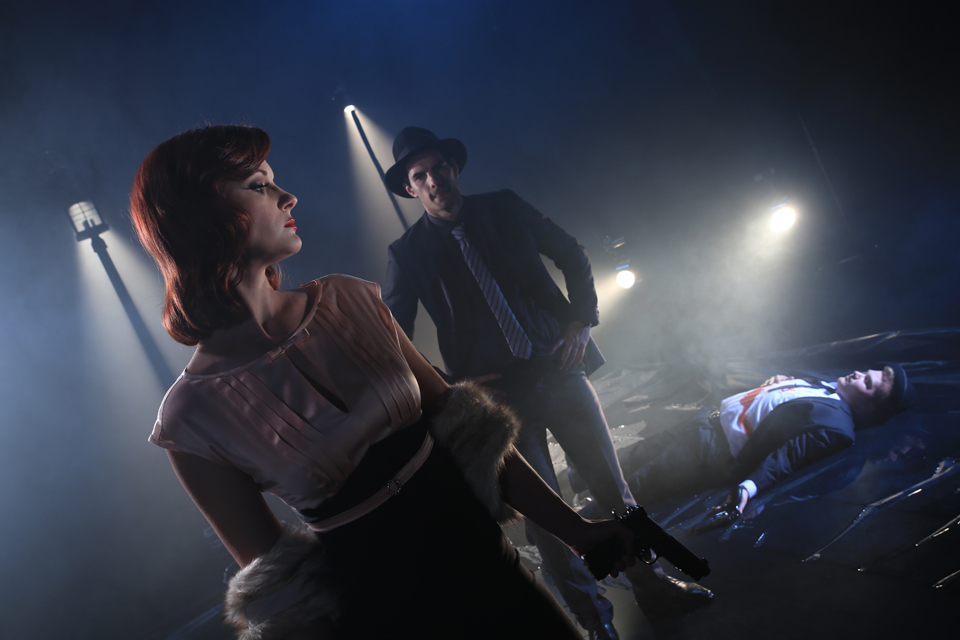
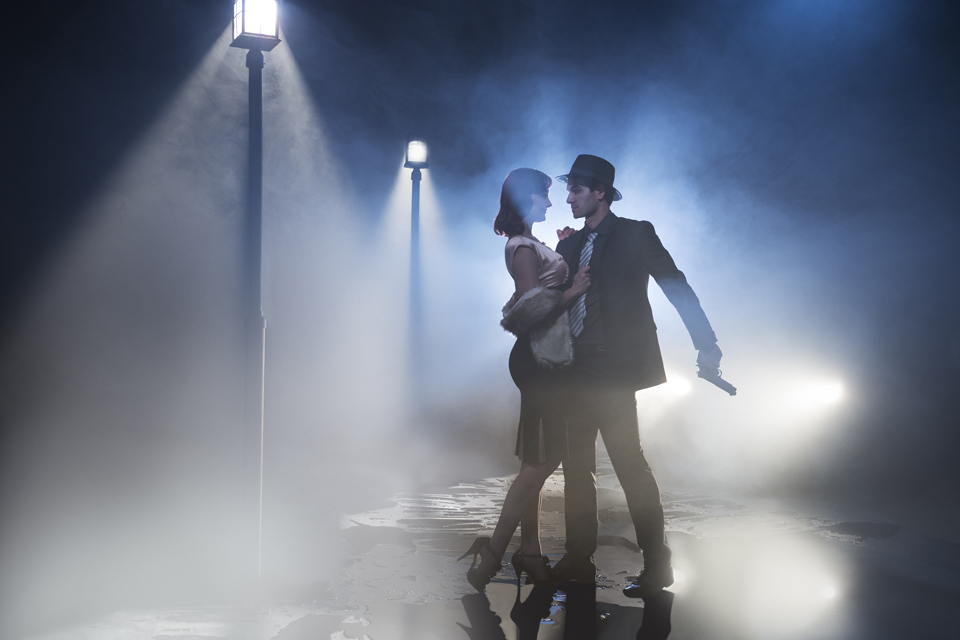
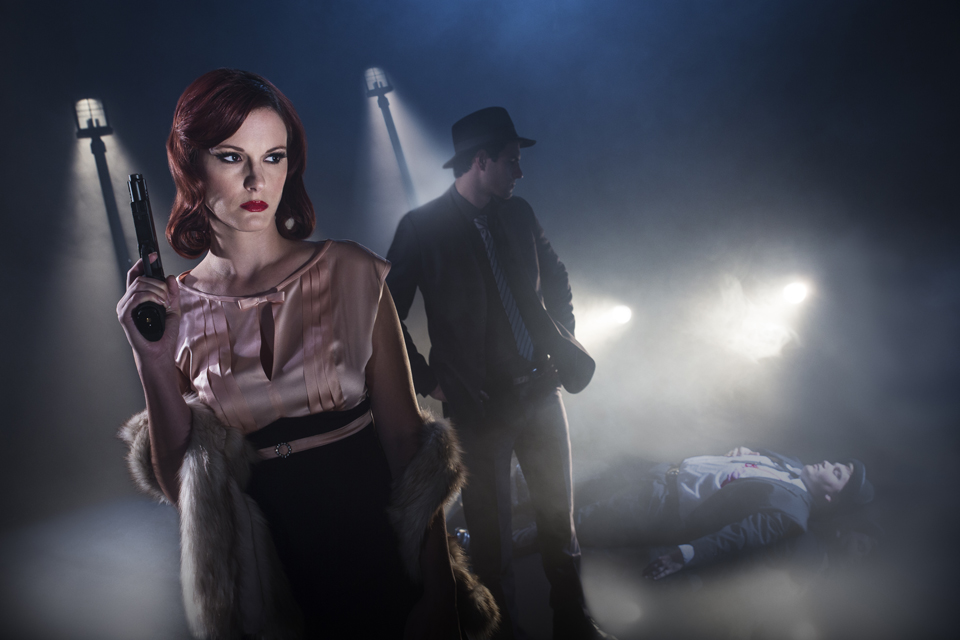
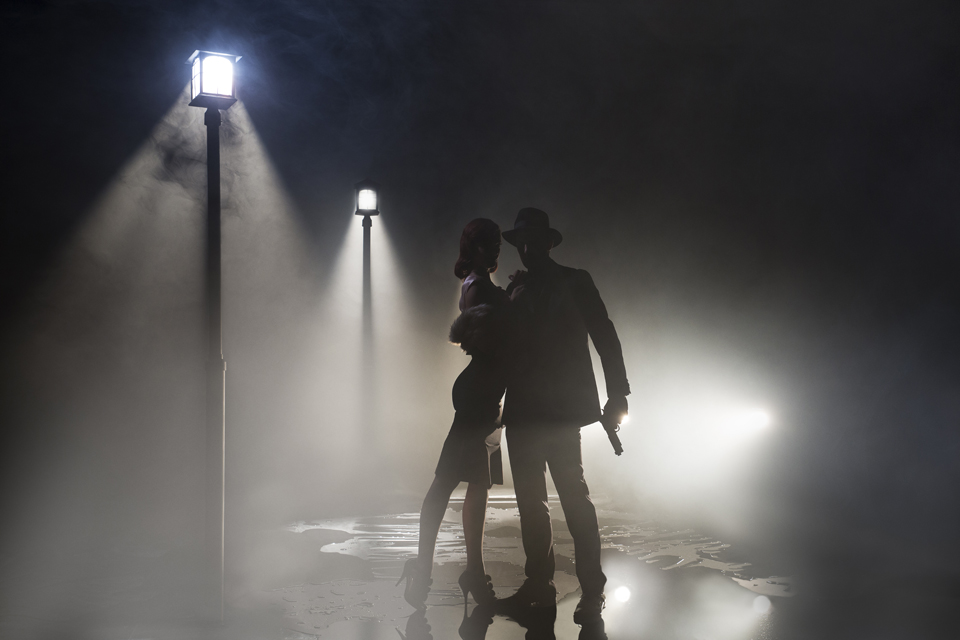
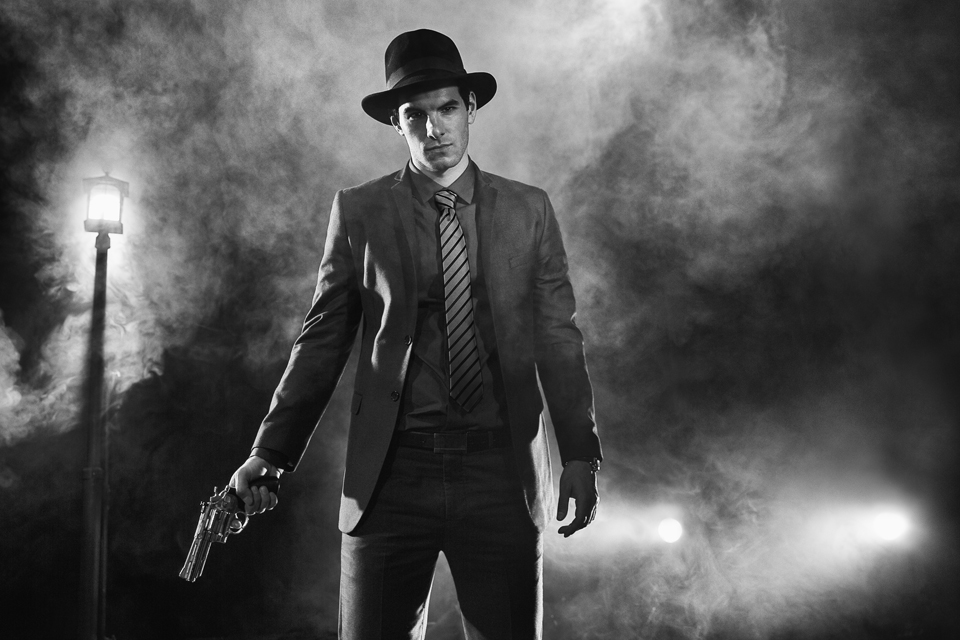
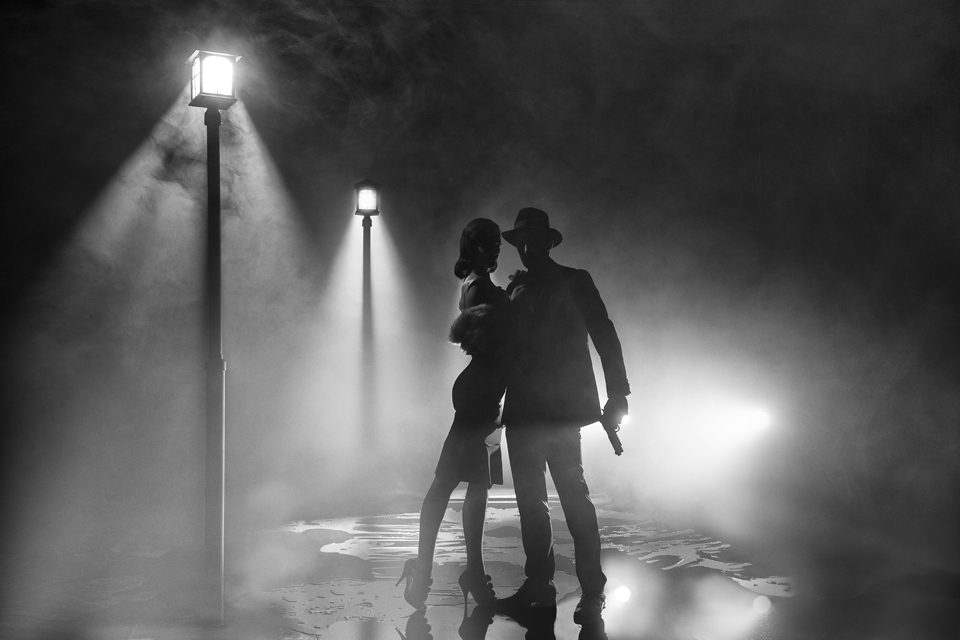
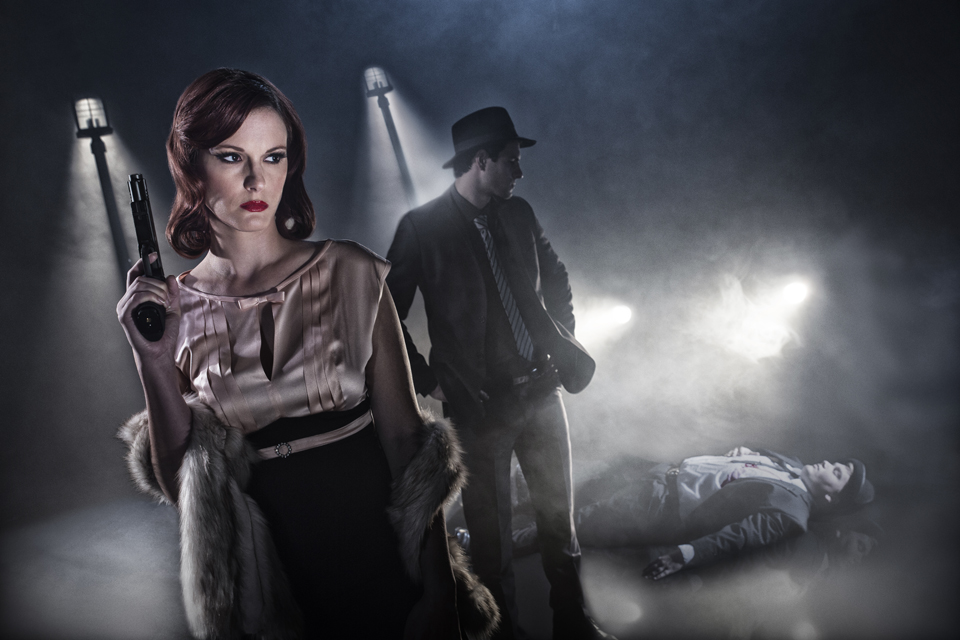
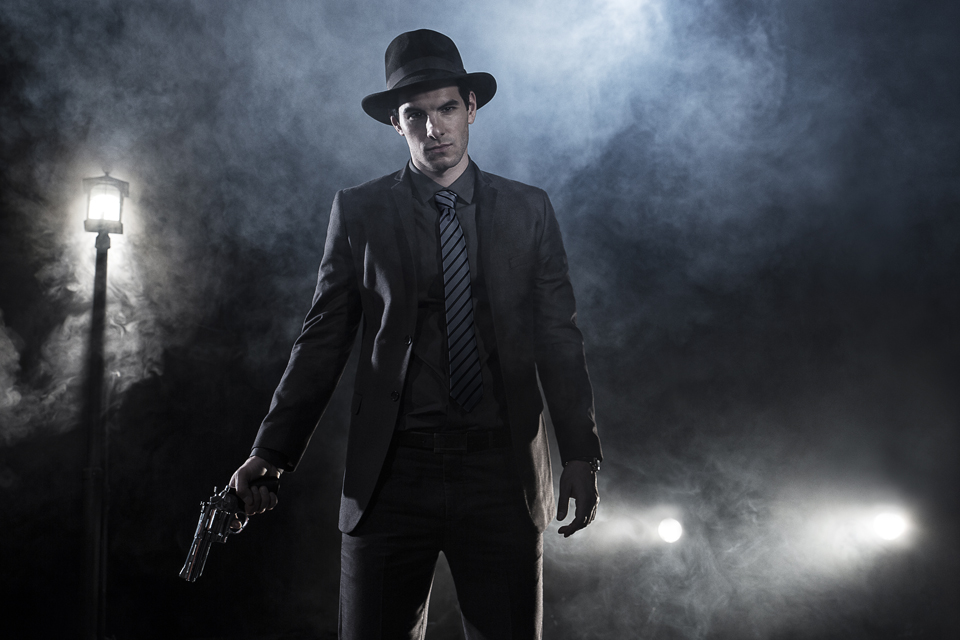
Here are four retouched images from the shoot:
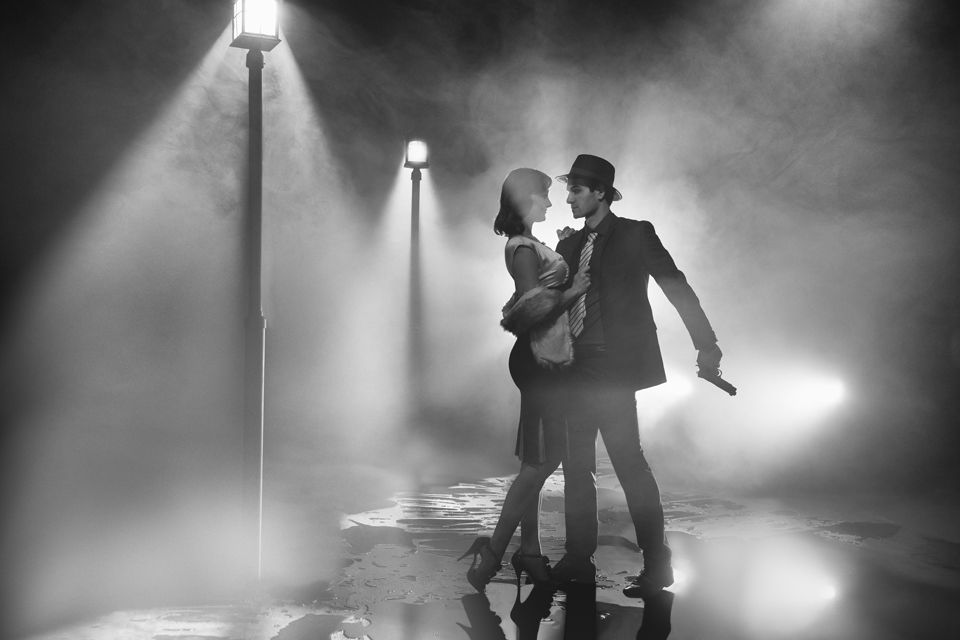
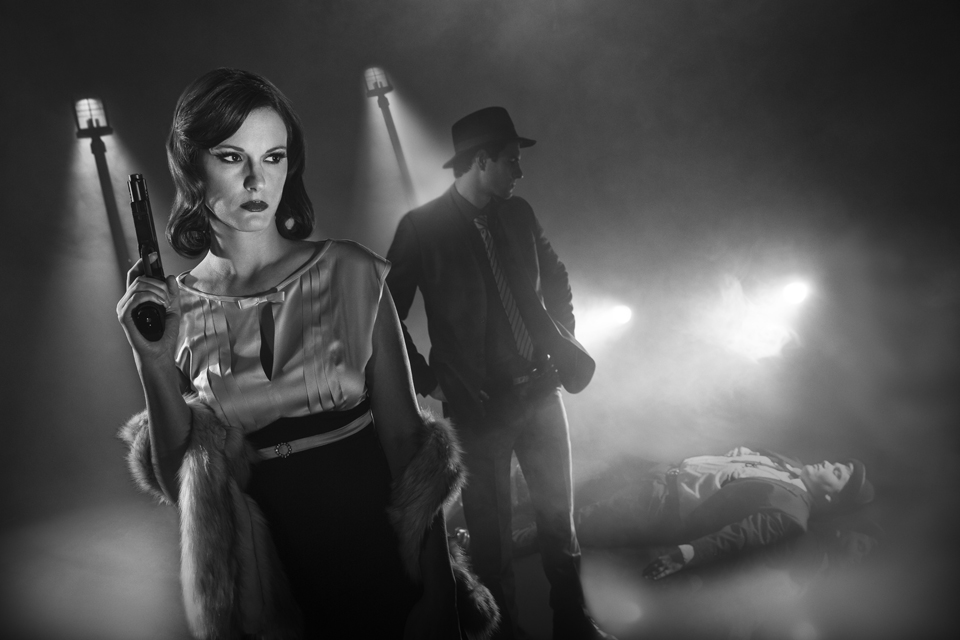
Now the real test of a good film noir image is how does it look in B&W. I took the four final images into Silver Efex in Nik Software and converted them there:
Some very cool vintage looks but I still want to see a little bit of color, so I went back to the colored images and used the Bleached Bypass filter in Color Efex:

I love this type of stuff and look forward to doing it again soon. Keep those cameras rollin’ and keep on clickin’.
Don’t forget to enter our January 2015 giveaway to get a chance to win a Rosco V-Hazer Fog Machine!
Jay P Recommends for this Shoot


Video Transcription
Subscribe to The Slanted Lens. Subscribe! Don’t be an idiot, push the button!
Hi. This is J.P. Morgan, and today we’re shooting at the YouTube space for the first time. I am so excited to be here. You know, I’ve been looking forward to shooting here for some time. And today is finally the day. So, let’s get started and see what we can do.
Hi. This is J. P. Morgan. Today on The Slanted Lens we’re going to take a look at Grids. You know, if I could only have one light modifier, what would it be? It wouldn’t be a Grid. But, if I had two light modifiers, the second one would definitely be a Grid. I’d have an OctoDome and a Grid. ‘Cause Grids are very focused, they give you a wonderful pool of light. It’s an easy way to control light. So, we’re gonna show you a little neo-noir photograph here. Guns and smoke and cars. So, let’s get started and see what we can do.
We’re going to shoot a film noir shot using Grids on strobe heads and we’re going to mix that with a similar light that gives a very similar look in the film industry called a Source 4 light. I want to show how Grids work and how you can light with them, at the same time mixing them with tungsten light. Grids are a honeycomb metal insert that goes into the front of a reflector. Usually it’s gonna be a 7″ reflector. They restrict the area of coverage for the strobe. I love them because they really give you a lot more control when you’re working with light. Let’s look at the area of coverage for different Grid spots. At six feet from the wall with a 10 degree Grid you get about a 3 foot area of coverage. The light does not spill or fill the area outside of that area of coverage. This image was shot 1/60 of a second at F6.3. That’s gonna be important to our comparison. As we get a larger Grid we get more exposure, ’cause it’s allowing more to pass through the Grid. So, at six feet from the wall with a 20 degree Grid we get about a five foot area of coverage. Let’s move to the 30 degree Grid. Again we gained about two thirds of a stop. We’re opening the Grid up allowing more light to pass through, it’s gonna give us more exposure. Our area of coverage is about six feet now. Our last Grid is the 40 degree Grid. It’s very wide and gains about two thirds of a stop again. It covers about eight feet and is bleeding into a shadow areas more than the other Grids did. Grid light is directional and not soft. The spill in the shadow areas of the image increases as you go to larger Grids. A 10 degree Grid does not bleed into the shadows almost at all, but by the time you get to a 40 degree Grid it’s bouncing some light into the shadow areas. The reasons is that the Grid openings become large enough that they allow the light to bounce off the sides of the reflector and bleed into the shadow areas. Grids are perfect for a film Noir shot with a hard light and deeper shadow. Let’s now take a look at our shots and see how we used our Grids.
Our set is very simple. It’s a black curtain in the background and black plastic on the floor. We’re gonna put some water on the floor so it just looks like it just rained. It’s got puddles everywhere. We’re going to need a streetlight. Actually we need three of them. We’re going to build these ourselves. So, here’s a little DIY streetlight project for you.
We took a four inch ABS pipe and stepped it down to a two inch ABS pipe using an ABS step down collar. This will give our lights some shape and not having to be with just one straight line. To hold it in place we bolted an ABS end cap to a piece of three quarter inch plywood. Then we just shove our streetlight onto that cap, and it stays right in place. The carriage lights come with screws that simply tighten to the top of the pole. And there you go. For $60 each we got three DIY streetlights. A couple of sandbags and it’s great to go.
We’re going to use the Rosco Hazer to fill the room with haze and create the mood. We set the hazer up and set the output to about six or seven, and then gave about 30 second bursts every few minutes. But once you get it balanced it’ll give you constant haze all day long on a gallon of fluid. We’re going to add some smoke at times in the background with a vapor machine just to give the image a little bit of depth. That’s gonna look really cool, especially when it catches that blue light. I absolutely love this machine.
Now for our light. I wanted a car in the shot, but at the last second it canceled on me. So now, I’m going to have to create a car on the image with just a couple of lights. We took two Area-650 lights, put them on a crossbar and used this as our car lights. The bar and the stand were both wrapped with the black fabric to hide them from view. For our streetlights we’re going to use a Source 4 light on a stand aimed straight down towards the floor. Source 4 lights are a very pinpoint light source. We’re going to shape the light pattern coming off of our streetlight. And as it reflects into the smoke it’s going to look like that light is coming right off from our streetlight. Here’s an image with just our Tungsten lights on. You know, this isn’t bad just on its own. We’re gonna set our white bounce on Tungsten, and then we’re gonna put Full CTO, that’s orange, on all of our strobes. Here’s our first image with only the Tungsten light on. We’re now going to add a PhotoFlex FlexFlash in the background. I am not going to put any orange on this light. I want this to go blue and add some depth to that background. Our next light is a FlexFlash on camera right with a 20 degree Grid spot. It’s on a short stand shooting on a dead guy. It’s suppose to imitate the light coming off from a car. Now we will add our key light on her face. This is a FlexFlash 400 Watt second light with a 10 degree Grid. I’m gonna have my assistant handhold this light and keep it pointed right at her nose. This is the downside of using Grids. When you get down to a 10 degree Grid the area of coverage is very small, so someone has got to babysit that light. They gotta make sure that it’s always on your subject. Because if they move very much, you’ll lose ’em, and your light’s not doing any good. So, I usually have an assistant handhold this light and just work side to side with the person. We’re now going to add a fill light from the front. We added a Dynalite strobe head with ND to get it dark enough and shoot it through a folded fusion. It shoots a simple fill light, but you can see that it opens his face up just a little bit and certainly opens up her shoulder. Our last light is a rim light from camera left. It has a 20 degree Grid and it will rim her hair and cover his face. We can pan this right or left to increase or decrease the light on his face. The nice thing about Grids is they are very soft on the outside edges of the area of coverage. So, when you pan it over a little bit it can become a little harsh around her back, but a little softer on his face. So, this one light, one Grid, kinda becomes two different lights with two different light qualities. It’s a really nice look. So, there’s our lighting set. Here some of the images before any retouching. Let’s look some of these and see what we got. There’s some fun stuff here.
Here are four retouched images from our shoot.
Now the real test of a good film noir image is, how does it look in black and white? So, I took the four final images into Silver Efex in Nik software and converted them into black and white. Here’s what we got. The secret to good black and white is contrast. You want to put dark areas against light areas. We really worked to do that with a smoke and the back light. And I think we’ve got some great images. As much as I love the look of these in black and white, I still have a desire for a little bit of color. So, I went back to our color images and took them into Nik Software into their Color Efex 4. I did a Bleach Bypass look at those. So, it just took some color out of them, added a little bit of tonal contrast. It’s just kind of the sense of old and new, kind of vintage but a little bit of color. I really love the look. This was a lot of fun. Great look, great images. Very simple set but a lot of work.
I hope this lesson has been very beneficial to you and you’ve learned some things about Grids. They really are very applicable on set. You can go from very narrow area coverage to a larger area of coverage. The thing that I learned the most about this, and the thing that I enjoy the most about Grids, is that soft edge of a Grid has a very soft transition. I actually like it. Hard in the middle, soft on the edges. Something that you can apply in your next shoot. So, keep those cameras rolling, keep on clicking.
This is my favorite smoke machine of all time made by Rosco. It’s a V-Hazer. We’re giving away one in January. So, go to TheSlantedLens.com. Absolutely do not miss out on this. Go to TheSlantedLens.com. A V-Hazer, man!