


Sign up for my free business coaching call. We’ll have giveaways worth $1,000! https://theslantedlens.com/businessclass

Hi, this is Jay P. Morgan. Today on The Slanted Lens we’re going to photograph wildlife with our MIOPS laser trigger. Wild, ferocious animals. Okay, fine, the wild crazy creatures we’re about to photograph… are hummingbirds. I’ve been wanting to take pictures of hummingbirds for a long time. Don’t judge. The first thing I needed was hummingbirds. So I put a hummingbird feeder just outside the window here in my kitchen. Secondly, I realized that the birds were all around the feeder, and not where I wanted them. I needed them in one place. So I taped off the other two holes so there was only one they would come to feed at. That worked perfectly. They were right where I wanted them so I could photograph them.
Now let’s take a look at our camera setup. We’ve got a Canon Mark III inside the house, with a 90mm macro lens. It’s that Tamron 2.8 macro lens. Very sharp lens, great lens. So we put that inside, leaned the camera in with the tripod, so it’s close to the window. We put our laser outside on the lawn. It’s about ten feet away, and it’s having to go through the glass, which is not a problem. We aimed that right at the laser trigger but the birds were coming in underneath it. We lowered it again and again until it got the point where the birds were flying through it and firing the trigger every time.
Everything was all set up but then I realized in the background I had some big white blurbs that I didn’t want. So we cut some branches from a tree, brought them in on c-stands, and covered up one of the blurbs. Then we had a production vehicle back there and we put branches on top of that. Now we’ve got nice, soft foliage colors all through the shot. It looks very pretty.
Let’s take a look at our light. Very simple lighting- we’re exposing for outside because that’s my whole background. But then the bird was very dark. So I brought a Rosco vector light inside- an LED. Brought that up really close to the window, put it on the right power setting to give us a nice kind of balance off light so it opens up the bird and makes it look nice up front. By exposing for the background, then bringing our vector light in to brighten up the bird, it gave us a nice balance and we’re ready to shoot.
I set my ISO at 1250 because I really needed good depth of field and shutter speed. I first started at a 50th of a second at f/7.1 because I thought I needed a lot of depth of field for that bird. The problem is he’s moving around so fast it was hard to get anything that was very sharp because the shutter speed was too slow. The image I’m working with a little later here is actually one of those images shot at 50th of a second 7.1. But it really worked out better when I went to 500th of a second at f/4.5. Now I don’t have as much depth of field, but the shutter is going to stop the bird a little better. These birds are moving so fast that the shutter’s not going to stop them completely, but a 500th of a second shutter is gonna have a much better chance than a 50th of a second.
We set up the MIOPS so that when the bird crossed the laser the camera would fire off seven frames. So the bird comes in, trips the laser and it just fires away. It’s not on motor drive mode, it’s just the camera shooting as fast as it can.
The nice thing about this setup is that I don’t have to stand here all day to try to get these photographs. I’m gonna go back and work at my desk and every so often I’ll hear the click, click, click of the shutter going off and I know I’m getting more birds. I’ll check in once in awhile just to see what it looks like. But in the end we’ll look through those, find the best one, take that in to Photoshop and do some editing.
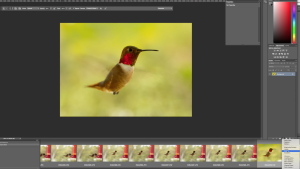
It’s been awhile since I’ve calibrated my monitor. So before I get started on these images I’m going to calibrate with my Datacolor Spyder5PRO. That’ll give me confidence that the color is going to be correct and the images are going to look right. I’ve picked my favorite image in Bridge and brought it into Photoshop so it opened up here in Camera Raw. First, I’m going to start by pushing our blacks just a little bit. I’m going to bring them to about twenty-eight. That’s gonna give us a nicer look there. The bird has a little more presence.
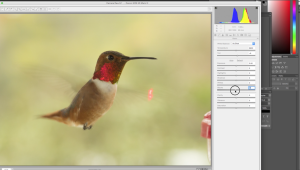

I’m now going to kick the clarity up just a little bit. I’m going go up to about 14 to 15. That’s going to give us a nice sense of the bird’s feathers. That clarity really does a nice job for any kind of detail like that. Our background is really boring. If we kick our vibrance up, get it up into thirty-four, we now have a nice vibrant background with our bird. It looks really nice. We’re losing a lot of his wings so we have to do something about that. We can kick our saturation up just a little bit. Maybe to 14. So now we’ve got a nice saturated image.
In a lot of my images I use the gradation tool. I’m going to take gradation from the top and it gets a little darker and goes to little lighter at the bottom. And so I’ll play with that a little bit and just see where I like that. Make sure you’re leveling the top. If you pull it way down it’s going to get in front of our bird and start to darken his head. Now when I’m in this layer I can look at that exposure and I can make that either brighter or darker. So I’ll find a spot where I feel like it’s comfortable.


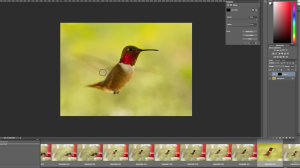
Now I’m gonna open it in Photoshop and take care of a few more things. First I use the patch tool to get rid of the feeder on the right hand side. I select the patch tool and circle what I want to get rid of. Then I drag that selection to a spot that has what I want to fill the area with. Everything’s so mottled anyway that it just blends in. It’s pretty nice.
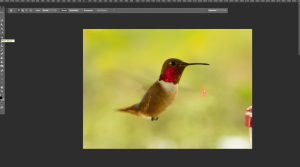


I can try the patch tool on the laser spot, but it’s going to leave a red glow around it if I’m not careful. If I go towards the wing, I’m going to be using the wing area and I’m going to want to line it up as much as I can so that it aligns correctly. It’s not terrible but I see a little bit of that red glow around it. I’m going want to go in and lightly clone, probably at about 30%, to take some of that red out.
There’s still a little bit of red in it but there’s a little bit of red in other areas of the image as well. The bird even has some in his wings. So that looks very nice. The last thing I’m gonna do is create a curves adjustment layer to make it a little darker.
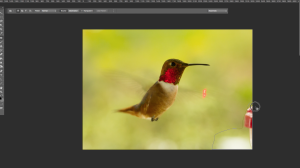
Click on the curves layer, hit command-i and that will fill the layer mask with black. I’m going to make sure my brush is on white and start to paint back in using about 20% opacity. I don’t want to use too much. I’m just going to slowly paint in this wing. Make it a little bit darker. It helps to define the wings a bit better. Looks a lot nicer.
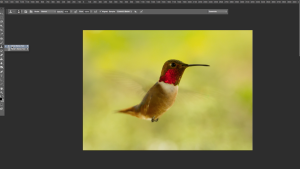
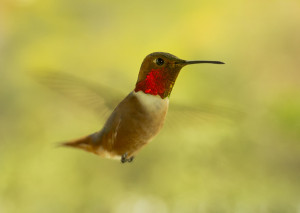
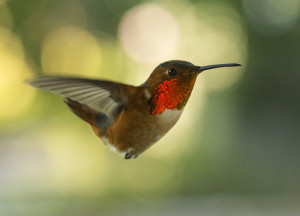
So here are our finished images.


This reminds me of a poem. You’ll know the artist and you’ll recognize it, because you’ve probably all heard it several times.
“A little birdie came tapping, tap, tap, tapping at my windowsill. I coaxed him in with crumbs of bread. And then I smashed his little head.”
So on that note, keep those cameras rollin’, keep on clickin’.
-Jay P.