


Hi, this is Jay P. Morgan. Today on The Slanted Lens, we’re going to show you how to create shafts of light both for still images and for film. I love the look of light streaming into a room for film as well as in stills. There are four principles that come into play when you’re creating shafts of light in camera. So let’s get started and see what we can do.

Creating Shafts of Light
Atmosphere
To create shafts of light you first have to have atmosphere. Light cannot show itself, a shaft cannot reveal itself, unless it’s reflecting off of something. Whether it’s smoke, dust, fog, or something else in the atmosphere, light has to have something to bounce off so you can see it. So if you’re trying to get a shaft of light out there and you don’t have something in the atmosphere, it won’t work. The easiest way to create and maintain atmosphere on set is with either a hazer or a smoke machine. I use Rosco hazer and fog machines. I love the Rosco machines because they make it easy to control the atmosphere on set.
Angle
The second thing you’ll need is the angle of the source. You’ve got to move your lights in and aim them back towards the camera if you want a nice shaft of light. They can’t be out and crossing as much as back and in towards the camera. That 45 degree angle gives you a nice angle. “Listen” to the camera and it will reveal your shaft of light. If you’re struggling to see your shaft of light, move your light closer to your subject matter, aim it back towards the camera, and your shaft will reveal itself.
Quality of Light
Number three is very important- the quality of light. I have a Fresnel lens on my left light and it’s on full focus so I get a nice shaft of light out of it. On my right, I also have a Fresnel lens, but it’s on full flood and the light blooms and it’s softer and kind of opens up. It doesn’t give me the nice shaft of light I really want. So continuous lights give you great, great shafts of light. Source Fours, Fresnel lenses that are focused down, are great lights for doing this. It’s much more difficult to create this effect with strobes. You’ve got a reflector on the strobe, which bounces light all over the place. You can put a grid on or paint the reflector which works the best, but it kills a lot of the power.
So here’s where these two worlds collide for me. I absolutely love to light with strobes, get a nice look on my talent, but then put a shaft of light through the window with a 2K or a Fresnel lens that has a nice focused beam of light going through my atmosphere. I can combine those two and they look fabulous. I can lengthen my shutter speed to make my shaft of light coming through the window look stronger and it will match perfectly with my strobes. So I combine these two together very often.
Shaping the Light
Last is shaping the light. Everyone uses a window, and why do they do that? Because it’s a perfect light shaper. Your light source is outside, it’s coming through a window, the window cuts that light source down into just a shaft of light coming into the room. You can do that same thing with flags, you can do it with trees. Anything that will cut that light source down and make it into a shape will help you create your shafts of light. Sometimes you’ve got a soft box or soft source that’s just not really giving you what you want. Start to shape it, start to cut it, and you’ll start to get more of those shafts of light as you cut that light tighter and tighter. It’ll give you more of the shaft of light you want in the room.
Application
Now that you understand the four principles for creating light shafts in camera, let’s take a look at a photograph we did on a blacksmith’s shop and see how we applied those principles to create this image. We’re using the Canon 5D Mark 3 and Tamron 24-70mm. When I first walked into the shop, he’s got his fire going, he’s patting on the metal, and there was atmosphere in the room already. The sun was coming through the window and so I had shafts of light immediately. What is the best hard source of light? The sun, it’s a billion miles away. Is it two billion miles away? Maybe it’s 40 billion miles away. I don’t know how far away it is, [92.96 million miles away] but it’s a long ways over there, so that gives you a really focused light and great shafts coming right through the window. The image looked fabulous. 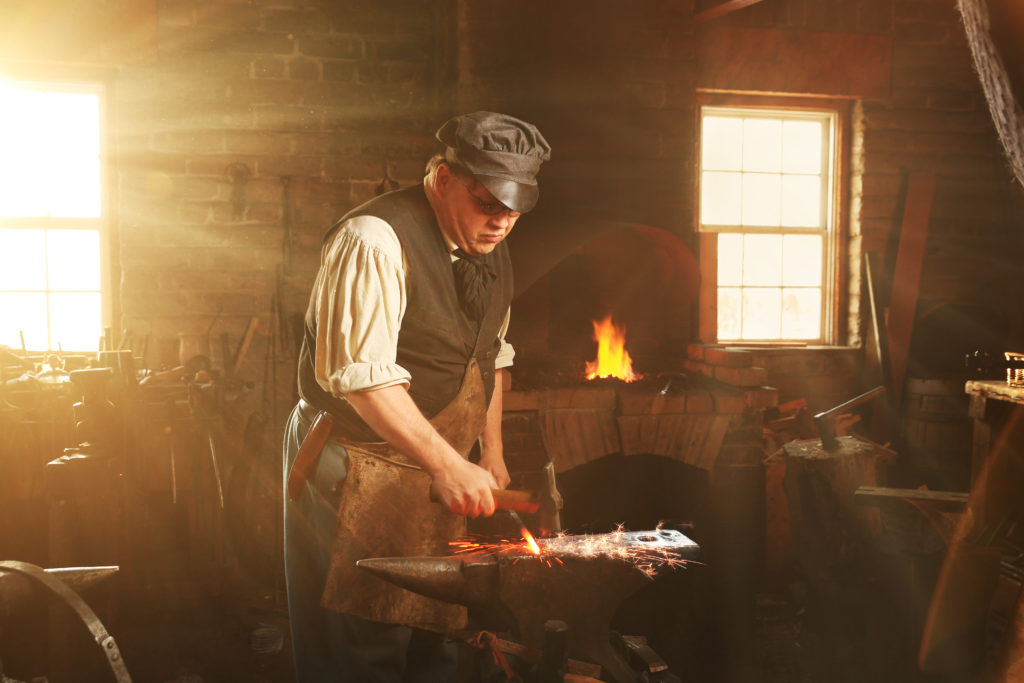

Setup
I didn’t have a 2K with me, which is what I really wanted to have coming through the window, so I had to come up with another solution. I went all the way back to the beginning and I started lighting my person. I put up an Octodome from Photoflex with a grid, tilted it up, and I got a nice light on his face. Looked fabulous. I could see my exposure, I knew what my aperture was. The second light I added was a shaft of light coming through the window. We put a Baja B4 from Dynalite out there with a reflector on it to create that shaft of light. I looked at that and realized we didn’t have enough atmosphere in the room, so we added some Rosco smoke. It gave us that shaft of light we wanted. It bloomed a little more than I wanted, so I backed it away from the window. That made it a little further away, the source a little smaller, and narrowed the beam of light just a little bit.
We next added another Baja B4 coming through the second window. We struggled with this light because we couldn’t get the angle to give us exactly what we wanted. If I got it too close to the window, the shaft was straight toward the camera, and it didn’t really look like a shaft. It just looked like an explosion in the corner. If we turned it more to the side as we moved it in towards the center, it was aiming more towards the side and we lost our shaft completely. We never really got that shaft to look as nice as we wanted. But we let it light up the window on that side and moved on to our next light. The last light we added was a fill light behind the camera. We were able to make that brighter or darker depending on how dramatic we wanted the shot to be, and we started shooting away. 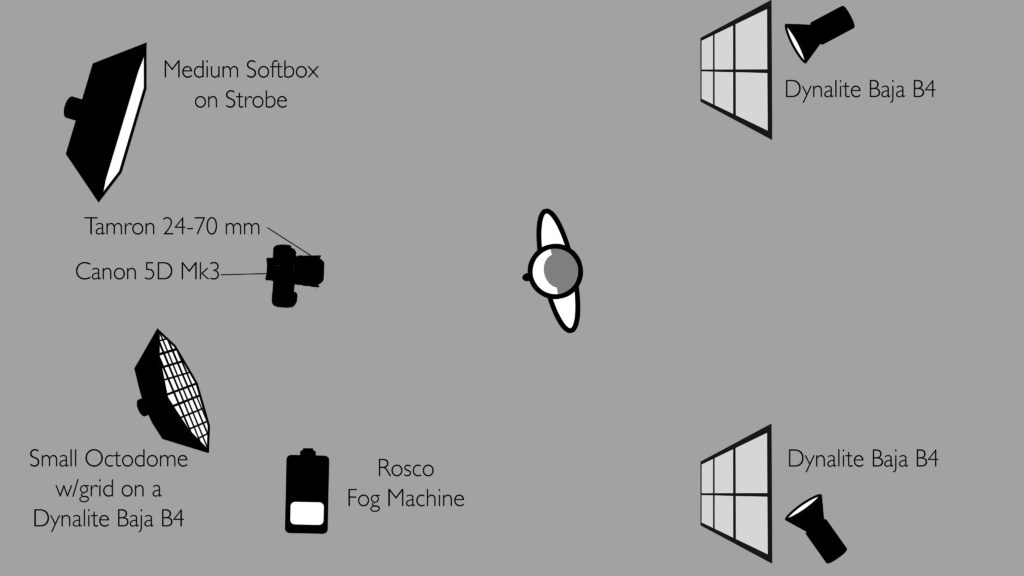
Conclusion
So there’s application of those four principles when we were doing this photograph out on location. One, our light source was a little too soft so we moved it away. That made the edges a little harder. We shaped our light with the window, we got an angle on the light by moving it around to where it gave us a nice shaft into the room. When we didn’t have enough atmosphere, we just added a little bit of smoke. Those four principles came together and gave us a nice light shaft on the camera left side of our image. I hope those four principles will help you as you’re trying to create light shafts in camera. Whether you’re on set or on location, those principles all apply. So keep those cameras rollin’ and keep on clickin’.
-Jay P.
Be sure to enter our giveaway!