


Hi this is Jay P. Morgan. Today on The Slanted Lens we’re at The Mannequin Gallery, a mannequin factory here in L.A. We’re gonna show you how to light an interview in mixed lighting situations using your Vector lights. And remember, when you order through our affiliate links at Amazon or B&H Photo Video you’ll be helping to support new content here at The Slanted Lens!

Shelly and her husband, Walt, have been nice enough to allow us to come here and to do an interview of Shelly and talk about what she does here. At The Mannequin Gallery they make fabulous mannequins; they sell them all over the world. But we’re gonna show you my process for lighting an interview when dealing with multiple sources of light.
First, I come prepared. In my Think Tank case I’ve got everything I need to do an interview. I’ve got four Rosco Vector lights, grids, gels, and three short stands. This case is fabulous. I can fly with it; I roll in and I’m ready to go. One of the things I love about the Vector lights is I’ve flown with them, I’ve banged them around, they’re almost indestructible. There’s even a video of Rosco driving over one with a truck and the light still worked. They’re incredibly well built. Another thing I love about these Vector Lite Pads is the battery. I can’t stand trying to find power on location, so I’m not going to use an LED that doesn’t have the battery capability. Even though there’s power all around here I just don’t want to deal with it. I can throw my lights up, I can put my power on and I’m ready to go. So when I walk in to do an interview I know I’ve got everything I need right here to be able to make it happen.
There’s a lot that goes into setting up an interview. But today we’re gonna concentrate on picking a spot and lighting it. So let’s get started and see what we can do.
First, we’ve got to pick an angle. It’s important we choose the right lens. In this case I’ve got a Tamron 35mm on my camera because I want to see a lot of what’s going on here in the warehouse. There are mannequins everywhere and I want to see them. I don’t want to use a long lens and make them out of focus and fading into the background. So I’m going to choose a little wider lens. My camera is set to f5.6 at a 50th of a second. I’ve got enough depth of field that I can see the mannequins in the back. We don’t want to waste the time of our actual talent; the lady who works here has got a lot to do. So I’ve got Judy here as my stand in. I’m gonna walk around with her and find the angle we like and make our decisions about lighting.
We ended up in a little alley of mannequins. I love the leading lines they create. There’s kind of a pool of gold and flesh colored mannequins back there, plus another of white on the left side. And we’re getting the fluorescent from overhead. It looks really nice.
The first thing we have to decide once we’ve chosen our angle is what we’ll do with the ambient light. Is the ambient light going to become a keylight? Is it going to become a fill light? Is it going to become a backlight? What are we going to do with it? We’ve got a mixture of different light temperatures here. We’ve got fluorescents in the background, but sunlight coming through the garage doors behind me. Generally speaking we’re not going to have enough power with our Vector lights to overpower the ambient light in the room. So what we’re going to do is use it as an overall fill. We’ve got a hotspot in the background that’s giving us a nice spotlight on the mannequins. It brings them out in the background which will look great right behind our talent’s head. And then we’re gonna start to add our Vector lights. These lights are perfect in this situation because it gives us the ability to change the color balance. I can balance them towards the ambient light in the room.
So let’s get our first light up. It’s going be a keylight on Judy’s face. Another nice thing about the Rosco Vector light is I don’t have to have a softbox on it. It’s a LED that’s lined around it. Bounces into the light and out and gives me a very soft light. So it’s easy to work in tight spaces like this. We can slide it right in between the mannequins and give us a nice look on her face. We can also easily dial it up and down with the dimmer. It’s a nice soft light. I panned it away from her just a little bit so it doesn’t show so much on the mannequins behind her. We set our light on forty-three hundred degrees and we did bring a fill card in just to soften up the shadows just a little bit. You could have shot it with the light and just the bounce off the white mannequins next to her as a fill. But we brought one in so it’s a little closer and softer to fill in the shadow. It looks very nice. So there’s a one light setup. If this was all you had it would be a beautiful shot, but we’re going to add more light. 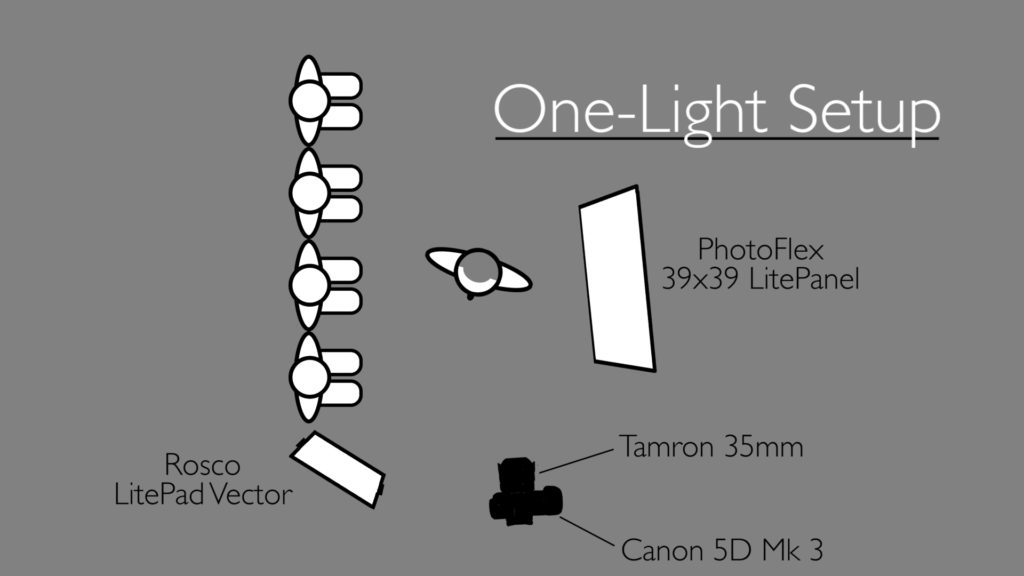
We’ll add just a bit of light on her hair with a rim light on the camera right side. At first I put the light up and let it light everything. But it was too much. There was light on the mannequins on the left side of the frame. Got light on the mannequins on the right. It made everything look too flat. So we put a grid on it just add a nice highlight on her hair. It looked very nice and balanced out the rest of the scene. Our last light is a background light. We’re just going to rim some of the mannequins way deep in the background back there. Makes them look very nice. 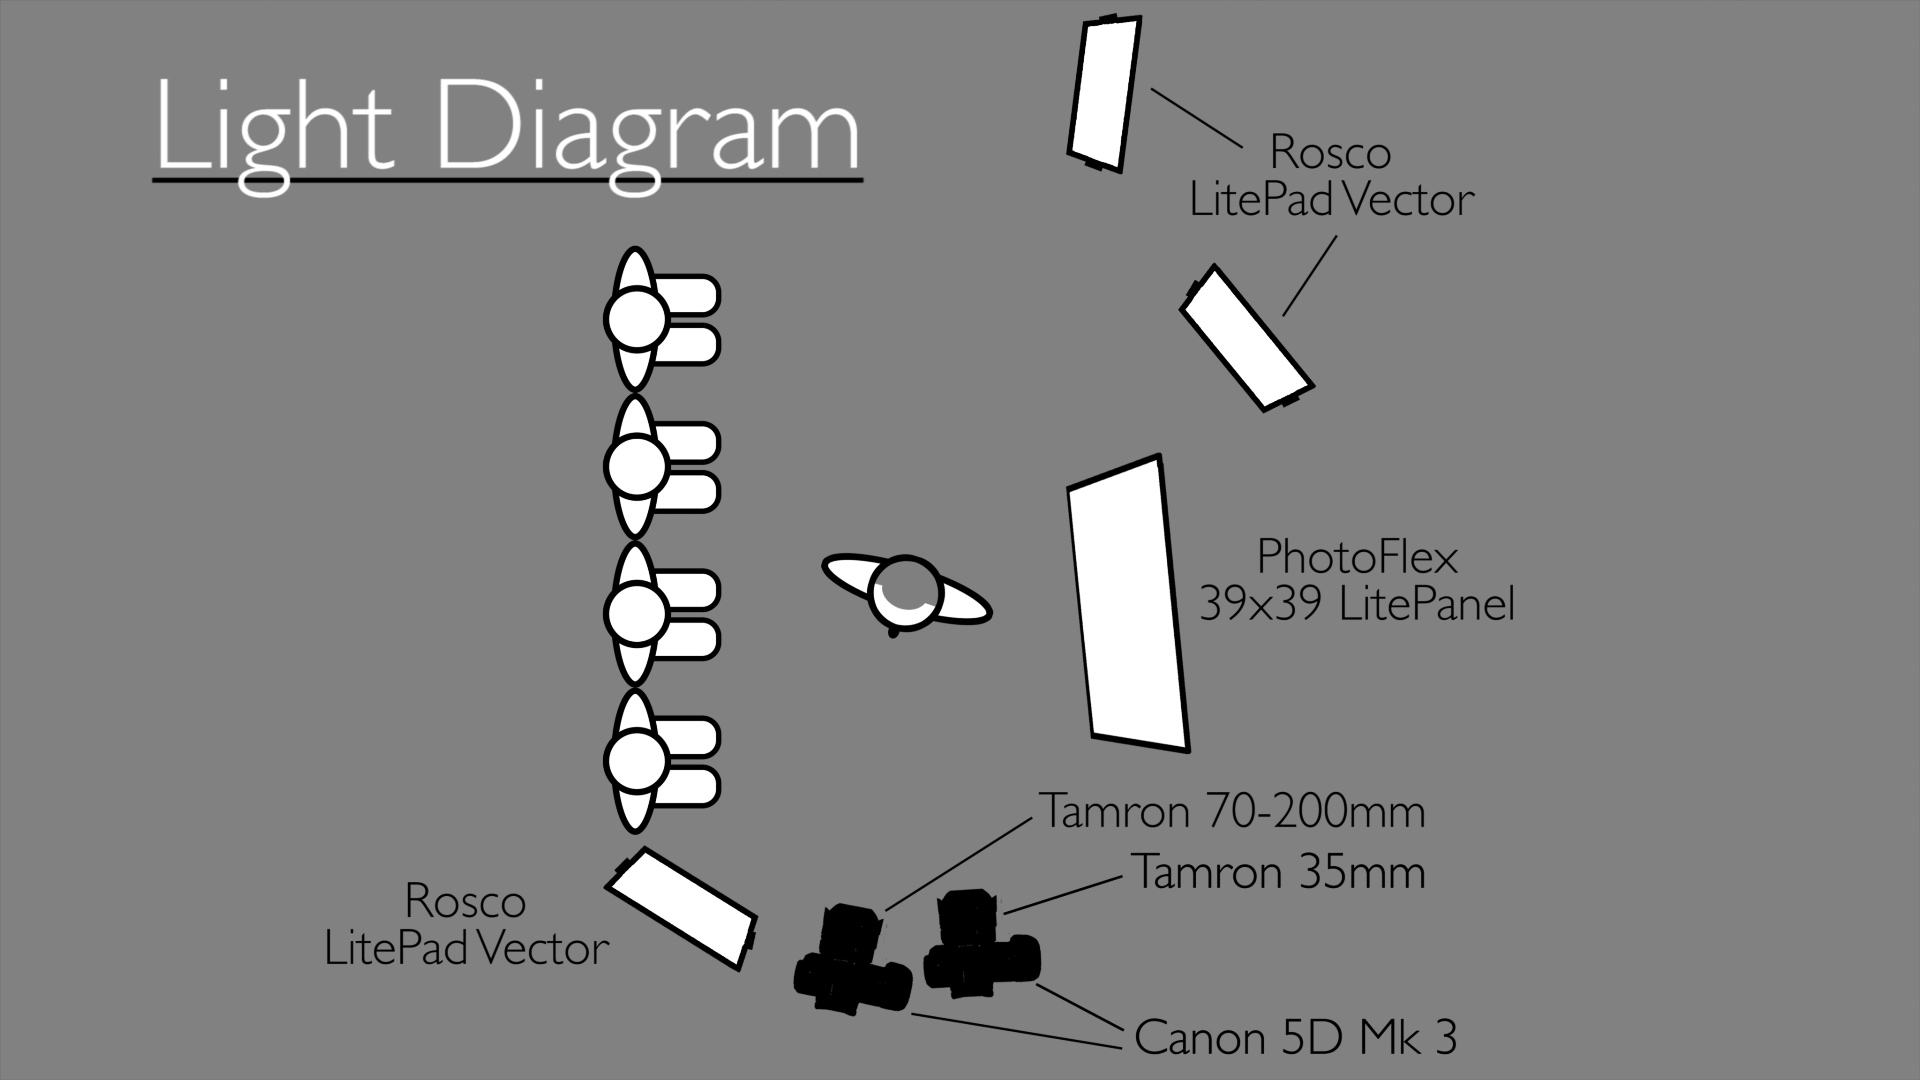
Now that our lighting is set we added a second camera with a 70-200mm lens on it. We’ll run that at about 70mm so it gives a nice tight look on her face during the interview, but we’ll still see the mannequins in the background. It’s time to bring Shelly in.
Shelly: The Mannequin Gallery rents, sells, customizes and repairs mannequins for the Hollywood industry, fashion industry, museum industry and anyone else that needs that product. We also have sculptures in house that can create anyone’s vision. My husband is a sculpture. Walt Wilkey, he’s the president, is the sculptor. He’s the lead sculptor here. We have other sculptors we work with.
It was fabulous to be with Shelly at The Mannequin Gallery. She was fun to work with. What a great place this is. We learned how to light in this mixed lighting situation which was a great experience for us. If you’ve got interviews you’ve done, if you have images you’ve done where you’re
working that mixed lighting situation, post them on our Facebook group. Join our Facebook group. Let us hear from you and see the things that you’re doing.
Keep those cameras rollin’ and keep on clickin’.
-Jay P.
P.S. Enter our giveaway and you could win an 85 or 90mm lens from Tamron!