

Download my Business Coaching Class. It’ll change your business.
Hi, this is Jay P. Morgan. Today on The Slanted Lens we’re going to shoot forty photographs of dentists on a white background. We’ve only got ten hours to do this so we’d better get started and see what we can do.

We’re shooting forty photographs of dentists in ten hours, on ten different sets. We’re gonna move from set to set to set, spending an hour at each. We have three setups going here- set A, set B, and set C. We get these all ready to go the day before so we can start right away. As we do our first shot and we move onto the second, we’ve got a crew that’ll come behind and change everything up. By the time we get back to set A again, it’ll all be ready for the new shot and we’ll shoot again. So we’ve got to go really fast.
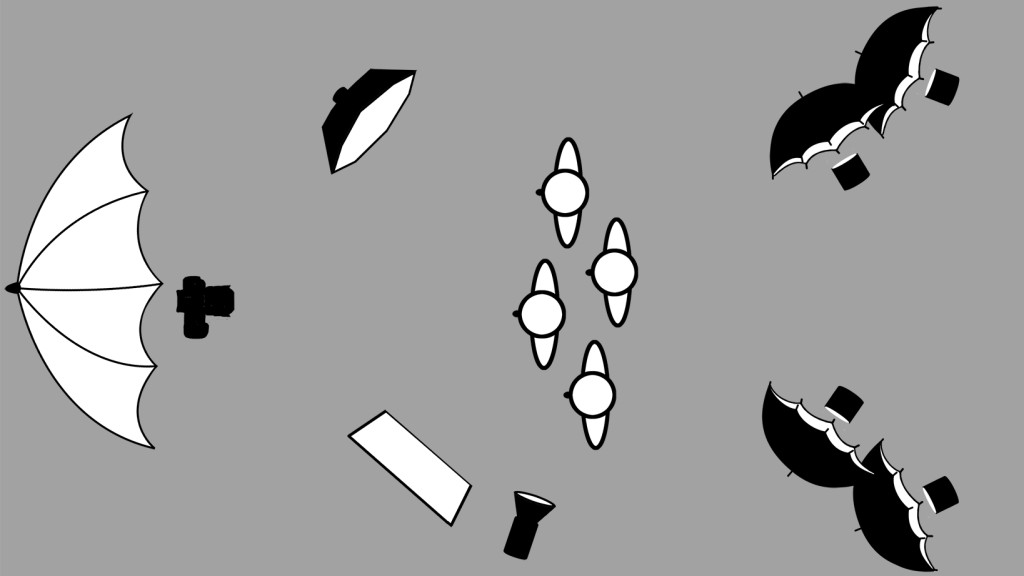
Let’s talk about these four lights we’re putting up on the white background. If you just slap them up there and don’t think about them very much they’re gonna do crazy things. What I do is put two heads on each side of the white background, two to a stand. One on the stand and one on a Bogen clamp. The reason I do that is there’s not enough real estate to put two stands next to each other. You can’t get them very close to each other, so it’s just easier this way. So a tree of two on each side of the background. The two on the top of each stand are pointed pretty much straight toward the background, and turned slightly toward the middle. Not very much. You don’t want them to spill onto the person in the foreground. The two on the bottom you’re gonna turn slightly toward the middle and slightly down because they’re going to create a nice, kind of glow onto the floor. I’ll turn them till I get that as smooth as I can. If you do that you won’t have a hard line from the floor into the background. Now you’ve got a nice white background.
Now I’ll meter that. I want them to be, say, at F16 on the background. That gives me a nice white. And I’m gonna want to be F11 on my subject matter. So I get one stop brighter in the background than my subject matter. That gives me a nice clean white. I know now days everyone’s gonna say well we’ll just outline it and fix it in post. But you can shoot on a white background that gives you a clean outline and have it look very nice, and it doesn’t have to bleed forward or spill onto the subject matter. We’re shooting forty photographs. Do you know how much retouching that is? So we’re gonna clean it up- get it right in the camera and it’s gonna look very nice. And yes, I did use a meter. Our meter across gave me F16 on the background and F11 on my subject up front.
So I have my four umbrellas with a background. And then I’ve got a nice rim light coming from the camera right side, and a nice key light up front. I’m using a medium Octodome as my keylight. The reason I love the Octodomes is because they’re slightly shallower than the softboxes, which means you get a little harder highlight. And I like that look a lot- it looks very pretty. So there’s my key light, my rim light, and I’ve got four lights on the background. We had this on three different setups.
Now we’re gonna play around a little bit. On one set we’ve got a boxing ring. On that one our lighting’s a little different. We’re gonna have one heavy rim light from behind and a small Octodome above. It’s gonna open up the shadows just a little bit. Open up the faces, get a little highlight on the faces. Then we’ve got a huge 72-inch white umbrella upfront. It’s just gonna open the whole scene up, give us a nice fill light. So the light is gonna change a little bit on each of these. But just understanding that principle of getting a nice, solid white background will help you control the light and give you a nice white background.
We’ve got three setups here and so we’re using three different types of strobes to get enough heads on set to be able to light all three of these at once. So some of them, like the power packs from Dynalite, have a built-in PocketWizard. With a trigger on the camera they fire, they pair, it’s fabulous. The first set is on channel one, we also use the second set on channel one. We put two heads in between two sets. We’ll use them for the first set and then we just have to turn them slightly for the next set and use them there. So we don’t have to put four heads in the middle. We can just use two, which helped us save on heads on set. We had PocketWizard channel one on the first set, and PocketWizard channel one on the second set, but then PocketWizard channel two on the last set. Because on the last set we’re gonna have to put PocketWizards on all the different strobes because a lot of them don’t have built in. We have a Speedotron pack in there and some of the PhotoFlex heads. We’ve got a whole menagerie of stuff we’re using to make that happen. So we’ve got everything working to get all three of these sets lit and working.
So there you go. I hope you enjoyed looking at the photographs we did on our white background. I hope you learned something about how to set up and photograph on a white background. It’s a lot of fun to do. So keep those cameras rollin’ and keep on clickin’.
-Jay P.
Support new content! Shop our affiliate links for the equipment we used on this shoot:
SKB case
Tamron 24-70mm lens
MIOPS Smart Trigger
Photoflex 72″ umbrella
Photoflex White Umbrella
Photoflex FlexFlash
Photoflex Octodome
Photoflex Medium Softbox
Dynalite XP 800
Dynalite Baja B4
PocketWizard