Today on The Slanted Lens I’m showing you how to light and shoot in small spaces. I’m using Rosco’s LED Tape VariWhite Gaffer Kit to light the inside of a space helmet- you won’t want to miss it!
Rosco’s LED Tape VariWhite Gaffer Kit
This LED Tape is fabulous because it’s just small strips of bi-color LEDs. The kit comes with a remote so you can change the color or the intensity of the LEDs, so it’s a really great resource to have on set.
This Tape has an adhesive back, so you can literally just peel it off and stick it inside the helmet! You can also use some really thin double-stick tape to replace it so you can use it again and again. Another great feature of this kit is that you can put a series of these together off of the same dimmer. The kit includes two-foot pieces of LED tape, a pad that’s about four by six inches, and then the shorter pieces of six-inch tape.
Lighting the Space Helmet
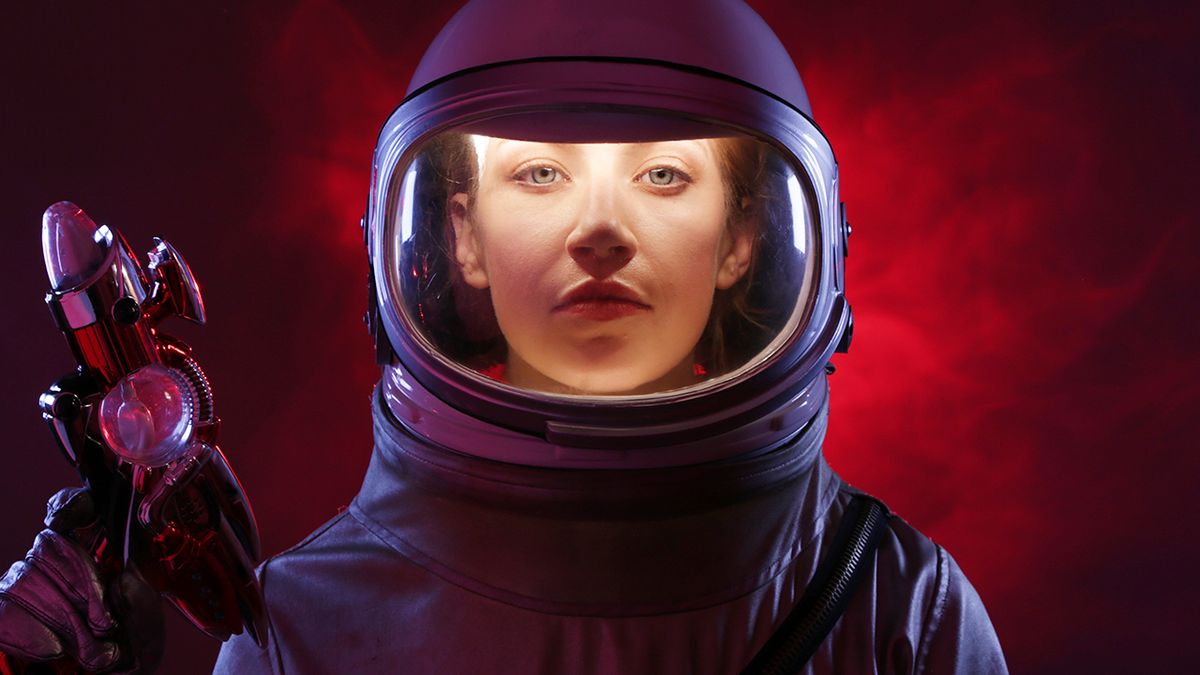
We taped one of these strips along the upper line of her helmet and used it as our main key light, which gave us a nice light on her face.
We then pushed the helmet out and put another line of tape along the bottom of her helmet underneath her chin. This gave us two different lights which we could dial down individually, depending on the intensity we were looking for. Those two strips above and below her face became our key lights, and then all we had to do was light the rest of the room.
Lighting the Rest of the Room
From there, we simply lit the room with a vector light on the camera left side, and a Rosco Vector light on the camera right side. We threw a full blue gel on there so we could get a really theatrical blue light on her right and left. Then, we added one final Rosco Vector on the camera left-hand side, which also had a blue gel on it. This gave us just a little bit of blueness in the smoke that we added in the background.
We also added one more light at the very end (and Aputure 128D). We used it as a more focused source for the red light behind our model. It gives a little heavier beam of light right behind her.

Adding Smoke to Create Atmosphere
We used the Rosco Vapour and dialed it down so that we weren’t using very much smoke at all. It became a little bit of a statement in the background, swirled around, and looked very cool. We didn’t run it through a fan like we usually do because it chops it up and makes it into more of a haze. Instead we wanted the smoke to hang in the air and make patterns to give the effect of a weird atmosphere.
The reason I use Stage & Studio, and I love it the most, is because the Stage & Studio dissipates pretty quickly. The heavy smoke gets in the air and you have to wait a long time for it to reset. The Stage and Studio smoke, however, gives us an opportunity to do smoke, get some great shots, reset, and then do it again. There are some situations when I’m shooting outside and I need the smoke to hang, that I will use the heavy smoke, but for this, that Stage & Studio was perfect.
Getting Creative With Rosco’s LED Tape VariWhite Gaffer Kit
I used this kit to light the inside of a helmet, but this really does work for lighting inside any small space. If you want someone to look inside of a microwave, into an oven, or into a safe, lighting those areas is very difficult to do! This is a perfect way to do it. It’s just a simple way to get lights in really tight confined spaces. It would be fabulous for cars as well and would look great inside of a dash. This kit is very powerful and very punchy, and it worked out excellently.
What do you think? Where could you use this kit in your work?
Keep those cameras rollin’ and keep on clickin’!
-Jay P.
Leave a Reply