

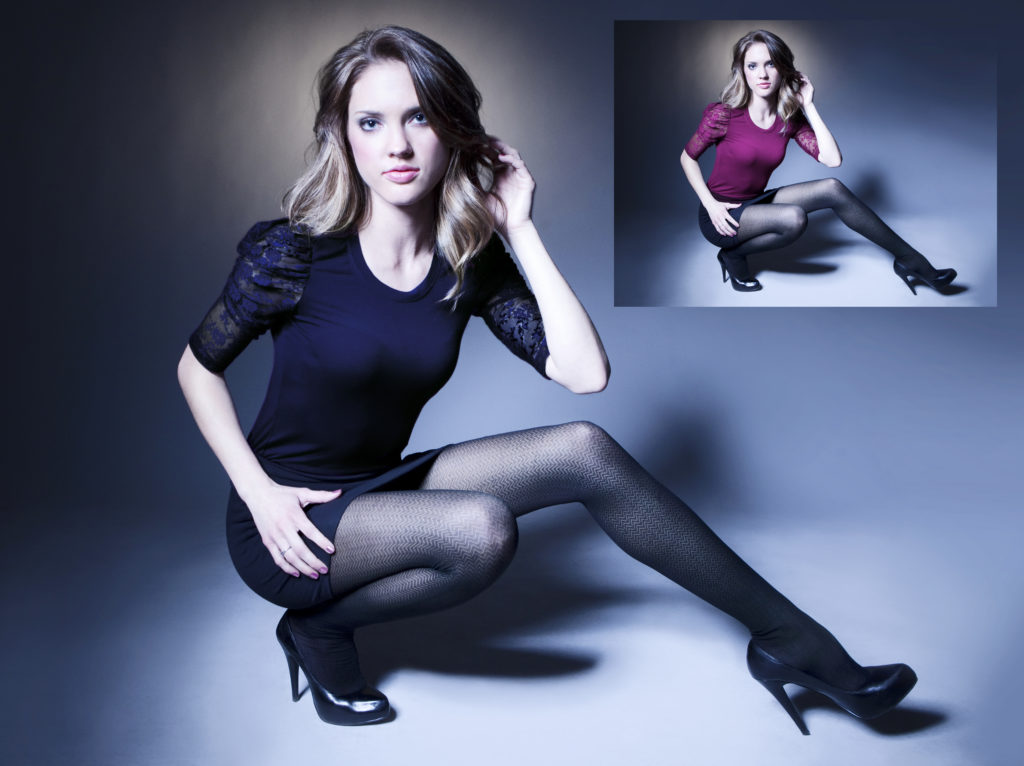
Today on The Slanted Lens, we are going to teach you how to change the color of a shirt! This lesson is going to be the first of a new segment here at The Slanted Lens. Julene Morgan, an experienced re-toucher here in Los Angeles, is going to be showing us retouching techniques. While changing the color of a shirt is very simple, it can be incredibly frustrating if you don’t know how to do it, so let’s take a look at how Julene does it!

Masking Out Your Shirt
When changing the color of a shirt, or anything, the first thing we need to do is mask it out. I like to use the “quick selection” tool in the tool palate. After selecting that you can trace along the edge of the item that you want to change, like the shirt. I use a Wacom tablet to do this, but you can also use a regular mouse or the trackpad on your laptop. In our attempts to mask out a shirt, we sometimes select the background as well. In order to correct this, select the option key (a little negative sign will show up) and then outline the parts of the background that you don’t want to mask. Then you go to the layer and add the mask.
After adding the mask you will want to double click it. After you have double clicked, a menu will pop up showing you the mask’s properties. In properties, go to “mask edge” and it will allow you to refine the edge of your mask. The “decontaminate colors” and “refine radius” tools are really good for working around hair. Now that the shirt is masked out, you want to make a color adjustment.

Adjusting the Color
I like to use “selective color” in the layers palate. To get to it you can select the circle that is half shaded in, and then the menu will open up and you can choose “selective color.” This option will let you adjust reds, yellows, blues, magentas, etc. depending on your desired color. Often I am not fully satisfied by the color I get in selective coloring, so then what I do is go into”solid color” and overlay a different color. In the video I chose black, but you can choose your color depending on your desired effect. By selecting “overlay” you are adding black to the top of your shirt, but can still see through that layer of color. I highly recommend experimenting with several different blend modes, but I chose to stick with the “overlay” effect.
Changing the Color Again
If you want to change to yet another color, you start the same way. You have already masked out your shirt, so you would once again go into the drop down menu and click “selective color”- “hue saturation” would also work. Next add the mask from your original layer to the “selective color” layer. Do this by holding down the “option”key and dragging the mask into the new layer. You can now configure the color according to whichever color you want. Selective color really helps with small adjustments to color.
If you are looking for a faster approach, you need to go into “hue saturation.” Using the same technique described earlier, you would then add the mask to that new “hue saturation” layer you just created. Now you can click on “hue saturation” and drag the bar along and check out a larger variety of color. It is important to remember that in “hue saturation,” selecting red adds red to the color you already have on the shirt; it does not change the shirt color to red.
And it’s as simple as that! Find us on Facebook and let us know how you are changing color in your photos!
Keep those cameras rollin’ and keep on clickin’!
-Jay P. and Julene