Hi, this is Jay P. Morgan. Today on The Slanted Lens we’re going to take a look at DIY RGB lights. Not that these are lights you can change them from red, green and blue. But at Home Depot I noticed they’ve got these lights. They’re LED bulbs. They’re like nine bucks. And I can put them in my clamp light and I’ve got a beautiful blue light or a green light or a red or a yellow. So this is going to give us beautiful colored light on her face and give us the ability to give us a contrasting color or primary color in the background. We can shoot so many different combinations of these. We’re going to photograph these and just see exactly how they look.
Color is about exposure. Color is about not polluting the other color on set. So we’re going to talk about how to isolate them, how to make sure that they are or they give us really deep color. Or more perhaps pastel color if we choose, depending on exposure. So let’s take a look at that. Let’s get started and see exactly what we can do.
So I just got clamp lights. Very simple lights. You can buy them at Home Depot for about twelve dollars. I mean, they’re actually some pretty inexpensive ones out there. Some people have them as a light to heat up their lizard or something. You know, it’s a reptile heater. So you can put a light bulb in these. These light bulbs just fit into those clamp Lights. I’ve had these forever. Had them from different projects we’ve done. Getting these though, I’m using a light stand, I’m going to clamp them onto the light stand. That little clamp works on the light stand. It’s not ideal but it does work.
If you don’t have light stands and I would guess most people have some light stands. But if you don’t, here’s two options for light stands that you have at your house right now. You don’t have to go buy anything. My DIY light stands, this is just a broom that I’ve set on to a chair and then I clamped it. I put a piece of cloth down there so I won’t ruin my chair. And now I’ve got a stand. I can get up here and I can put my clamp light up there and it gives me a way I can move this around. Now I can move my clamp up and down this if I want to make it higher or lower. Is this ideal? No, it’s not ideal. But is it free. Yeah, it is. You have this in your closet and this at your table. So it’s a great way to have a stand and it’s not too expensive. Actually it’s not expensive at all.
This right here is not a bad way to go. This is just a lamp, standing lamp. Now it does have the Edison in the top that you need. You can’t put them in here because it just shines at the roof or the ceiling. But you can take this off and you can clamp your clamp light onto the shaft of this to give yourself a stand. I’ve seen people do that before, take the lampshade off and use that as a post. I’ve seen them that have the ability to adjust. But that’s an inexpensive way to get a light stand if you don’t have one.
So the first light I always start with is the background light. I’m going to throw that background light up. It’s going to be off to one side. I’m going to, I know it’s going to gradate on me, it just is. I could maybe put it on the floor and shine it up at the floor if I want that light to be a little more even. But I think it’s going to look nice gradating from right to left. I’m not just going to plug in my green up front. Now several things can happen here. If I bring this light way around I get a lot of light on the side of her face so I light her ear. It’s just, it’s not as graphic as I want it to be. As I bring this around and just get it past her ear, now and if I’m down here I just like the shadow on her shoulder there. But look at my background in the back. This light is feathered towards that background. If I feather it away from the background I’m going to isolate the light from this one off the background. And that’s going to create a much better red back there, much nicer red.
Now if I feel like the intensity is better here and I really like that there I can just take a card and I can, on another stand, I can put a card in here and I can cut that light off from the background so that I really keep a clean color in the back. We want to keep these separated from one another as much as possible. So there’s the difference. But right now I’ve got it feathered enough that I think that works really nicely right there. Let me look at that. It looks really nice. I just feel like I want to bring it around a little bit so I don’t have so much on her ear. And that’s going to allow me to feather this a little more away from the background.
Now I’ve got beautiful green light on her face and beautiful red light on the background. But I feel like it needs to be filled in. I feel like it’s just too dark. I can bounce this green light back in to the shadow side and I think that’s going to give us a really pretty look. It’s going to open up and give us that green shadow which is so fabulous.
So I’m using these lights very directional. I can use a translucent and I can soften these out. It makes a huge difference if you look at the exposure on your face. Let me get out of the way of the camera over here. That translucent and especially depending on where I put that translucent, if I get it out more towards the front, if I get it more towards, if I come back here it’s going to be a little less. So if I move it out here it’s going to be, it’s going to open up that front a lot. So you can change the quality of these lights. I think they look really great with just directional light and this kind of fill here. Turn towards me a little more again right in there. Chin down just a little bit.
So let’s talk about how vibrant the colors are. You have complete control of that. It’s about exposure. It really is. So you may think to yourself, “Well you know, they just don’t give me a really good blue.” Well it’s probably because you’re either polluting your different light sources or you have not given yourself the correct exposure. So let’s take a look at different exposures with these two colors and see how they change as we move them up and down the scale.
There’s one stop, two stops, that’s obviously too bright on your face. But the idea is that this exposure is what is changing how dark and deep these colors are. You have complete control of that. Now if you say to yourself, “You know what. I just love the red right here. But the green, I just wish the green was just a little brighter.” You only have one or two options with a light like this. You’ve either got to push it in closer or you’ve got to raise the exposure. Which means you’ve got to darken your red in the background by pulling it further away or doing something to compensate for the exposure.So it really is a balance. You want to make sure you get the right exposure so you don’t pollute your lights. And then you just shoot away.
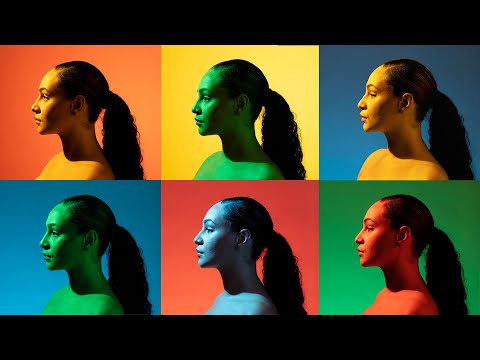
So we’re going to go through a bunch of combinations of these here. Then we’re going to talk about adding three of these together in a shot. So let’s shoot through several of these combinations. And here they are. Here’s the six different combinations with these four lights.
So I’m going to add three lights together now. We’ve got the blue on our face. We’ve got the red background, which I like that combination. I think it looks really nice. But I’m going to just put this yellow light right behind her and just give us a little bit of Rim light on her hair. Maybe a little bit on her shoulder. So let’s just put that yellow light right behind her here. Now you got a combination of three lights here, which I think is really pretty. We see the rim on her hair. We see the blue on her face. Red on the background.
Again it’s a matter of keeping these isolated from each other. If I bring this in it’s bringing really yellow fill light into this. So I’m going to take this out completely and let the front go kind of dark.
One thing to remember is that when you have colors that are this distinct and they’re separated so well from each other (red is on the background, green is on her face and they’re not polluting each other) when you go into camera raw in the HS module you can change each one of these colors individually. You can make them more red or less red. You can also go and you can brighten up one of the channels. Make the green a little brighter or a little darker. You have complete control of this when you get into camera raw. I think camera raw works really well for this kind of setup. It just gives you complete color control because you have isolated everything. Which allows you to control it in the edit completely.
So there you have it. Using inexpensive LED RGB lights from Home Depot. It’s a great way to work, an inexpensive way to work. But just remember those two principles. 1. Don’t let the color pollute each other. Because your color won’t be as vibrant. It won’t be as nice. So make sure you flag them. Make sure you pan them. Just keep them off from each other so you get beautiful color. 2. Also, your color intensity is built around your exposure. The longer your exposure, the more light you give, the lighter the color. The shorter the exposure, the less light you give the sensor, the more intense the colors. And then you get into Photoshop. Go in that HS module. Get in there and play with each color. You can really make these into the strong color you want. It’s just a fun look and a great way to play when you’re doing a portrait using RGB lights. So keep those cameras rollin’ keep on clickin’!