Hi, this is Jay P. Morgan. Today on The Slanted Lens we’re going to take a look at how to light a car. There are some simple steps you can go through to get a beautiful image of a car every time. They’re not difficult and does not take a lot of equipment. It’s something you can do at home. So let’s go through those simple steps. Let’s get started and get through the things you need to do to be able to light a car.
Do I know how to photograph cars or trucks? Absolutely! I photographed for Pilot Freight Services, for Morgan Trucks, for Mitsubishi Trucks and Penske trucks. I’ve shot a lot of trucks and the principles are exactly the same. So let’s look at these simple things you can do to get a beautiful image of your car every single time.
Number one is select the right location. Look at this location we were going to shoot at up on top of the mountain. It’s beautiful. I see the mountains in the background. Everything looked wonderful about it. I wanted to shoot there, but look at the reflection on the side of the car. There’s telephone lines all along the opposite side. So when I say choose the right location it isn’t just about choosing what’s in the background which I think is super important, but also what’s behind you in the location is just as important because the car is basically a mirror. It reflects everything around it. It’s going to reflect the power lines. It’s going to reflect the fence and everything on this other side. Why do I love this location? Because we’re looking at a gorgeous view of the mountains and we’ll see the sun go down on them. But more importantly, behind me is just simple lines. We have a little bit of foliage, nothing that’s going to reflect into the car and make it look messy. This is why you need to choose the right location. That is 90% of the process.
All right, now it’s time to decide what our angle is going to be on the car. There’s so many different options and the problem is every option has different levels. And the car changes for each one. I can’t tell you what’s best because each car is a little different and it’s going to make a difference on the size of the car and the profile. All those things will really determine what your best angle is. So the best thing you can do is just simply shoot through the angles.
I start up front. I’m going to look straight in. I’m going to look straight in and high. It’s nice but I see a ton of road. I don’t really like it. I’ll come straight in on low. Straight in on low really emphasizes the front of the car and makes it look larger. It looks really fabulous. It’s not my favorite angle.
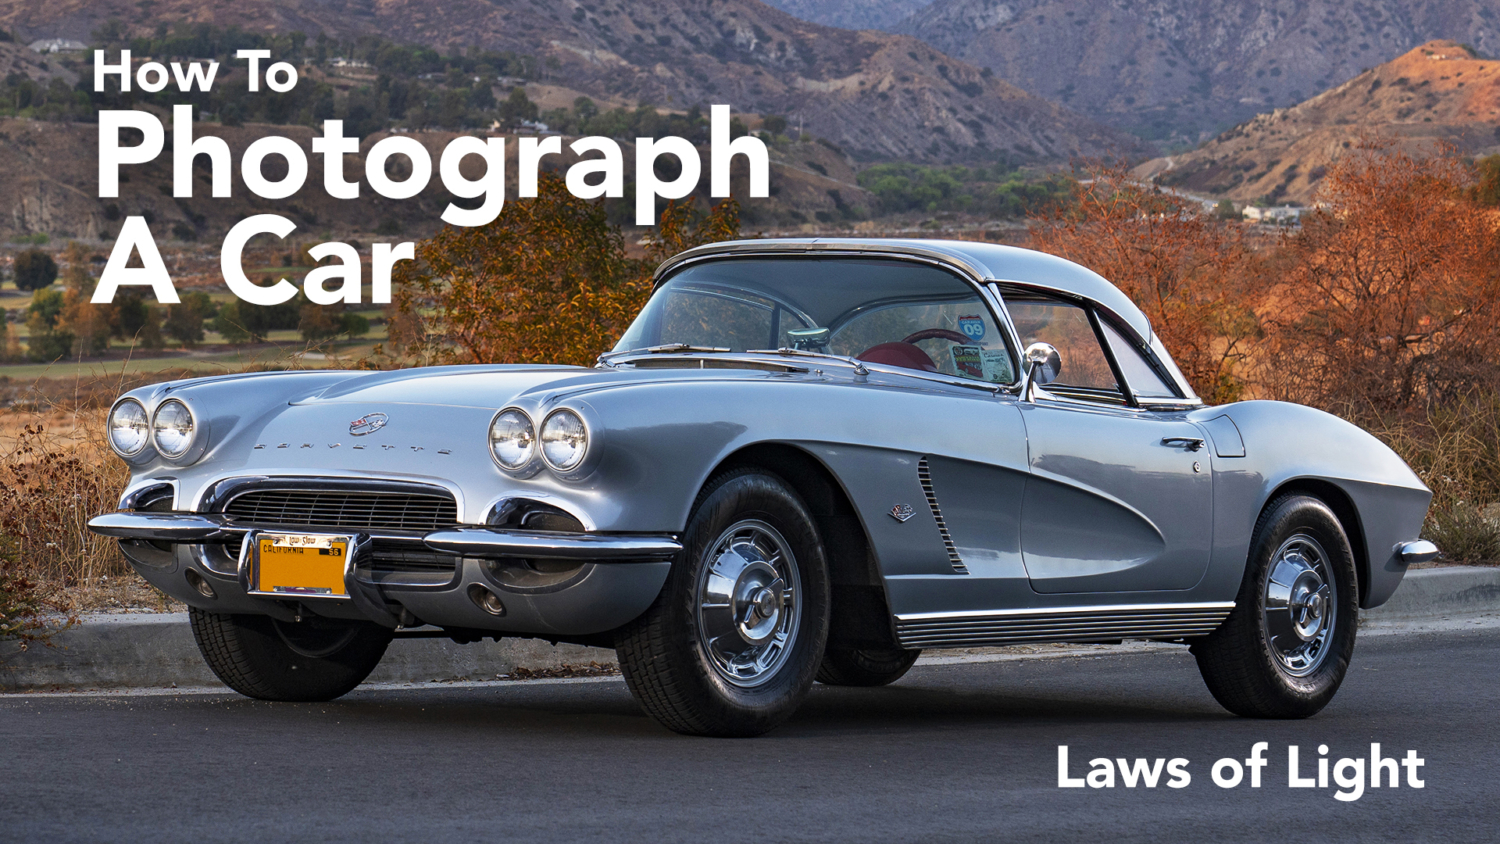
I like to come around just a little bit. Favor the front but see the side. This is a three-quarter front. This is a gorgeous view right here. I can go low which is nice or I can come up high. I don’t like up high, I like low. I can come around further to give myself more of the profile of the car so I’m seeing less in the front, more of the profile.
If I want to just see the car and look into the background I go with a longer lens and back up to like a 100-150mm. And that’s going to isolate the car against the mountain back there. I won’t see the tops of the mountains. So I like this angle a lot.
I can come around to a strict profile and come to a back shot from behind. And that pole is definitely in our way. For me, I usually end up somewhere right in here. I like to see the front of the car, feel the strength of the front of the car. But I want to see the long lines of the car. And our sky here is going to light the long lines of the car. It’s going to look fabulous. I’ll back up with just a little longer lens. But I still want to see the mountains back there. So for me if I’m about 28mm. I can get low and right in here. It doesn’t make the front of the car too large because I’m putting the car in the center of that 28mm. And it’s not distorting like I would if I was straight on the front of it. So I get a nice profile with a nice mountain range in the background.
50 millimeters is going to bring the mountains in closer. It’s going to make the lines of the car not distort as much. They’re going to be very, very square. It’s going to look really nice on this car.
I’m going to step back to 75mm. So for me, I’m going to shoot it from this angle. I’m three quarter side, one quarter front. I’m going to come back here at 75mm. So I really get no distortion in the car whatsoever. It’s just beautiful lines on the side, beautiful lines on the front. I can already see how the sky is going to light this car and just show us all the great drawing of the body. It’s going to look fabulous.
So our video camera right now is in the spot where our still camera is going to be. And it’s seeing all the lines on the car because we have a clean line on the camera right side, the entire top of the car is reflecting that sky right behind it. Look at that beautiful line on the top of the car. This entire side of the car is reflecting this sky, on this side. There’s one distraction. There’s a little bit of a tree right here. And it’s a little bit of that house. But as that house gets darker that’ll blend in really nicely.
In the front, because we’ve got this big sky up here, we’ve got a beautiful highlight across the front of the car which is showing us these two dents, dents (shouldn’t call it dent). These two lines in the car.
Julene said, “How about that telephone pole? That’s going to get in your shot.” No, and it doesn’t because the angle of incidence that I’m looking at for this right now is right out there. That telephone pole would have to be right here to be in our way. So right now we’re in the perfect spot. We have clean lines all the way around the car. We have beautiful sky there all the way around to there. And that’s going to light every single angle of the car.
Anytime there’s a change in the shape you get a highlight on one side, you get a shadow on the other side. That gives us dimension, highlight and shadow. All these lines come up on the chrome highlight into shadow. This line here, highlight into shadow. A little bit of shadow on the back from the mountain back there. Every line of this car is completely drawn by the sky around it.
Now if I can’t stand this stuff over here I can put a foam core, a big piece of foam core on the side here just out of frame. And that can cut that line there. I can raise it up and just find the point where it gets rid of the trees back there. I use the v-flats. Just unroll them here and bring them up so it just cleans that line. But I don’t need to here. This little bit of foliage is going to blend in. It’s going to look really nice.
So this makes you look like a hero. The Art Director or your client goes, “Wow, you lit that car. It’s so amazing.” “Yes, I did. I lit it right there. Yes I did, I lit it.” Actually I didn’t do anything. I parked it. I parked it right there. That’s what I did. I parked it right there.
If you’re getting reflections you just can’t stand, put a polarizer on your camera. As you twist that polarizer it’ll slowly get rid of some of these reflections. I don’t want to kill all the reflections in this car because that’s what’s lighting it. But if I had something that really bothered me I would maybe take a little bit of it out using a polarizer. So that’s something you can try.
Why does the light work so well right now? Because I chose the right time of day. It’s not in bright sunlight. It’s in the shade. That allows the whole sky to become a reflector like soft boxes and draw the lines around the entire car. You have to shoot at the right time of day. That last 30 minutes before the sun goes down into about 20 minutes after the sun goes down will look fabulous on the car. We’re just going to shoot away. So choose the right time of day. That’s super important.
So why do I have strobes? If the light is so gorgeous here why would I put strobes up? I learned a long time ago that you can get beautiful light from the sky around you, but just a little kiss with the strobes is going to open up the shadows. And it just makes the car even a little brighter on that background. And it makes them look fabulous. So we’re going to turn these strobes on to just give us a little bump. And I usually put the first one up front. I want to open it up from the front but then I’ve got to find a spot where I can hide the strobe in the grill or someplace where you won’t see it. I don’t want soft boxes on them. I don’t want big modifiers because I don’t want something creating a big highlight on the car. I have highlights. I just want something to open up the shadows. So I’m going to bring the strobe around and I’m going to try to drop it low and hide it into the front of the car, maybe into the headlight, maybe under the grill.
I’m going to put some warming gels on the car right now. I’m just going to warm up the light a little bit and it is nicer for the background. So putting some, I’m going to put a full CTO on both the front and the back. The light is hitting the back of the quarter panel. I see that dot in there. I don’t want to have to retouch it. I’m going to move that light around just a little bit. So I took these strobes, I aimed them up because I don’t want any of the strobe light, or as little as possible of the strobe light on the ground. I want it to be on the car. It will open up the ground a little bit. I’ve gone to the orange just to give it a little bit of color to make it feel a little more inviting because it’s so blue out here now when the sun has gone down. But it still looks really good. I could shoot without the strobes and it would still look wonderful here.
I’m chasing this with a shutter. I started out at 1/200th of a second so I can sink to the strobes. And I’ve gone down now to 1/20th of a second as it’s gotten darker. And that just keeps opening up the ambient light. I’m going to, in fact, go a little further. I’m going to go down to 1/10th of a second here.
Easy, simple way to light a car is to choose a wonderful background that has a wonderful background behind you that’s not going to reflect in the car. It’s going to give you clean lines. Choose the right angle that flatters the car. Add a little bit of strobe light to be able to open up the shadows. And then just make sure that, if you need to put up a piece of foam core to be able to clean up the lines on the side of the car, you’ll get a beautiful image every single time. It’s not difficult to do, but it’s hard to find that location. It takes a little bit of work. You have to drive around. Look at different places. Take your car. Park it till you find the place that really gives you the right location. Sometimes you find the right location and it just kills you because it’s so close. But it doesn’t quite work.
So I hope you enjoyed this, how to light a car. Get out there and light some cars. Leave us a comment. Put your images in our Facebook group. We want to see your cars or your lighting. We want to see what you’re doing. So keep those cameras rollin’ and keep on clickin’!