One Light Portraits Using Bounce Light For Stills & Video
Morgan
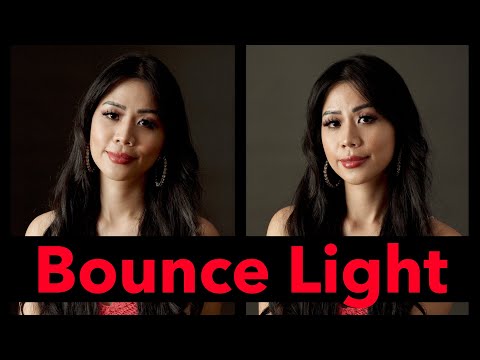
Hi, this is Jay P. Morgan. Today on the Laws of Light we’re going to take a look at bounce light. What is bounce light? We use bounce light all the time in photography. Whether it’s bounce light for a fill, whether it’s bounce off the concrete, when you’re shooting outside you use bounce light all the time. But what exactly is bounce light? Bounce light is when we take a light that is aimed directly at our talent and we pan it up and away and we bounce it off of the ceiling. And it changes the quality of the light completely. It softens it. It makes it much more wrapping. It really helps the quality of the light completely.
Why would we use bounce light? There’s a lot of reasons to use bounce light. And the number one is that when you bounce a light into the ceiling you turn that entire ceiling into a bounce surface or a soft box or reflective surface. So it’s large and it’s soft. It’s going to give you great wrap around the person. It just gives you a beautiful, beautiful look in video. I use it all the time because I’m stuck in a small room like this one. And you can’t put up three soft boxes. It just doesn’t work. So it’s just an easy way because you don’t need a modifier. It doesn’t need a modifier. You don’t have to spend the money for a modifier. You just simply bounce it out of the ceiling. It works in tight spaces. It gives you a nice floor and brings things up. And it also integrates into the scene really effectively. It feels natural the way it integrates into the scene. But anything we do here today will translate into strobes as easily as it does continuous light. We’re just using that continuous light to be able to demonstrate. So let’s take a look at three bounce light setups.
Number one is the ceiling bounce. I use this one most of the time because most ceilings are about eight foot. I mean from a room with a 20 foot ceiling, obviously, it’s not going to work. But if I’m in a room that has a lower 8-foot ceiling like this room it works perfectly. But where you place it in that ceiling really makes a huge difference on your talent. It changes completely. You have complete control of this. You can do the five portrait lighting positions in the ceiling. So right here I’m in a butterfly light. I’m straight in on top of her. Now if I put this thing too far back and move it behind her it’s going to be like any light. It’s going to start to get over top of her head. And it’s going to become, it’s not going to look very good. But as I put it up in front and I bounce it into the area of the ceiling that’s going to give me a nice butterfly on her face, it’s a beautiful light that falls onto her face. It really makes a difference if I move this light this way and come around, all of my light is bouncing up and across the room. So I’m getting a bounce on her face. From my hot spot here I’m getting a secondary bounce across the room. Look what happens if I keep in the same position and I now move this across the room. I’m going to take it across to the other side. It changes the room completely. All of a sudden there’s nothing in the background. When I just move this this way that light that’s sitting in the ceiling over here is lighting my background. It’s bringing a little bit of fill light. But when I come across like this it becomes much more localized. So how you tilt this light makes a big difference. If you tilt it towards the talent it’s going to open up the room more. If you tilt it away from the talent it’s going to open up the room less. I’m in right there, there’s a great Rembrandt. I can bring this around into a loop light somewhere about right there. And back in to the butterfly. I can bring it all the way back around here. I can split this forward so it’s going to not light the background. I can just put it backwards so it does light and separate in the background. So you have a complete control. Any of these, if I get over here into a Rembrandt, a nice Rembrandt there. If I now tilt this towards the background, I tilt it down just a little bit and I tilt more towards the background, I’m going to open that background up and create separation behind her. As well as now, just more isolated separation, more isolated. So even though I’m using the ceiling, even though I’m bouncing this out of the ceiling, I still have control. It’s a very soft light. The more I bounce across her the light becomes softer. It just gives us, because I’m bouncing out of both sides of the ceiling in front of her, I’m getting a huge wrap around her face. And it’s just giving me a beautiful light. Now I can take a card here and I can bounce this light back up underneath her and open up underneath her chin just by putting that right underneath through there. If I come over here to the Rembrandt to this side now I can just simply bring this in and I can bounce that light back in on to the side of her face. It’s not as efficient as what you get from a hard light coming in. Because a hard light gives you a hard bounce. This is secondary off from a secondary. So you’re getting, it’s a diminishing return. Get a bounce here, it doesn’t bounce quite as quickly. If I turn this over and it’s bouncing across I’m going to get a much better bounce back. As I put this in it’s going to open up her much better because I’m getting a stronger look at the reflector. If I want to I can simply put this reflector down just slightly. Now I’m catching the edge of that reflector and it’ll even give me more fill on her face. Because I’m starting to get, I’m starting to get into the direct beam of the light as it bounces back onto her face. So it’s really easy for me to modify this using just the light in the ceiling and a card. That’s my favorite setup, just a ceiling bounce light. It looks fabulous.
The second is bouncing your light off from a card or a reflector. This can be large and soft or small and more hard. So here we go bouncing light off of a reflector. Look at the quality of light on her face when I fill this entire reflector with the light. But look what happens as I move in. If I get this light super close to this reflector it becomes much more directional, much harder. I can tilt it to the side. It becomes much harder. When I come back I’m now opening up the light and I’m going to try to use that entire white surface to bounce light onto her face. So where we place this reflector makes a huge difference, the closer I get it to her. So the idea is filling the card with your light rather than becoming really close. And just because once I get in super close, I’m just using a single little area to be able to get light to bounce on her face. When I bring it back I get a much nicer light. And the difficult part about this is getting this thing in close enough and to get it in the right place and to have room to bounce this into. It sometimes, across the room bounce into it, it’s very difficult to place this light sometimes. But it can look really good and it can work. I can now grab a reflector. I can bring this light back in. I can open up her face from the side. I can come in underneath if I want to open her face from underneath. This has all those qualities. It’s a little more directional because I’ve got the light a lot closer. It’s not as broad as what I had in the ceiling. It’s just a lot more directional light when I get it in that close. If I’m in a huge room and I don’t have a low ceiling then this is a great solution. Because, I can throw this up, bounce the light out of it and I can still get a beautiful light on my model or on an interview using this kind of bounce system. And it just, it looks really nice to me. I could put a piece of, a piece of gel on this like a large piece of quarter sun. And that would just warm it up a little bit. Give me a nice look. I can cover it with muslin and bounce it off from that. And that muslin is really beautiful light because it’s warm. It has a real warm tone to it. And that’s going to help kind of open it up. It’s going to make it look really warm and wonderful.
So some of you are probably wondering why I had this Sunbounce in the background with the light on it. It’s not doing anything right now. It’s set up for my next setup. So let’s go to that.
Let’s go to number three. That’s bouncing a light out of a V-flat. Why do we use a v-flat? Well the biggest disadvantage of bouncing light is control. When you bounce it in the ceiling it opens everything up. That can be a negative or can be a positive. But control is always our problem. So a V-flat allows us to get control of light and direct it and keep it off the background and have some control. So let’s set up the V-flat. So there’s the V-flat set up. The v-flat is right here. It’s giving me the ability to cut this light off from the background. If I move it around it’s going to cut the light off the background. If I move it this direction I can bounce the light to the background. I can make the background brighter so I have the ability to control the background with this V-flat. This is from V-flat World. They make great stuff. Not a sponsor, but they should be. They make great equipment. These are awesome. So that just gives me some control. A V-flat allows me to have control. As I move it from side to side here, I can make this broader and more forward. And that’s going to open up my background. But it’s also going to open up the light on her face. If I pan it around up front here it’s going to change. Look at her face. Look at the intensity we gained by bringing this up in front there. You have to dial that down further away. That makes a big difference too. If I bring this thing way back like this and I bring the intensity up it’s going to open the whole scene up. It’s going to just start to bring everything, make everything brighter as I bring it back. So where I place this V-fat flat makes a huge difference. If I let it bounce into the ceiling it makes a big difference. If I go up now, I’m using a combination. I’m doing a V-flat and the ceiling. But we’re going to stay just with the V-flat down in here. I can bring this in, punch that light back in to open up her face. Look at that. Oh, that’s just beautiful. Coming underneath, that’s just beautiful light right there. I’ll just use this Sunbounce right now, for me just right now, to bounce that into her. Now I’m going to take and add a light on the background. I’m going to bounce the light out of the ceiling in the background and that’s just going to give me a nice wash on that ceiling. Just to open up the background just a little more. That works beautifully because we’re bouncing into the ceiling. It’s an open light and that open light is just going to give us a nice wash across the seamless. All right, this is a wonderful way to work. Using a V-flat just allows you, like you say, to control the light. To direct it slightly. To be able to give it direction. And it also allows you to be able to get a nice bounce that’s either close and hard, back and a little more open so you kind of wrap around soft. The closer I get this to the camera then the softer this light is going to be. So if I move this up front here it’s going to become more and more frontal and more and more soft. And I’m also going to dial it down just a little bit because it’s too bright, too much. And that changes the quality of the light sometimes. This V-flat is maybe a little short. I would probably put this on a box and I would get it up so it’s more to the ceiling height. Because I want that light to come in a little higher. I think that’ll make it look a little nicer.
Okay, so there’s a look at bouncing light. Three different lighting setups. Now let’s take a look at bounce light to light our background. This is really high intensity. I can see on my image up there. But if I come down with it I can bounce it out of the ceiling and it becomes lower and it just separates her just a little bit. It can be very, very tasteful. Just a little bit going on back here to a whole lot depending on where we’re at. It is interesting if you look at the placement of this. If I bring this light in close and bounce it up here, if you see in the image with Cindy, you start to see the wrinkles of the background. Because the light is really directly over the backdrop. It’s creating texture because it’s a cross light on that background. But if I move it forward up here it’s going to soften it. More forward and it’s going to be less likely to show that seamless, the wrinkles in the seamless. And now we can just change it. We can change completely the way I direct it here. If I loosen it here I can direct it away from the backdrop. It becomes more frontal. I can go more to the side. If I loosen this I can take it more to the side which can make this light come more from the side. And now if I bring the intensity up it’s going to come from one side rather than across the whole background.If I just get down lower and blind my camera light, there we have a lot of different options with this light on the background. Another thing I can do which is really interesting to me, if I dial this way down, is I can just bounce this directly into the floor and keep it off my background. And that becomes really interesting because it just kind of gives us a glow behind the person. Let’s turn that on and off and you see what that does. It just gives us a glow. So I’m bouncing off the floor. That light’s just bouncing up from underneath and giving us some light on the background. I love bouncing light on the background because it allows us to give a more even kind of look of the background. It’s not so directional. It just works much nicer. I’ve done something like this before where I simply put a card behind the person or a V-flat and I bounce the light into that V-flat. And it just gives us a nice even glow onto the background. It has a tendency to even light out and just light the entire surface more evenly. And it gradates really nicely. Whereas a direct light aimed right at the background is very direct and is very specular. It kind of lights very hard from one side to the next. It’s very hard. To get it even you have to put four of them up, two on each side. Whereas a bounce on each side on a v-flat or bounce from underneath, on the side and the front gives you a beautiful bounce light that gives you an even background.
Okay, so now just to wrap this up. Bounce light is easy to set up. It’s inexpensive because you don’t have to have a modifier. You can work in small tight spaces with it. It’s just a great way to soften a hard light very quickly. It’s great for video, great for stills, great for any kind of splash or video. It’s just a really great way to work. The disadvantages are it’s hard to control, it’s everywhere, it bounces everywhere. But, so there are some ways we can control it as we look using a V-flat. We looked at getting a card in closer and bouncing off of a card. So if you have a high ceiling you can’t bounce out of a ceiling. You bounce into a card very close to your model. So there’s some, there’s a look at bounce light. Integral to just about everything we do in photography. You may set a hard key light in a soft box but you’re going to use a bounce fill. You can use a bounce in the background. It gives you a lot of different options. Think about mirrors. Think about hard reflectors like silver or gold. Those are all different qualities of bounce light that change the look of the image that you’re creating.
Alright, so I hope you enjoyed looking at bounce light here on the Laws of Light. So keep those cameras rollin’ keep on clickin’!