Hey, it’s Jay P. here. Today on The Slanted Lens I’m going to show you how to get great natural light portraits outside on location using a modifier that is extremely cheap and easy to use. But if you don’t use it right they look terrible. Let’s get started!
So what is this magical modifier of which you speak? It’s a reflector. Reflectors are really incredible modifiers. They’re inexpensive to purchase. A 30 inch will run you around $20-25. A larger up to 50 inch can be under fifty dollars. Very inexpensive modifiers. You can also see how they work. The light is actually reflected so you see exactly what they’re doing, unlike strobes. You see them, you see when they look good, you see when they don’t. So a reflector is very easy to use because as a photographer you see exactly what it’s doing. They also give you options to be able to modify the sun, using the sun as the source. Which means the sun is bright and now when you bounce the bright sun onto a person’s face it keeps everything in the same intensity. You’re not trying to match it with power from a strobe. You’re using the sun, bouncing the sun. And so even though it’s less efficient than the sun, it is in the same intensity range as the sun. Which means it’s easy to, really to balance a rim light with a reflected light and get a beautiful portrait.
What should you buy? I think a small 30 inch is a beautiful reflector for a more directional kind of light. I would get a larger. I really like this 50 inch from Westcott. This 50 inch from Westcott is large. It allows me to get a larger beautiful light. It also allows me to give a beautiful translucent when I’m using it. So what kind of reflector should you get? A five in one reflector, absolutely, no question about it. And the reason is, that a five in one gives you five different lighting options. And I use at least three of these most of the time. I use one of them occasionally and the other one occasionally, so mostly the three. I use a translucent all the time. Translucent is just what it says. It allows light to pass through it. It’s not a hard white. It’s a translucent white. It allows you to have light come through it. It’s great for putting a person in direct sun. We’ll show you how to do that. Then you have a hard white. That hard white is perfect for reflecting because it is a hard white. So it reflects very efficiently. It allows you to reflect a lot of light in. I’m going to show you how to use a transition edge reflection to be able to use that hard white to give you a beautiful image. So that hard white is fabulous. Then you go to a gold. I like the gold. I just like the warmth of it. There is on the back side of the gold of the hard white, a silver. So that silver, you could use that silver in the same way you use the hard gold. I just like the warmth of the hard gold a lot and so I use the hard gold more often. So I like the way this is set up. I feel like Westcott has set this setup up so that you have the three most important surfaces are easily accessible. That is you have the hard white, back side is the hard gold. But inside you can pull out and get your translucent. You also have a black if you want to subtract light. So you can push that in and it kind of subtracts light out and allows you to have more contrast, more shadow. And so that’s a great way to use a reflector as well. Whether it’s large or small, five in one gives you so many options to be able to light and to create different lighting situations. It’s really important that your reflector is flat. You don’t want one that really curves. You want it to be very flat. As they’re flat, they’re more efficient. They’re going to bounce the light better. You’re going to get a better highlight with a flat reflector. They’re really quite easy to set up and use on your own. Westcott has this little bracket. It’s a little bracket that allows you to clamp the reflector in the bracket. And that really makes it so that you can use these with a stand on your own. I always carry with me an a-clamp. I’ll either a-clamp the bottom of the reflector to the stand so that it stays in place or I’ll a-clamp a piece of wood, a stick or something, to push the reflector out on the bottom. Which makes them way more efficient. It gives you more intensity, gives you more light when you do that. This is a $5.50 stick pusher reflector alternating device. I’m going to start selling these, the stick and the clamp. But there’s what it does. It pushes that reflector out and makes it way more efficient. So I always carry an a-clamp. And I guarantee you when you put this up the wind is going to blow. And you’re going to need a sand bag because it’ll blow it over. There’s always someone to help you, a bridesmaid, a groomsman, father, mother, boyfriend, girlfriend, somebody. There’s always somebody who can help you. If not, you’re on your own. A couple of stands, a couple of these clamps from Westcott and your reflectors in a wagon and you’re ready to rock and roll.
Don’t hold this reflector down here like this. When you set a reflector it’s like setting a key light. You don’t set your key light on the ground and bounce it up. Get it up here above your head. You can even put it over your head like this if a person is holding it. Now that is in the correct place for a key light. And it’s going to give you a much prettier light on the person’s face. Even if you push the bottom out it’s high and it’s in the correct place. It’s in one of the five lighting portrait positions on the face. It’s going to give you a beautiful portrait. So keep it up high. Okay, enough talking about reflectors and types of reflectors. Now it’s time to show us how to use a reflector.
This is my go-to, my first way that I always go to when I want to set up something with a reflector. And that is, I find the shadow edge. Like we got trees back here. So I got shadow all over the ground. But I’ve got direct sun just right outside. So I’m going to take Ali here and I’m going to get Ali in a spot where I see, (come this way Ali). I see her shadow on the ground. (Come over a little bit). I can see the entire, her silhouette on the ground. But it’s dark just behind her. So I’m now in the perfect spot to be able to use a reflector. Because just outside of that shadow area is the sun, the direct sun. I’ll need to turn her towards a reflector to the right here. I’ll bring this reflector out to the side and now I can reflect this light in on her face. The one thing that’s a guarantee is the wind doesn’t blow ever until you put up a reflector. Then it always blows over a soft box. It’s just not, that’s just the way it goes. So I’m going to put this sandbag on here so it doesn’t blow over on me. In setting this reflector I want to set it just like I would a key light. I don’t want to be too far forward, it’s going to flatten out her face. I want to reflect it to the side. (As you look back here to me, turn your head in that way just a little bit. Not too much. Look at me now, right there.) It’s a little too much to the side. I’ll bring it forward just a little bit. And if the wind is going to start to be a problem for me I’m going to a-clamp this thing off to there. I’m on 100 millimeters. I’m on the 70-180 Tamron. I’m using aperture priority and I’m shooting at f/2.8 and 100 ISO. Beautiful bokeh in the background. I can kind of move around. Look for bokeh spots. Oh, look at that, the way it frames her face. That’s so beautiful. I can turn her a little bit. (Come towards me, straight, there you go. Don’t move, just rotate. There you go. Right there.) Change the bokeh. That flattens out light a little bit on her face. As I turn around it really becomes, (Keep turning towards me.) it starts to become a side light on her hair. But gives me a beautiful bokeh in the background. Now that rim light from behind, the sun is much more efficient. It’s a lot brighter on her face. I’m getting nice bokeh in the background. So I’ve got a nice range here that really goes from almost a, I could bring this up a little higher, it’s almost a butterfly light right there where she looks right here at me. As I look around I find great bokeh spots up there. It just look really nice.
So if you have the model turn away from you and then rotate back to me it gives us a different look. As long as I keep her hair covering her blouse pretty much it looks good. Because I get the nice rim light in her hair. If her hair gets pushed back. (Push your hair back Ali, yep. No, the other side.) If the hair gets pushed back I get this bright sun all over the front of her shirt and it just looks terrible. So someone with short hair, this does not work. (So bring your hair back over your shoulder on your back side. There you go, just like that.) Now that covers up that and I don’t get that bright light on her shirt. That’s great. Now I’m just hunting for great bokeh in the background. Which is just patches of light that fall out of focus. I’m at f/2.8 at 180 millimeters. It just gives me a beautiful out of focus bokeh in the background. Beautiful sun. She can now rotate from out here which becomes a Rembrandt into a, really basically, a Butterfly. So that’s the easiest number one way to use a reflector.
So here’s another setup. This is very much like a clam shell when you put a light above and below a model. I’m going to bring this reflector around. I’m going to bring it all right in front of Ali here. And she’s young and beautiful. This light works for her, me, no not so much. Me, way too many wrinkles you’d show. So I’ve got this light, it’s bouncing underneath here. It’s giving us like a clamshell bright light underneath her chin, underneath her nose. But now I’m going to take another reflector, I’m going to take this reflector and I’m going to just bring this in. And I’m going to give myself a little bit of light on her face. There it is right there. See that come in. Oh, that’s so nice right there. And now I’m going to shoot underneath that. And I’ll get a very flat, very fashiony looking light. It gives a nice reflection behind. (Cheat, work towards the reflector. That way. There you go. Yeah, a little smile, there you go. You have a beautiful smile.) All right, nice tight shot. That’s a very different look as far as the light goes. But just something to play with. And you can change that up really fast. I still have her on the shadow transition edge of the, the shadow to the sunlight. But I’m using this as an under light. So it’s like a clam shell. I mean I could try to get this in closer like this. But it works right here. I could probably put this right here. See what that looks like. There you go. That’s a very flat look. But very pretty. (Back up here.) So there’s using two reflectors to give yourself a clamshell look. It’s a very pretty light.
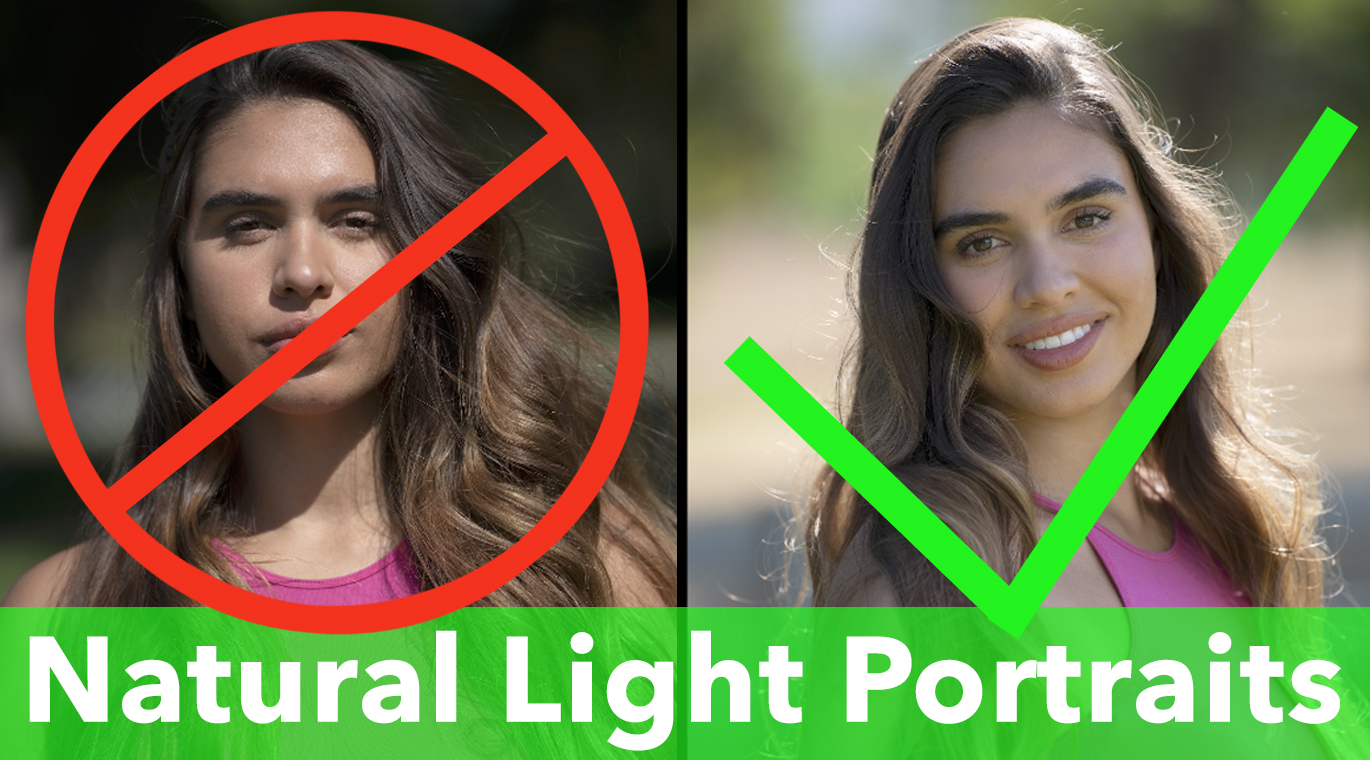
Now for the scariest moment of all. We’re going to go out into direct sun. No! All right, here we are in direct sun. The secret to direct sun is simply this. Put her in a position where the sun is acting in one of the five key light portrait positions. Like right now, if I turn her towards me I’ve got a great Butterfly on her face. I’ve got a nice dark background behind us. So I have a dark background to work into.And if I take a picture here. (If you just get down, your chin down. Just a little bit. Or up a little bit. There we go.) I mean, we see the light on her face. (Turn your head that way. Now keep turning.) There’s a little portrait. There’s the Rembrandt on her face. See the little loop underneath her nose. All right, but look how terrible that looks. So this is one of the aspects of a reflector that I absolutely love. It’s a translucent. Which means it allows light to pass through it. So it becomes a soft box. Basically, we’ve turned the great big sun into a soft box. I looked at where the light was going to be on her face. So I got her in one of the five portrait lighting positions. I put this reflector up. That cuts that light down and softens it on her face. I’m looking into a dark background that has some relief in it so I get some bokeh. And it just looks really beautiful. So let me take a couple of shots here. Oh it just looks fabulous. You just get a glow in the skin that is really pretty. It’s not a glow that looks like she’s sweating. It’s just nice highlights on the cheeks and just gives you beautiful highlights. You’re using that sun but using the translucent to soften it. So it looks really nice. Now what I can do is if I want a little rim light on her. My second reflector can bounce in a rim light. So I’m going to now put this, this is the gold reflector because I need a little harder light on her. The white is not going to give me enough. If it’s too much I’ll feather it. See on her hair, I’ll just slowly feather it away from her or forward so that it’s not quite so bright. Right now I’m going to hit it hard, take a couple shots and see what it looks like. There we go. Look at that. Man, that looks so amazing. Nice bokeh in the background, a little bit of rim light on her hair. Beautiful light on her face. No one would ever know we’re standing out in the sun here. That is a great setup there using that translucent to give a soft light in her face. Using the second reflector as a nice rim. Using the hard gold so it gives you enough efficiency to create a nice rim on her hair. Beautiful images. There’s a great setup for working in direct sun.
I could do this if I had to shoot this with no shade in the background. Let’s see if I can do it. So I flipped Ali around now so that we have this light is coming in as more of a side light. More of a Rembrandt. Get a little bit of actually a loop light on her nose there, you see that. And now I’ll bring this gold around and bounce some light on the side of her hair here. But I’m looking into bright background. Not my favorite thing. But as I do that, there’s enough dark back there as long as I avoid that one tree. (Looking right here.) Oh my word, it just looks fabulous. We can’t go wrong with these reflectors. It’s a little darker on her face which is really interesting. You can get a nice ratio. You can get a hard ratio. So you get a bright side, a dark side and with this translucent. So there we go, we got a nice ratio there a little darker, a little more shadowy in the shadow side. Very pretty, beautiful bokeh back there. Everything’s out of focus. Okay, so to clean up the light in her face I’m going to just keep turning her more. There you go. That looks nice. So I’ve got that gold giving us a nice light in her, light in her hair. And well, I’m getting light in her eyes. You know what I feel like, the light is not in her eyes enough. I’m going to bring this down to start to see just a little bit in the eye. I like to see a little bit of the reflector, a little bit of the strobe light, a little bit of the soft box in the eye. It opens up the eye and makes it look bright. It looks really nice. Now if I was feeling like she’s just not, too dark here I could take that second reflector and bring it in here as a fill light. But I’ll lose my rim light.
So let’s see what that looks like. And what am I doing? I’m looking into the shadow side of the face. (Here’s a lesson you should check out about where to place the key light. It’ll help you understand how to not put it in the wrong place.) I’m shooting almost 360 with that out in the sun. And the reason it works is because the sun is going through the translucent. That means you’re using the intensity of the sun the brightness of the sun. You’re softening it and then as you look 360 you either get a darker background or a lighter background. And that lighter background is only about a stop brighter than your face. And it really, it works. You can almost shoot 360. Shoot into whatever direction you’d like, choosing your location. Choosing your background that works best for the shot that you’re doing. As long as you’re using the sun as a key light through that translucent it means that it’s going to be powered very similar to everything around you. You can get bigger reflectors, big squares, eight by eight, four by four. I’ve used 12’ by 12’. I’ve used 20’ by 20’. To give you an area to work in that just gives you beautiful soft light. The same principles completely doing full figure, doing groups of people, doing a dinner at a table. I mean all those kinds of things are possible. It’s just a matter of using the sun and softening the sun. So it brings your exposure up to match the sun outside.
For this setup we’re going to go into deep shade. So she’s in the deep shade. I’m going to use the gold side of the reflector and bounce light in. I have her sitting because to get that reflector up high enough to keep the light into a decent lighting position, I need to bring her down. If she stands up that reflector’s got to be way up there and I need someone to push the bottom of that reflector out. You can see the reflector on the ground. You can see that walking around the ground. So you can see it where it’s going to hit her. If it’s too harsh on her face you can kind of feather it towards the camera or away from the camera to be able to create a nicer light. (So go ahead and put that on her face Julene. There we go. That’s a little too hard. Come back. There we go.) Very warm look. (Just turn your body slightly toward, there you go. Just like that. There you go, just like that. Right in there. That’s nice.) It has a really sunny kind of look to it. (So Julene, just soften it just slightly. Just, there you go, right in there.) That’s much better. That’s a nice light and it’s not too harsh. That’s nice. Her head is in a nice position there.
So you can make that gold reflector look good. You just can’t hit it hard. You’ve got to really learn to feather it. Which means you’re going to have to have someone holding it to make it work. It can’t be just left on its own because it really has to be finessed. Usually there’s somebody, a bridesmaid, a bride’s groom, a father, a mother, a boyfriend, a girlfriend, somebody. There’s somebody, hey you over there with the weed whacker. Somebody can hold that reflector for you just to kind of finesse it for you.
So I’ve gone to a white reflector, hard reflector and I moved it way in so it’s just outside of the shadow. It’s a much subtler look, much more subtle. But it gives us pretty light on her face. It’s a lot easier to manage than that gold is. It just gives us a soft light. So Julene is just going to lift the bottom of that up a little bit so it brightens up her face. I just see it in her eyes. Just a slight look of the reflector. It gives us just a little bit of openness and just beautiful light. It’s very pretty, very soft. So there’s working in deep shade. It’s not a hard way to work but I think it needs someone on the reflector to make the reflector really do what it needs to do.
All right there’s some look at different ways to use a reflector. So let’s wrap this up. A reflector is the perfect modifier for working outside. For one it is cheap, inexpensive. You see what the light’s going to do. So you know exactly what it’s doing. You’re not guessing like you are with strobes. And it’s really easy to set up. A person can work by themselves with reflectors without any problem. They’re not heavy. They’re easy to move around. It just gives you great looking light. They’re also balanced with the sun when you’re using the sun. So you’re using the sun in the same power ratio as the sun. So it means that they’re going to match the sun. It makes it easier to work. So reflectors are perfect modifiers for working on location, for new photographers especially. For experienced photographers it’s just a great way to work. Motion picture people use reflectors, shiny boards all the time to create great looking images. So if you enjoyed this and you want to see some other lessons like this check these out. So keep those cameras rollin’ and keep on clickin’.