
(If you want to watch the video go to The Slanted Lens on YouTube!)
I am so excited today because we’re going to compare a 3 foot x 4 foot softbox from Westcott with tracing paper. I love tracing paper. It is a beautiful look. It’s a soft light. It just makes things look so fabulous. So we’re going to take a look at tracing paper versus a soft box and see which one makes a better portrait light. Let’s get started. Let’s compare them and see what we got. I’ve got Abigail here with me and I’m going to get started and see what we can do.

I’m going to be using a 3 foot x 4 foot Westcott softbox that has a white interior, not a silver, but a white. That’s going to compare better with that tracing paper. So my camera setup today I’ve got a 35-150mm Tamron lens.  It’s a f/2-2.8 lens. I’ll be shooting about 100 millimeters which gives me a nice portrait length on that lens.
  It’s a Sony a7R V. I’m shooting on manual. I’m not going to shoot wide open at f/2.8.
  I’m going to be about f/4.5 to f/5.6 because when I’m shooting against a gray background I’m not as concerned about the background falling out of focus. I like to have a little bit of focus so that the eyes to ears stay in focus. So there’s kind of my camera setup as we compare a piece of tracing paper to a softbox.

All right we’re going to start with a 3 foot x 4 foot softbox I’ve got off camera left here. I bring it around so it’s going to give a nice loop light off from her nose. And I’ve got it vertical. So let’s take a few shots of that and just see what that 4 foot by 3 foot softbox looks like. Let’s get a couple of shots.

So this is a beautiful light on her face. We see a great falloff. I mean the shadow falls really fast. We could certainly put a reflector in that’s going to open that up. But for right now let’s just look at that hard transition. You see the transition, it transitions pretty quickly.  If I turn the softbox horizontally and I take another couple of pictures let’s just see exactly what that does to that face. It’s going to change that transition from highlight to shadow. It’s going to become softer and that gradation is going to be a little little softer and won’t be so hard. It won’t be so quick. So let’s get a couple of shots of that. Okay here we go.

So now I’m just going to slide a reflector in to just open up the shadows and just take a look at that. So it is a little softer with that.  If I really wanted to make this softer I would push it around to the side here closer to the camera and get a little more frontal. But I like where it’s at. I think it’s a nice light. So let’s let our comparison start from this point. But let’s put a reflector just to open the shadows up so it doesn’t look quite so hard.

So that’s really a beautiful light. But we’re going to make our comparison. We’re going to make this vertical again. And we’re just going to look at this thing vertical because that’s about the only way we can look at the tracing paper is dropping it down, unless we build some kind of a frame for it. It’s not our goal. So let’s go vertical and take a couple of shots here with that reflector and see that transition and see that beautiful light. Here we go.

All right, so that’s a beautiful light. The one thing we can do at this point right now is I can take this light and I can pan it towards the camera. I’ll pan that light towards the camera.  I’ll take another shot and you’ll see the background is going to be a little darker. So that certainly makes that background darker.
  I have a lot of control with that softbox. I can roll it backwards or forwards. I can really start to feather it and create control with the light where it’s on camera. That reflector is maybe a little too close. It’s kind of opening up the shadows more than I wanted to.
  So I’d probably back it off a little bit. Let’s take our final shot right there. Here’s our soft box feathered away from the background and with a nice fill light from the side. Yeah, that’s beautiful.

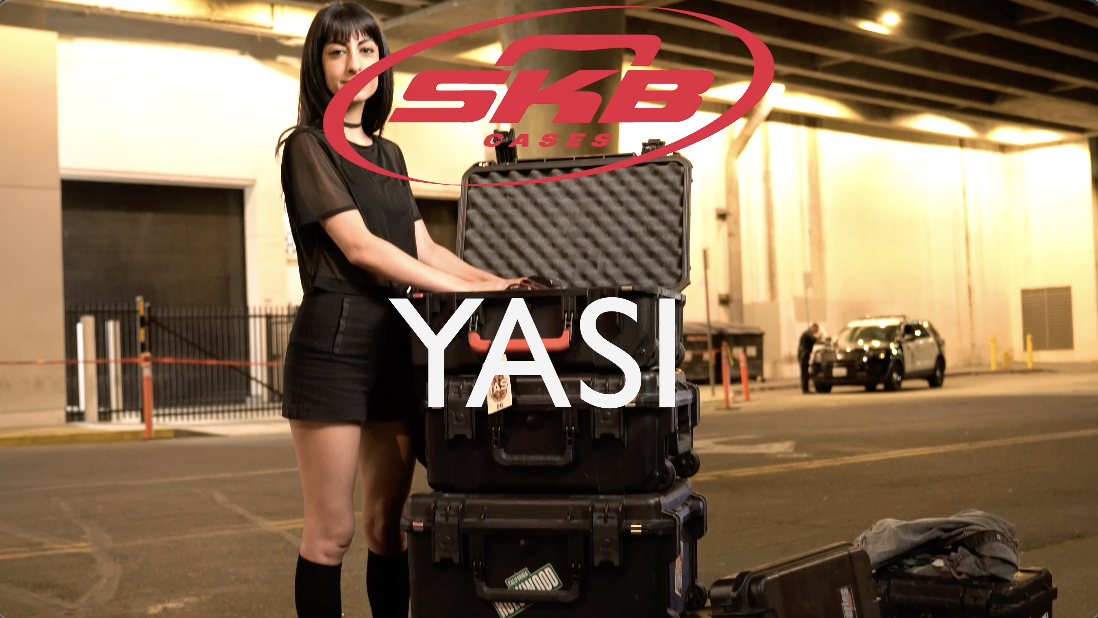 Hi, my name is Yasi. I’m a touring music photographer and here is what’s in my SKB case. I’ve got two camera bodies. One is digital, the Canon 5D Mark IV. Over here I’ve got the Canon EOS3, it’s my film body.
  And I keep my lenses all over here. The 70-200mm, the 35mm, the 85mm and the 16-35mm. I’ve got a whole stack of batteries over here. I’ve got my big flash, the 600. Got a little backup flash, just in case. Very, very, very important are my fitted earplugs. Also very important are my snacks. Don’t forget your charger and your cards. That’s literally it. So yeah, that’s what’s in my SKB case.
Since the beginning of time, well maybe not the beginning of time. I mean, I’m sure cavemen didn’t do it. But since the beginning of lighting, anytime you put an artificial instrument up people are trying to figure out how to soften it. How to make it more attractive looking.  And one of the first things that came up was you could buy a roll of tracing paper. Just a large piece of paper, butcher paper. I’ve seen people use a shower curtain. So many different things to soften the light to be able to give you a soft light. This is beautiful when doing any kind of product work. A beautiful light that goes through a tracing paper.
  And you should check out our lesson that we have on that, “Better Than A Soft Box, Inexpensive Product Lighting Solution” and just see how beautiful that light is using tracing paper. It also makes a beautiful portrait.
So let’s take a look at this tracing paper. Same place we had our light in the last. We’re going to take the softbox off, leave the light in the same place and put this tracing paper in. And take that same portrait and just see how they compare with each other. So here comes the tracing paper.

All right, so I slid the tracing paper in place. It’s just on a C-stand and drops down. I put a couple of clips on the bottom of it so it’ll just hold it down. I have the head in exactly the same place as the last one. It’s slightly panned towards the camera which is what we were doing. We were feathering the softbox towards the camera. So you see the background in this shot. Take a look at these images. Here’s a couple of images in this first setup.

So the background’s still pretty nice. I’ve got a 7in reflector on that. So it’s panned away from that background. If I send it straight to the tracing paper straight in that’s going to definitely change the background. So let’s take a picture and let’s take a look at that compared to the background.  So there’s that head with a 7-in reflector kind of panned back towards the background with the tracing paper. The background’s not changing that much. It’s still very open. That tracing paper is not controlling any bounce in the room. So it’s bouncing into the ceiling. It’s bouncing all around. So I can’t feather or make very much of a change with that head.
  I can do something like this. I can’t really feather the tracing paper but I can punch in which is going to make it a little stronger. So let’s see what that looks like.
 I’m going to come in really tight. Now that’s going to be a very focused light on her face and it should fall off on the background a lot. So there’s some of those images in that really tight. It’s very, very directional. I mean, you see much kind of stronger highlights on her face. You see a strong light in her eyes. I had to bring the exposure down.
  I had to bring the exposure up with the tracing paper. It was about a stop less light coming through that tracing paper than what you got through the softbox. And so I had to give the more power to the strobe. Now when I bring this in close like this I’ve got to bring the strobe down. But I can throw in a reflector. That’s going to help this a lot because it’s just, it’s very directional right now. So let’s put a reflector in and get a couple of shots and just see how the reflector softens that close head right next to the tracing paper.
So with the reflector moved in with the head very close to the tracing paper we get a very pretty light there. I think to compare this really fairly to the soft box we’ve got to move this back out so it’s hitting all of the tracing paper. We’ve got the reflector in so it’s going to give us a nice bounce back on her face. And let’s just take a look and see what that looks like and we can compare those two. And that’s going to give us the best idea of what those two look like compared to each other. So here we go, let’s get a couple of those shots.
All right, so there’s some images that make this tracing paper more comparable to what we’re getting with the softbox. And it’s a beautiful light. There’s no doubt about it. It’s soft. It wraps. The reflector certainly fills in and makes it a lot softer, looks a lot nicer. So we can look at those head to head. Now let’s take a look at the tracing paper versus the softbox side by side.
All right, let’s wrap this up. Obviously a softbox has much more control. It controls the area of coverage. It has the enclosure which allows you to keep that area of coverage very under control. It’s not going to bounce around as much. You can take the light off the background a lot easier. It gives you a soft and beautiful light on the face. Whereas the tracing paper, it’s going to let light go everywhere. But it does give you a beautiful soft light on the face.  Let’s take a look at that once again. That beautiful light on the face is because you have just a really soft kind of transition between because of the paper and the way it softens the light. But you can’t put it horizontal. It’s very difficult to put it horizontal. And you really have some kind of problems in using it because you can’t control where it goes. But the advantage is you can move the light closer and further away which changes the quality of light completely. With a softbox you’re stuck at one place.
  But with tracing paper you can move the head closer or move the head further back. That changes the quality of light completely. So you should check out a thing also for doing products with tracing paper. Tracing paper is a beautiful way to soften light. Something that’s very inexpensive to use. But I still think the softbox wins. So keep those cameras rollin’ and keep on clickin’!