Support The Slanted Lens by shopping our affiliate link with Samy’s Camera.
Hi this is Jay P. Morgan and it’s December! I love the snow. Snow comes in December. You’re thinking about the holidays… This isn’t snow. We live in Southern California! It doesn’t snow here! We have to make our own snow.
Today on The Slanted Lens I’m teaching you how to make and shoot realistic snow for video and photography using soap suds. I’ll give you some tips to make the snow straight out of the machine look even better. I’ll also show you the commercial I recently shot for BulbHead, using these techniques.
There are several things you need to know about working one of these snow machines in order to get more realistic results. Number one: the higher the level, the bigger the suds, and the less realistic it looks. So you’ve got to keep it fairly low to get smaller “flakes”. Number two: you need a fan. A lot of these have fans built into them but it really doesn’t do enough.
So I built a little setup. I took a baby plate and hooked it onto a piece of plywood. We used plumbing strapping, metal strapping, to secure the snow machine in place. The baby plate’s really long, so I was able to hook a c-stand arm on the end of it. Using more plumber’s strapping I attached a c-arm and an extra c-stand head to the fan. I had attached a board on the other end and mounted a baby plate to it. That baby plate became the base to hold the fan from being able to rotate. I used additional strapping and attached it to help keep it all snug. This gives us the option of hooking onto this baby plate that’s up high on our stand. Or we can table the fan so it gets right underneath the snow, and blows it in the air. Additionally, we can drop it down if we want to push it out further.
If I get that fan up higher it’s gonna blow the snow up in the air. It’s gonna break it up a little bit, make it a little nicer. I also pointed my machine up rather than straight out because it got the flakes going up and then falling down. It looks nicer in the shot.
In our commercial for BulbHead it’s snowing outside. We have a man who gets up on the roof, trying to put his Christmas lights on. He gets all wrapped up in the Christmas lights and he falls off the roof. So first let’s talk about how we lit that. We put a 350 zoom Fresnel lens in the background, put a blue gel on it and rimmed the scene from the background. You need to do that because with the snow, just like with rain or smoke, anything like that needs a backlight to really define it. We set up two snow machines, one on each side. Got them up high, fan up high, blowing that snow up. And we let it come and settle into the frame. Not too close, because the flakes will look too big. And then it doesn’t have to be way back in there so you’re trying to snow the entire house. But we got a nice spot where it started to get a little bit on the actor, most of it was in the foreground. And it gives you the sense that it’s snowing everywhere in the shot.
Now our background light was an LED but we put blue on it. We put a 2K in the foreground, and bounced it into a piece of foam core for a nice glow onto the house. We also added the Rosco Silk 210. We warmed it so it’s more like tungsten, to just give a little warm glow on the house- we wanted to imitate the Christmas lights. We turned all of our Christmas lights on. So it was really just three lights in play. Rim light, a fill light, and just a little kind of a kiss on the left hand side with that Rosco Silk 210. I love that Rosco Silk 210.
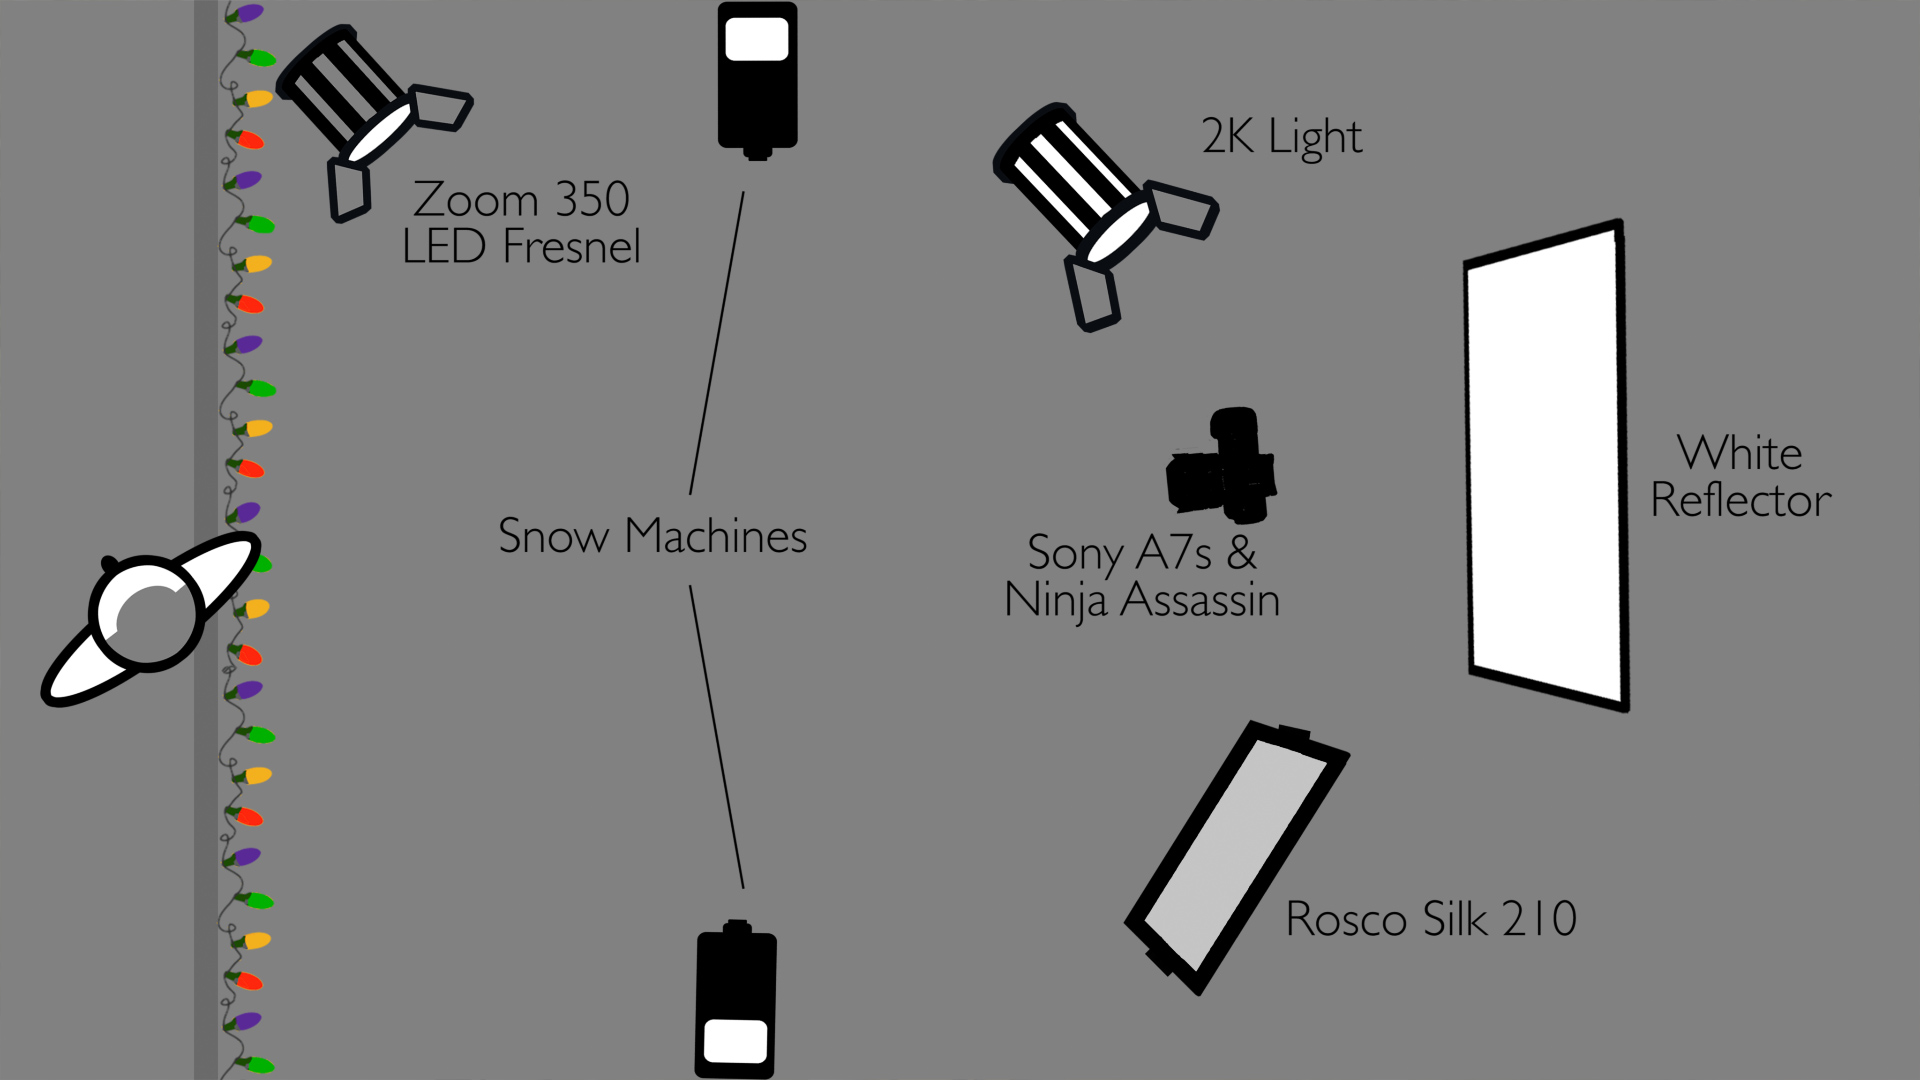
We shot this on the A7S, and on the Ninja Assassin. You know that 4K gives us a lot of versatility. It gave us a great platform for shooting this commercial and really worked out great. Now we just had to do our stunts. The stunt man did a fall forward off from the roof onto our big red mat. Then we moved our snow over to the left, and brought the camera inside so we’re looking out the window as that snow now is falling outside the window. We have a stunt here as well. Just a little truss. He’s gonna swing into the shot, wrapped up in the Christmas lights. We see that nice blue light from outside. We used a couple of grids to pool on our little girl and the Christmas tree, and to bounce into the ceiling. And a nice little glow on the stunt man’s face.
Thanks for watching and remember,
Keep those cameras rollin’ and keep on clickin’.
Jay P.
Leave a Reply