The Slanted Lens

Tutorials, Reviews and Tips for Photographers & Filmmakers

PHOTO & VIDEO TUTORIALS & REVIEWS

Online Courses, Giveaway, Mentoring

  • Online Courses
  • Mentoring
  • Giveaway
  • About
  • Members
  • Buy Gear
Home / Behind the Scenes / Build a Halloween Set for Under $100

Build a Halloween Set for Under $100

October 31, 2017 By Morgan Leave a Comment

Happy Halloween! In honor of Halloween, we’re checking out how to build your own Halloween-inspired set for under $100, today on The Slanted Lens!

Building the Set

We love Halloween over at The Slanted Lens- probably because it gives me a reason to turn my bedroom into a creepy, clown-infested Haunted House! I’m going to show you exactly how I built and lit this set, and how you can do for under $100. The set in this shoot was actually fairly simple to build. The blue walls in the shot are Luan panels ($25) that I sprayed some old paint over. I then used a sheet of brick ($30) from Home Depot for the other wall in the shot.

We rented the chair in the corner for another $25 and the torn curtains were about $12 from a thrift store down the street. I also went and got some carpet from one of my neighbors who was tearing it out, and I used some newspaper to add a little more depth to the Luan wall panels. So in total, it coast us $93 to build this set! Can you tell? I can’t!

Lighting the Set

Let me start by saying that I used quite a few lights to light this shoot. However, you can create a very similar effect with much fewer lights! All you really need is a single, small light on your subject and a back light from behind and you will be able to recreate about 90% of this shot.

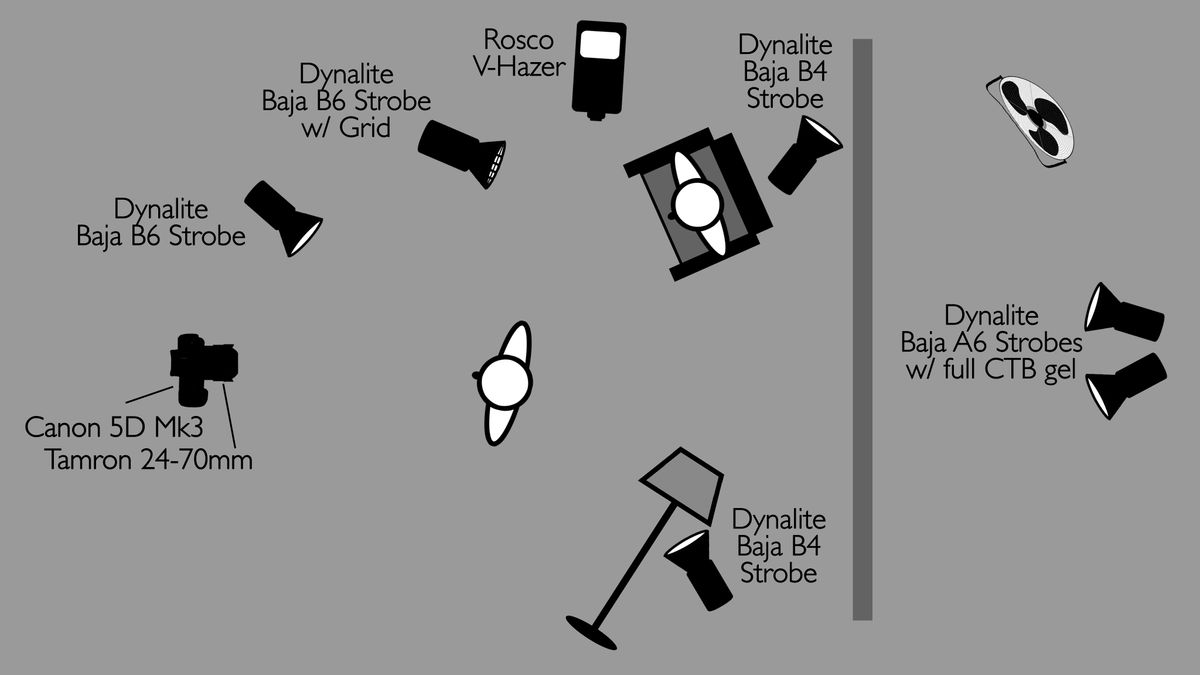
I started lighting this shot with two lights outside- one pointed camera left and the other camera right. Then I stuck some blue gels on those to ensure that those two shafts of light would have more color to them as they came through the window. I also added a Rosco V-Hazer to give the set a creepier, moodier look and feel. I then added a key light on the clown in the chair. This light moved with her wherever she went. I also added a key light on the main clown in front of the camera. We moved this up and down throughout the shoot depending on the angle we wanted the light to be at.

Then to add just a little more warmth to the set we put a lamp on the floor and placed a strobe behind it. I also added one more light with a red gel on it behind the curtain in the corner.

So remember, you can recreate this with much fewer lights! Play around with it and see what you like and what you don’t. Create your own Halloween-inspired set and tell me how it goes!

Happy Halloween!

Keep those cameras rollin’ and keep on clickin’!

-Jay P.


Share

Filed Under: Behind the Scenes, DIY, lighting diagram, Lighting Tutorials, Photography Tutorial, Workflow

About Morgan

With more than two decades of experience Jay P. Morgan brings to his commercial studio two special qualities: a keen appreciation of the bizarre and a knack for flawlessly executing elaborate shots. Through The Slanted Lens, Jay P. shares his knowledge about photography and videography.

Leave a Reply Cancel reply

Your email address will not be published. Required fields are marked *

TAMRON’s Winter Savings!

Click on the image above to find out more about Tamron's Winter Savings!

Enter the Giveaway for a chance to win a Tamron 28-75mm G2 Lens!

Shop Our Affiliate Links

Our Sponsors

SKB cases


Datacolor_logo


Categories

  • Advanced Lighting Tutorials
  • Architectural Photography
  • Beginning Lighting Tutorials
  • Behind the Scenes
  • Business Tips
  • Camera News
  • Camera Review
  • Camera Settings
  • Celebrity
  • DIY
  • Equipment
  • Film Photography
  • Foto of the Week
  • Funny photo
  • Gear Sweepstakes
  • Intermediate Lighting Tutorials
  • Intervention
  • Jay P's Shorts
  • Landscape
  • Laws of Light
  • Lens Comparison
  • Lens Review
  • lighting diagram
  • Lighting Tutorials
  • Making Money In Photography
  • Meet the Photographer
  • Photography & Video Articles
  • Photography & Video Business Tips
  • Photography & Video Lighting Articles
  • Photography Tutorial
  • Portraits
  • Posts
  • Product Review
  • Quick Tip
  • Special Effects for Photo and Video
  • sponsor
  • Stop Motion Photography
  • test
  • Time-lapse
  • Travel Photography
  • Trends
  • Uncategorized
  • Videography
  • Wedding Photography
  • Workflow
  • Working with Talent

Thanks for your support. When you click on a logo or link you help support The Slanted Lens. Some links shared on our website may be associated with sponsors or affiliate programs where we benefit from a commission.

Instagram

This error message is only visible to WordPress admins

Error: No connected account.

Please go to the Instagram Feed settings page to connect an account.

Instagram Feed

This error message is only visible to WordPress admins

Error: No connected account.

Please go to the Instagram Feed settings page to connect an account.

The Slanted Lens Copyright © 2023

Subscribe to our Newsletter!

Get Updates, Latest Trends, Specials and other goodies

x